Search result
Speaker configuration and “Amp Assign” settings
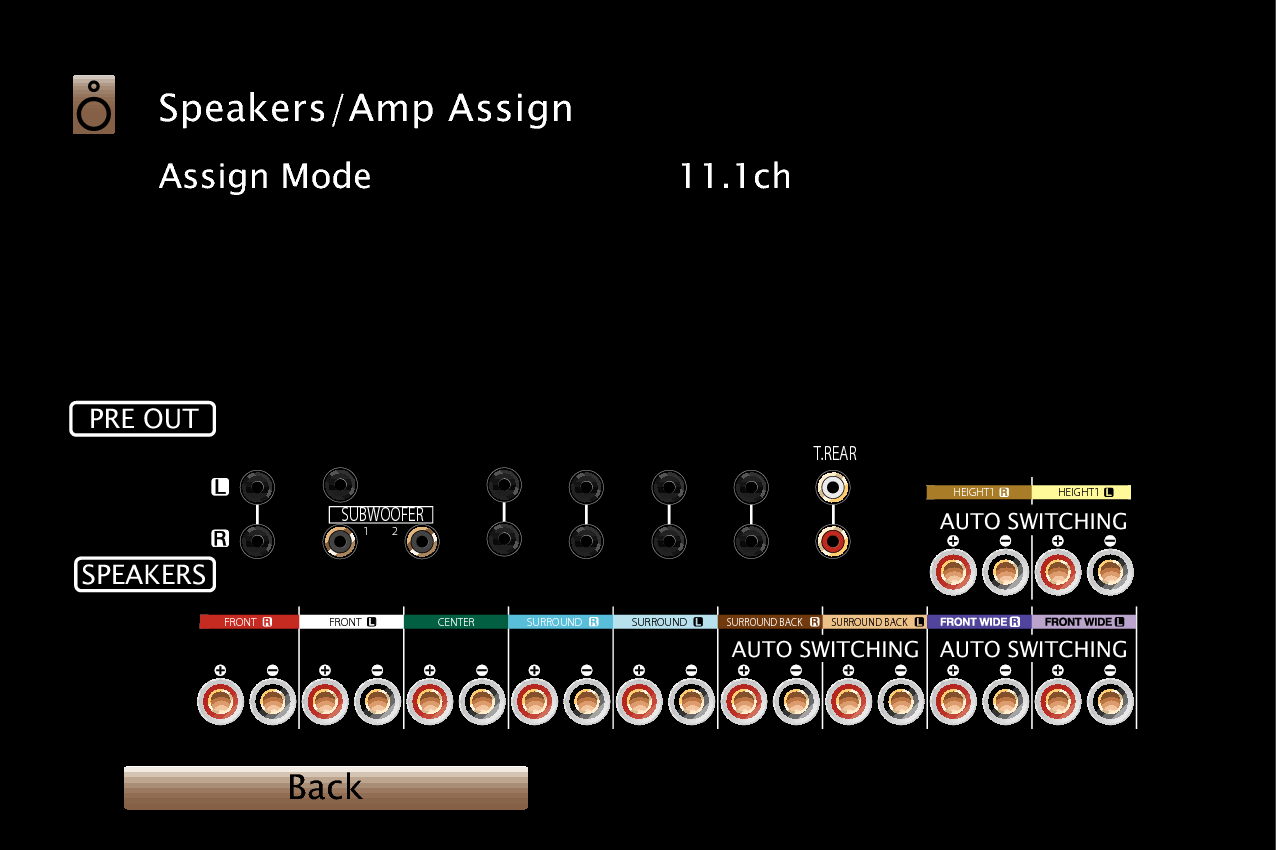
This unit has a built-in 9-channel power amplifier. In addition to the basic 5.1-channel system, a variety of speaker systems can be configured by changing the “Amp Assign” settings to suit the application, such as 7.1-channel systems, bi-amp connections and 2-channel systems for multi-zone playback. link
Perform “Amp Assign” settings to suit the number of rooms and speaker configuration to be installed. link
|
Playback speaker in each zone |
“Amp Assign” settings |
Connection page |
||
|---|---|---|---|---|
|
MAIN ZONE |
ZONE2 |
ZONE3 |
||
|
5.1-channel playback |
2-channel (Pre-out) |
2-channel (Pre-out) |
Can be set in all “Amp Assign” modes. |
|
|
7.1-channel playback |
7.1ch + ZONE2 |
|||
|
9.1-channel playback |
9.1ch (Default) |
|||
|
11.1-channel playback |
11.1ch |
|||
|
7.1-channel playback (bi-amp connection of front speakers) |
7.1ch (Bi-Amp) |
|||
|
2-channel speakers for stereo playback |
9.1ch/2ch Front |
|||
|
2-channel bi-amp speakers for stereo playback |
7.1ch/2ch Front (Bi-Amp) |
|||
|
Second front speakers |
7.1ch + Front B |
|||
|
7.1-channel playback |
2-channel |
2-channel (Pre-out) |
7.1ch + ZONE2 (Default) |
|
|
7.1-channel playback |
2-channel (Pre-out) |
2-channel |
7.1ch + ZONE3 |
|
|
5.1-channel playback (bi-amp connection of front speakers) |
2-channel |
2-channel (Pre-out) |
5.1ch (Bi-Amp) + ZONE2 |
|
|
5.1-channel playback |
2-channel |
2-channel |
5.1ch + ZONE2/3 |
|
|
7.1-channel playback |
1-channel |
1-channel |
7.1ch + ZONE2/3-MONO |
|
The sound mode that can be selected varies according to the speaker configuration. See “Relationship between sound modes and channel output” link for the sound modes that are supported.
The following pages provide basic connection examples.
Upgrade (Auro-3D)
Refer to the example connection for Example connection for the Auro-3D 9.1-channel systemlink when playing Auro-3D with a 9.1-channel system using the basic 5.1-channel system and the front height and surround height speakers.
Also refer to the connection example for Example connection for the Auro-3D 10.1-channel systemlink when playing Auro-3D with a 10.1 channel system by adding the top surround speaker.
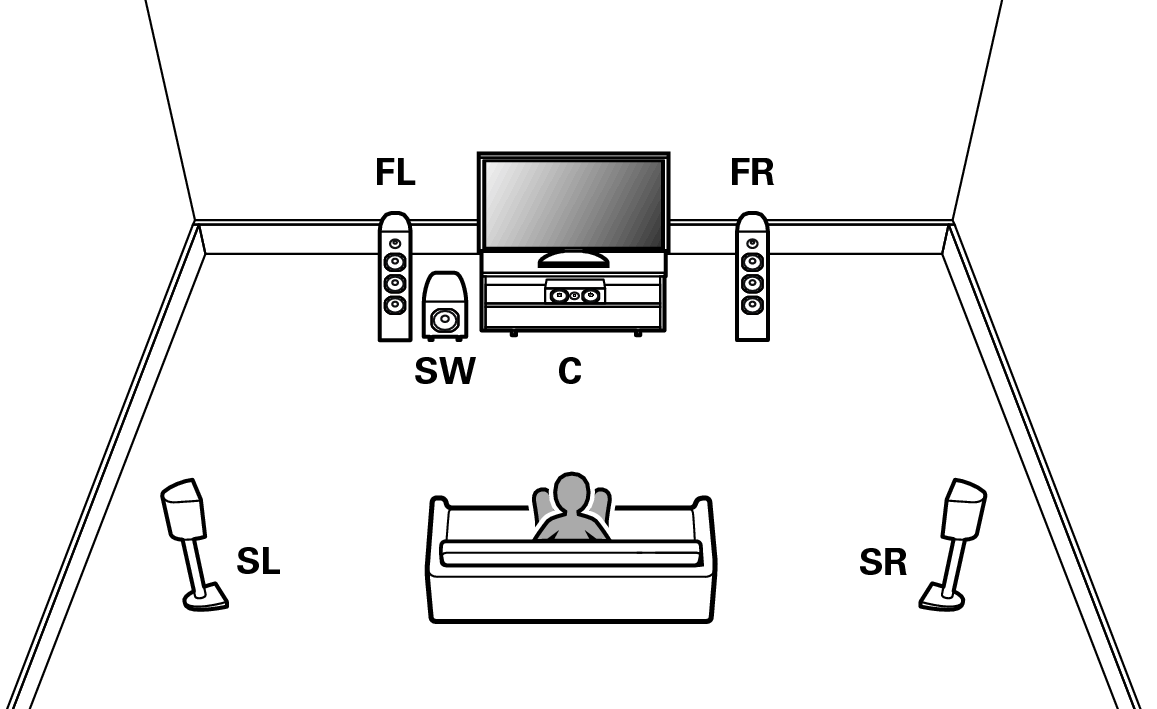
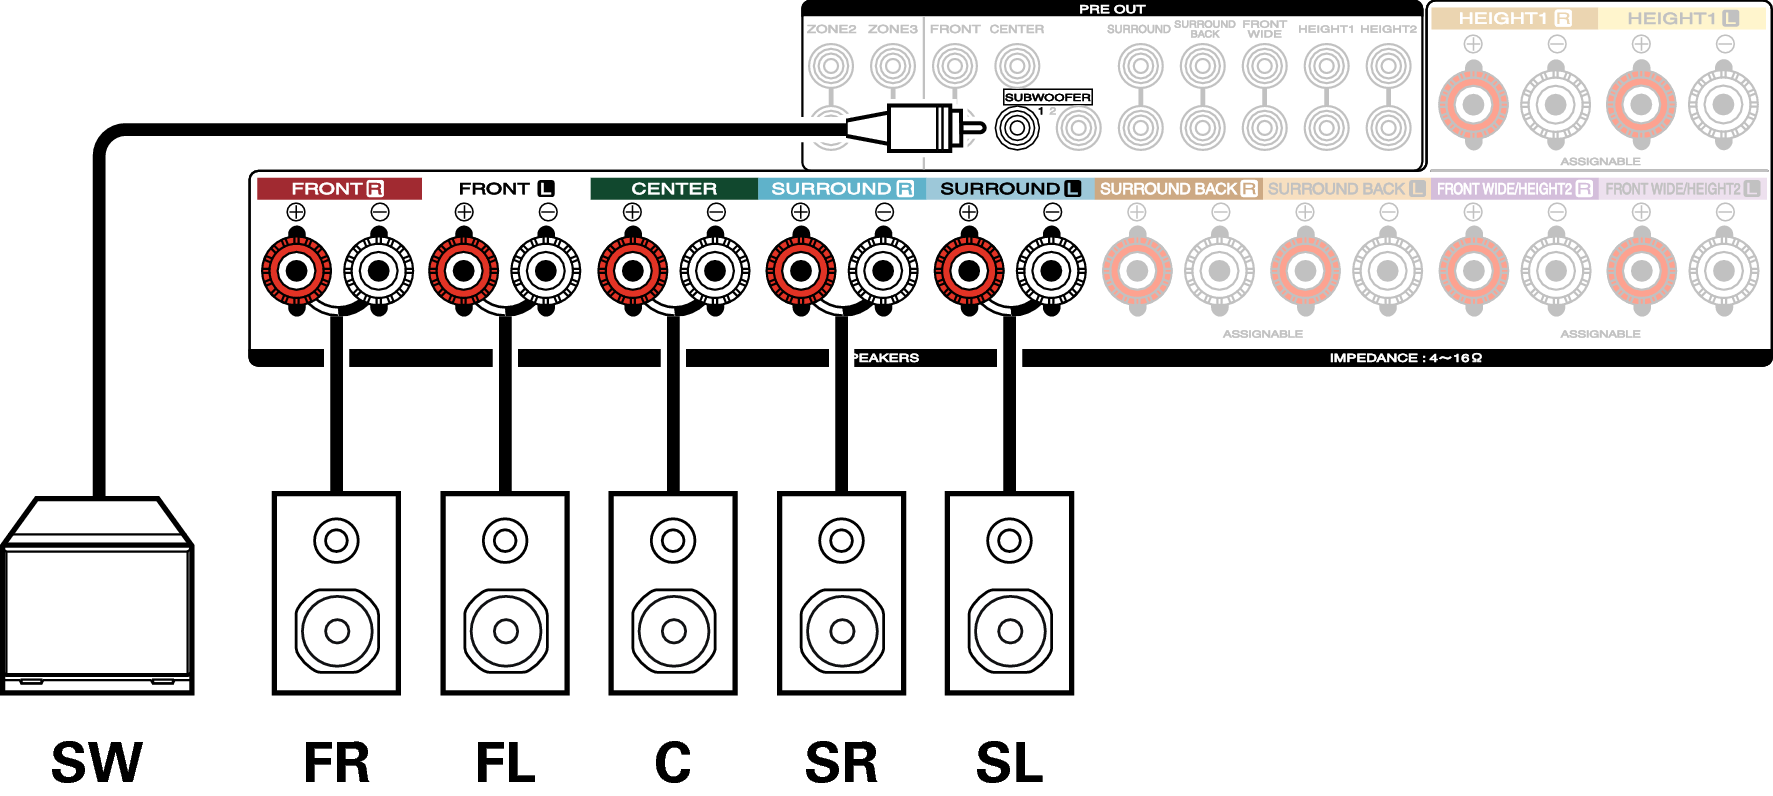
5.1-channel playback
This serves as a basic 5.1-channel surround system.
7.1-channel playback
Example connections when using surround back speakers
This 7.1-channel surround system is the same as a basic 5.1-channel system but with surround back speakers.
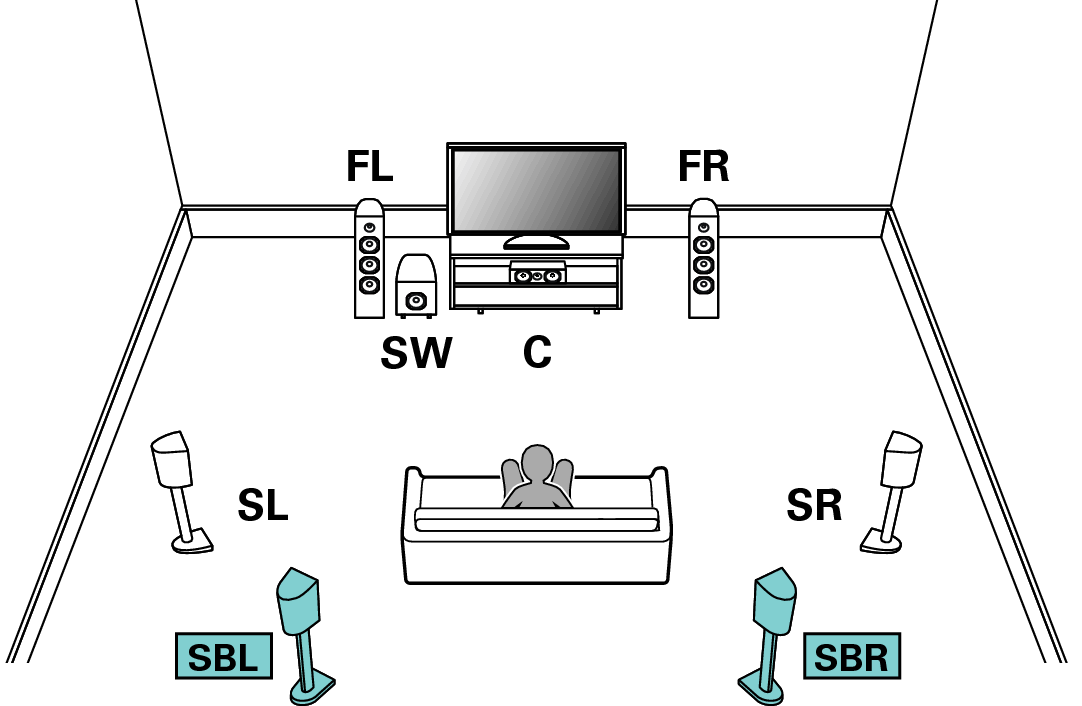
Set “Floor” - “Layout” to “5ch & SB” in the menu when connecting in this configuration. link
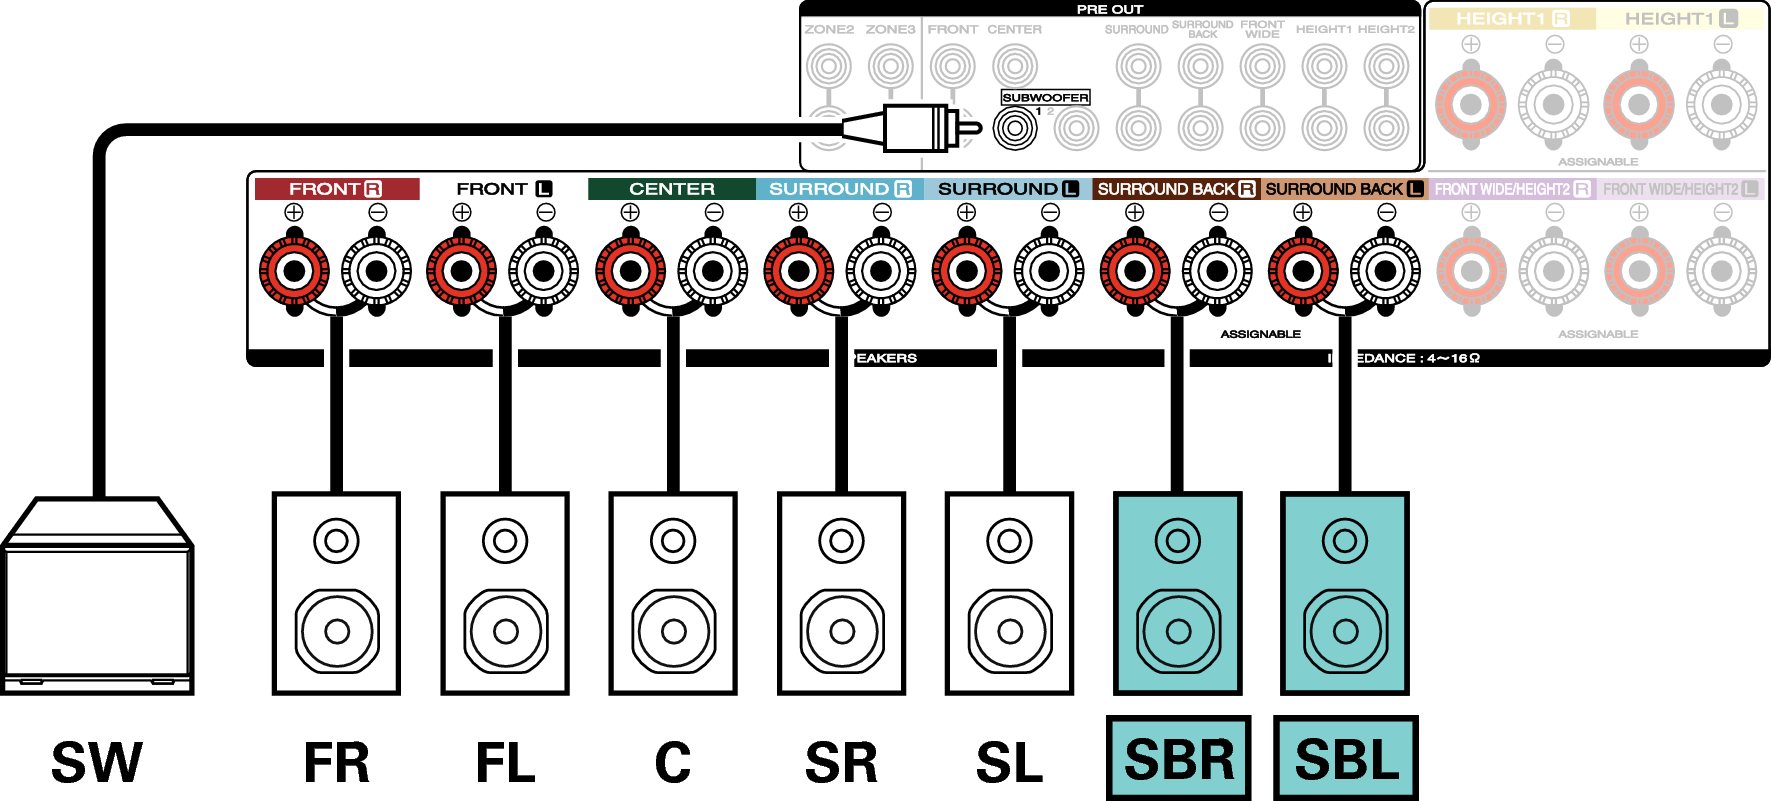
When using a single surround back speaker, connect it to the SURROUND BACK L terminal.
Example connections when using front wide speakers
This 7.1-channel surround system is the same as a basic 5.1-channel system but with front wide speakers.
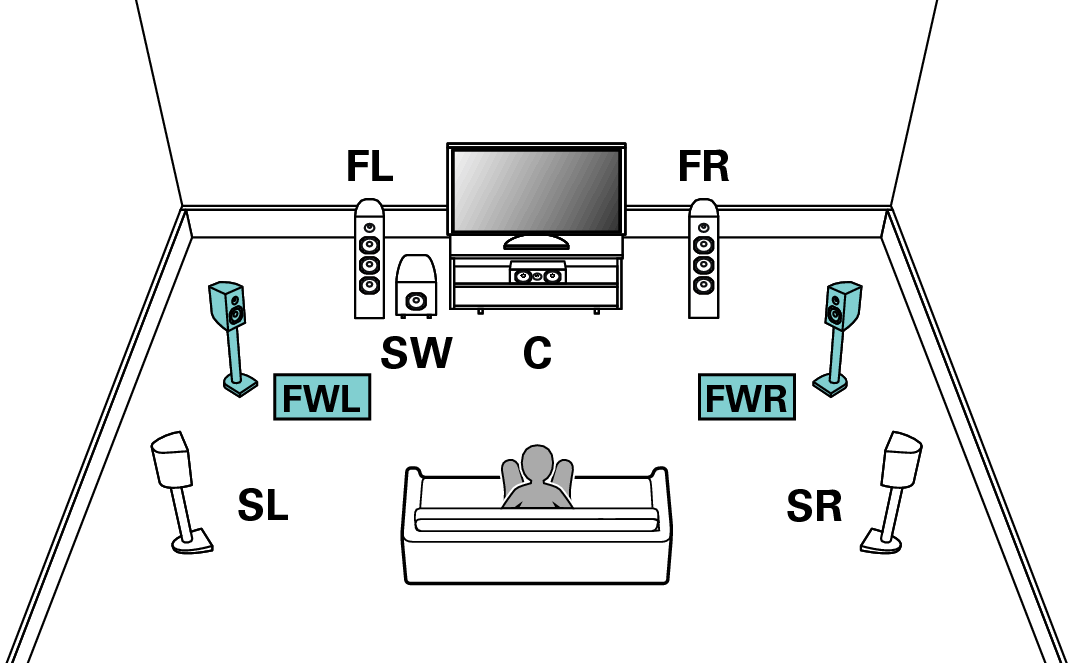
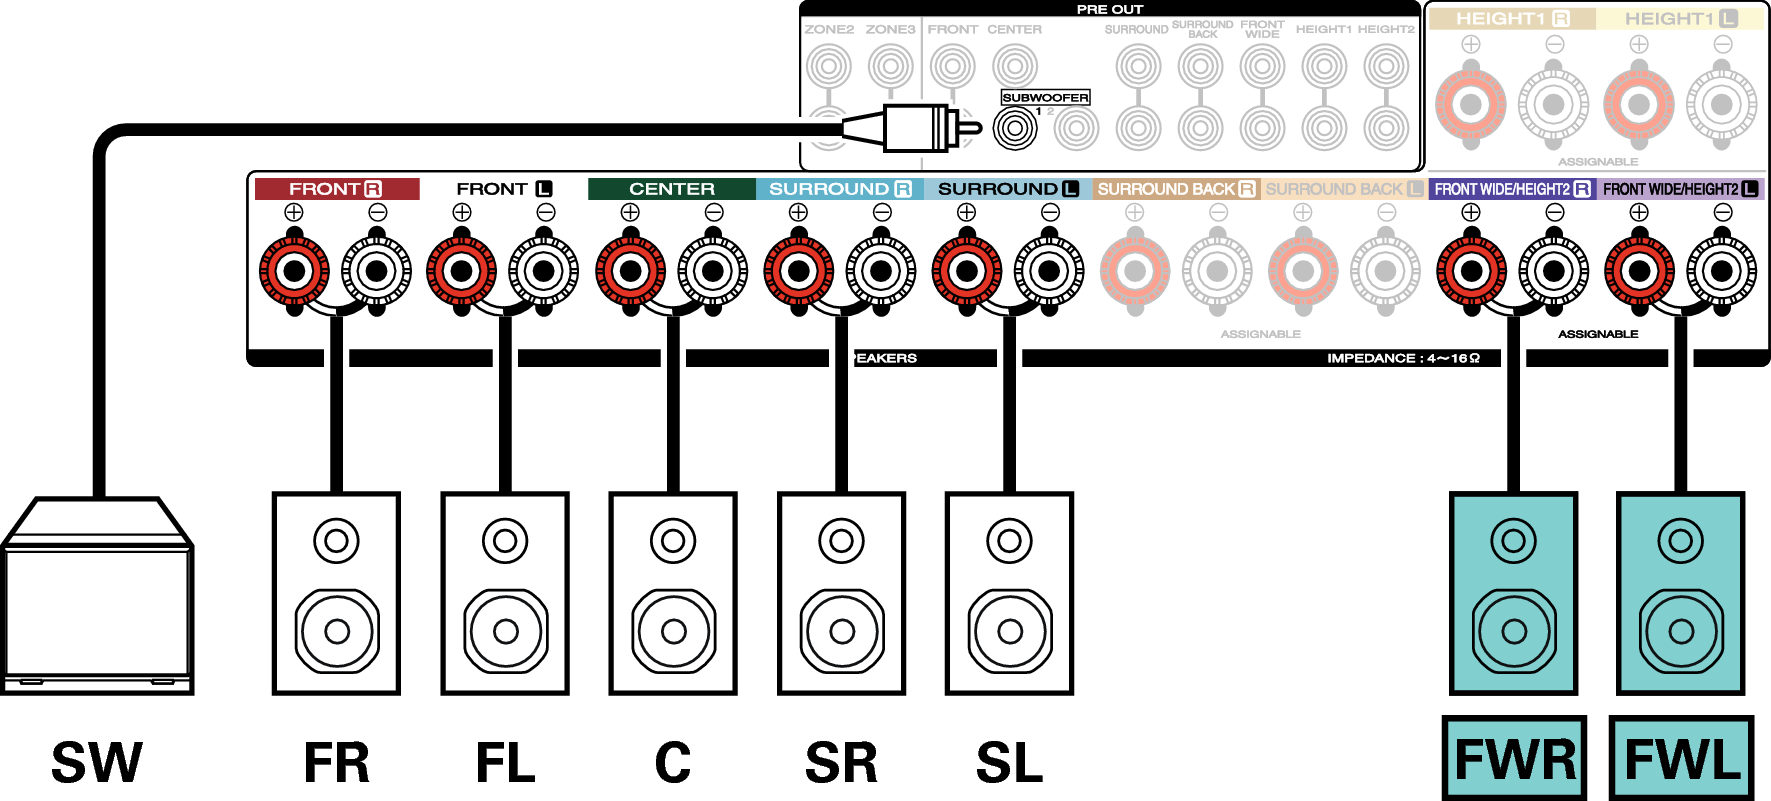
Set “Floor” - “Layout” to “5ch & FW” in the menu when connecting in this configuration. link
Example connections when using ceiling speakers
This 7.1-channel surround system is the same as a basic 5.1-channel system but with ceiling speakers.
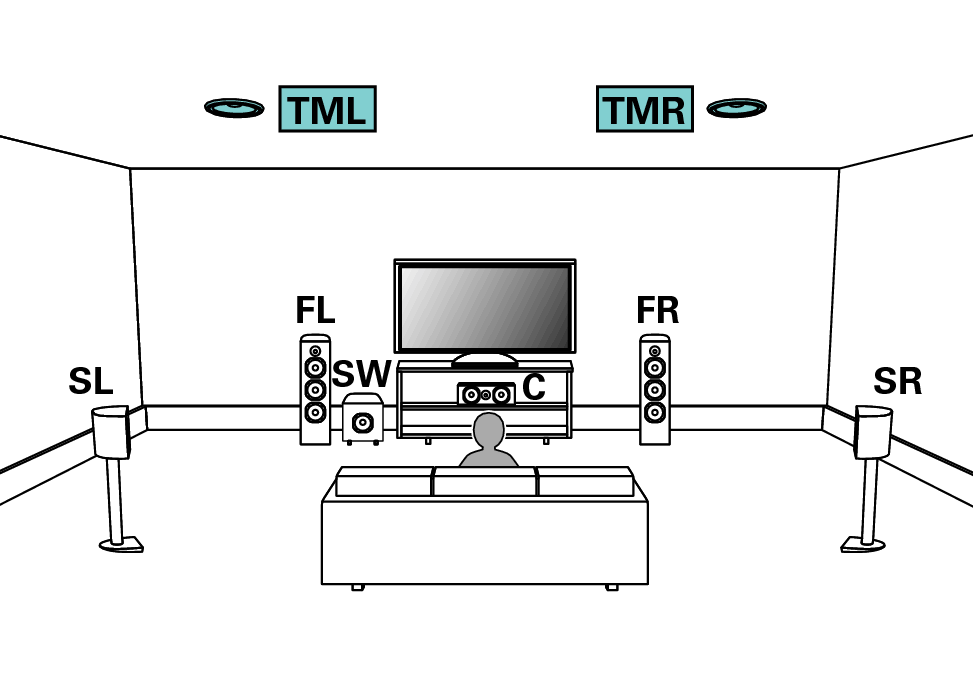
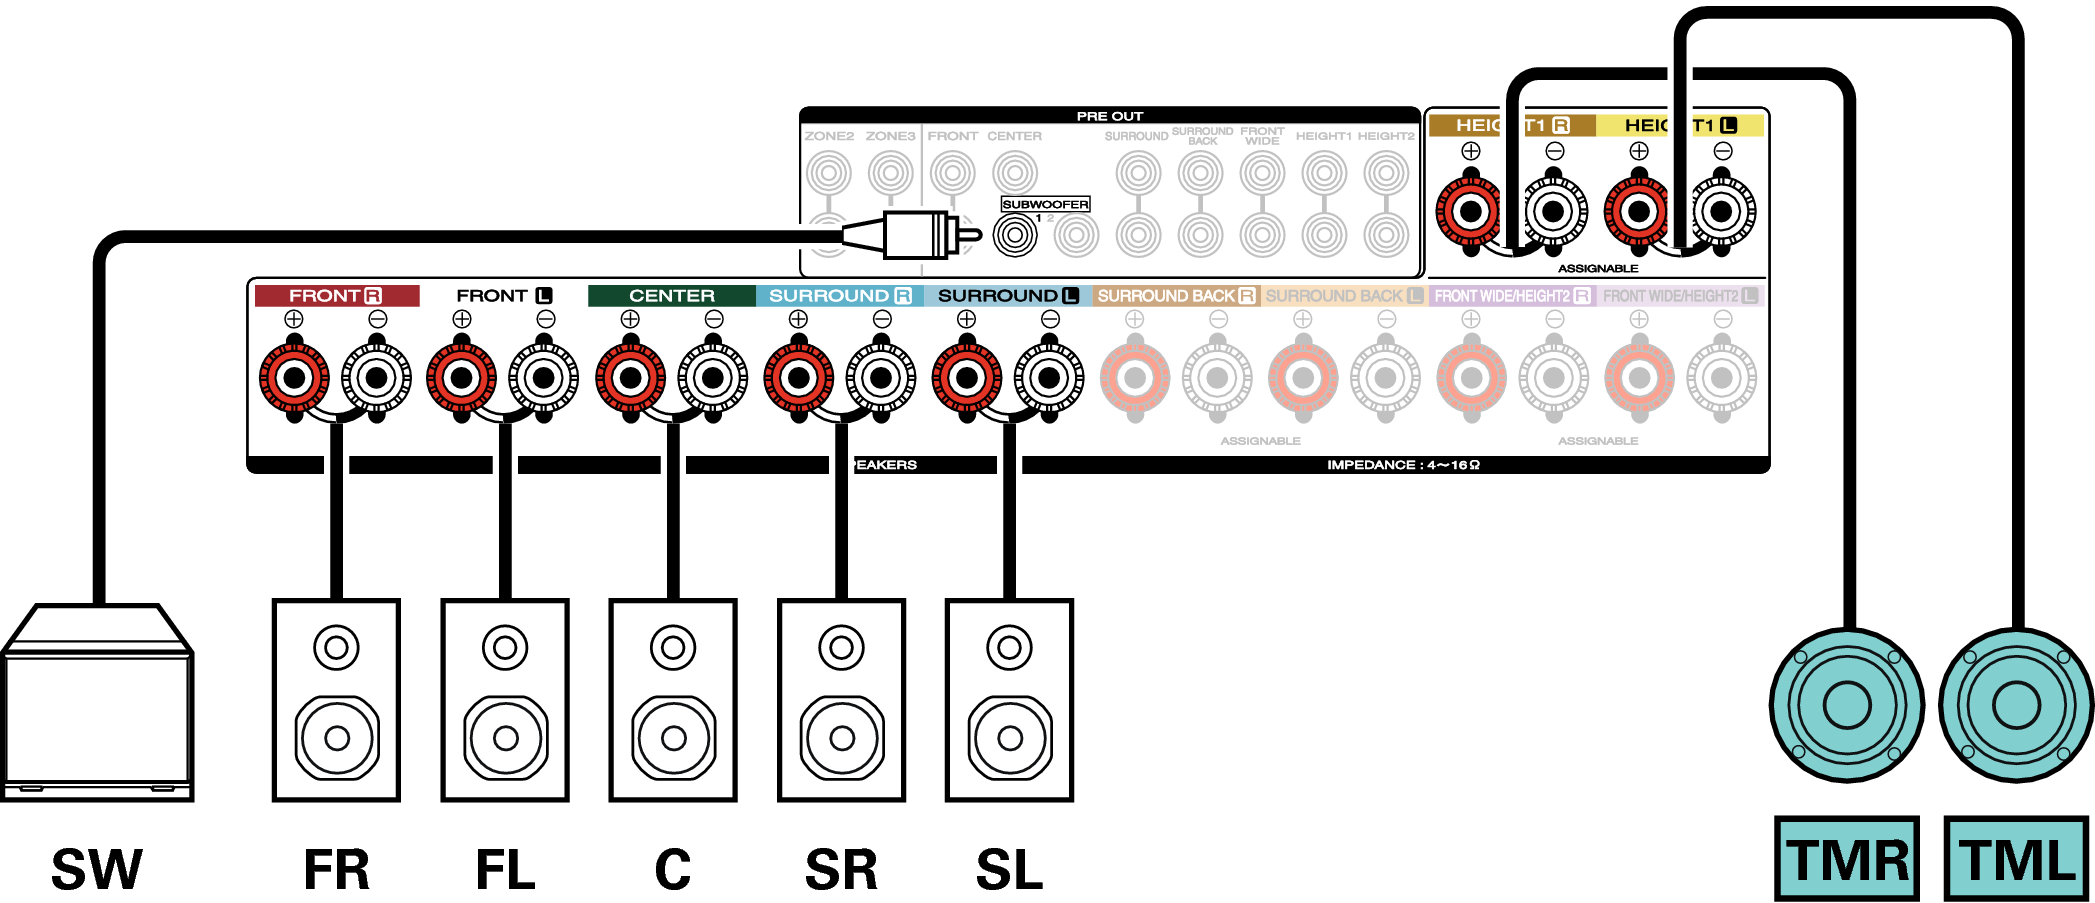
Example connections when using height speakers
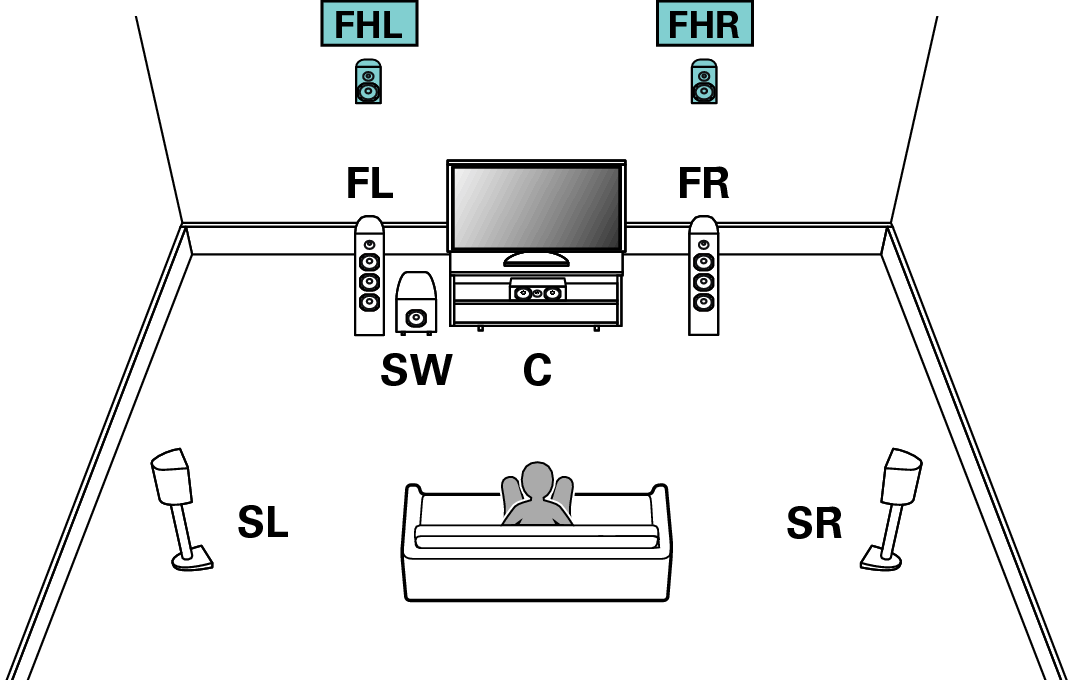
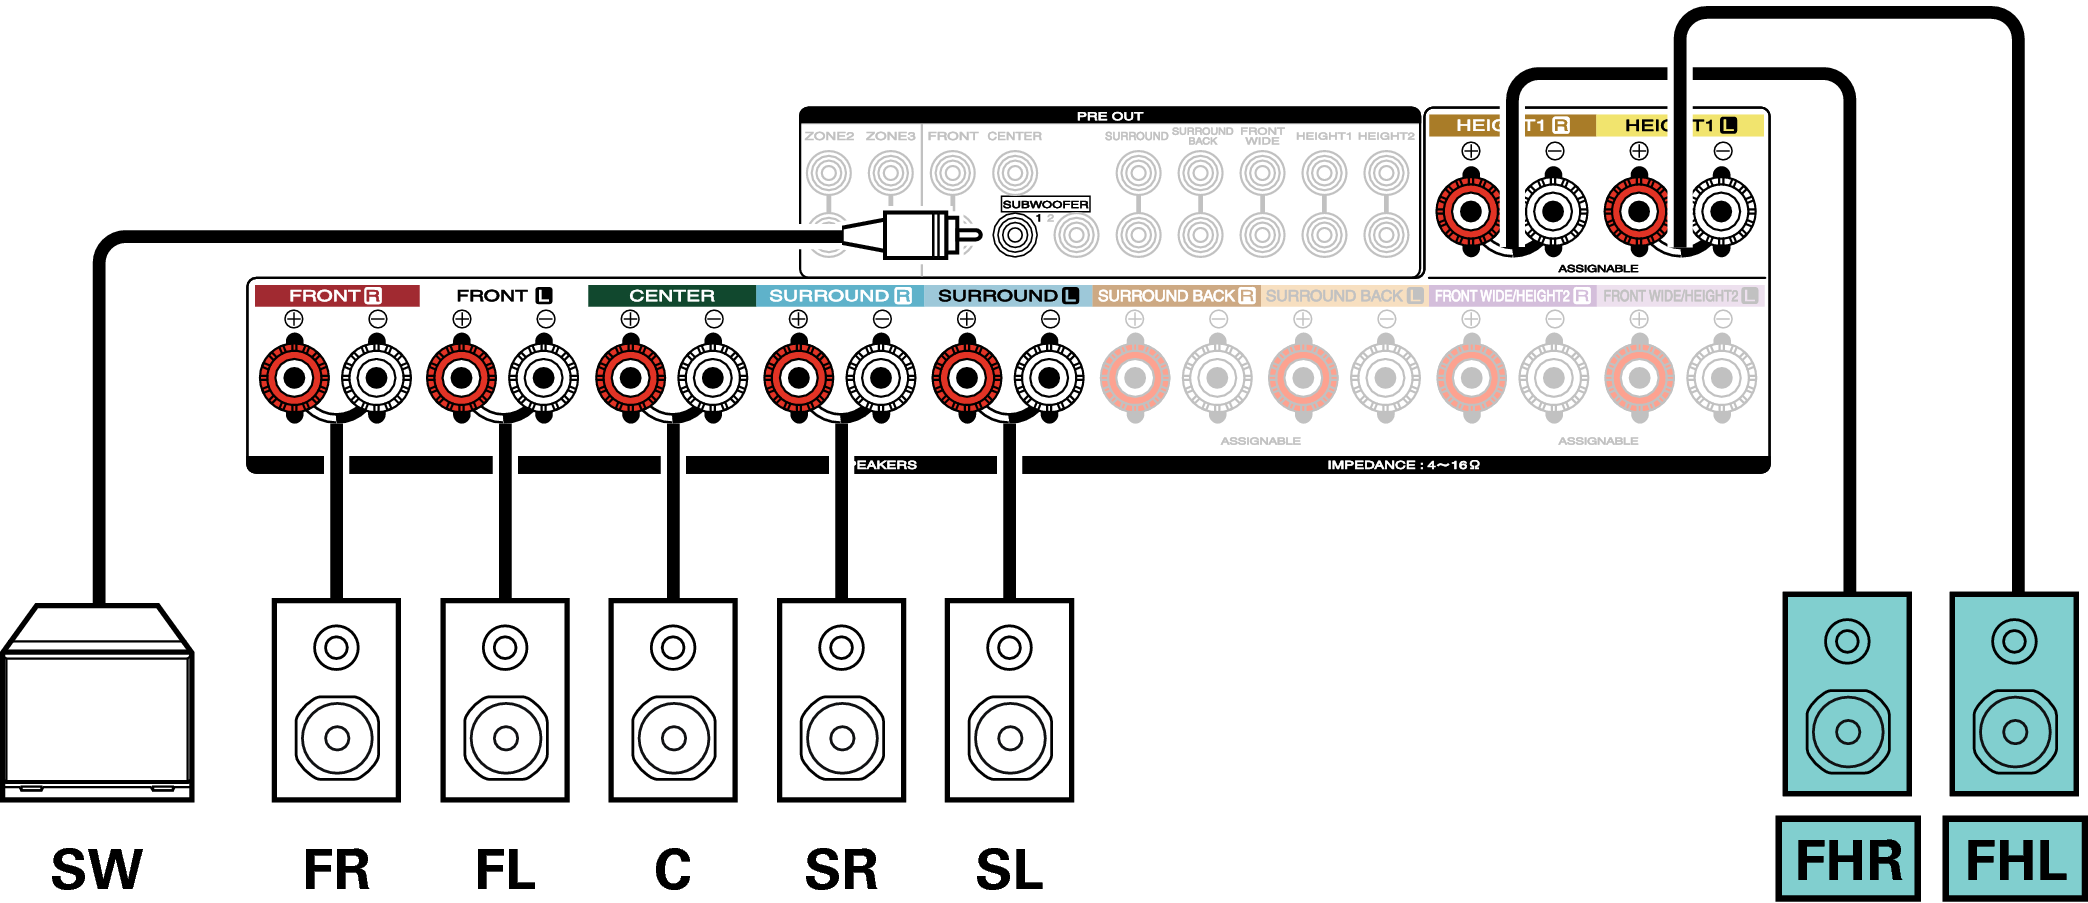
Example connections when using Dolby Atmos Enabled speakers
This 7.1-channel surround system is the same as a basic 5.1-channel system but with front Dolby speakers.
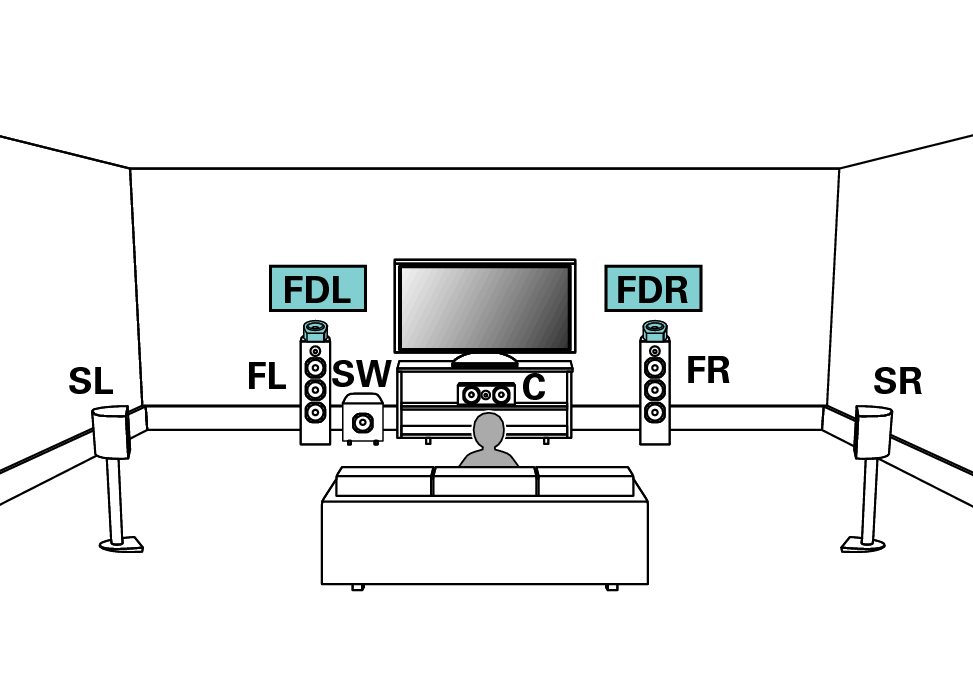
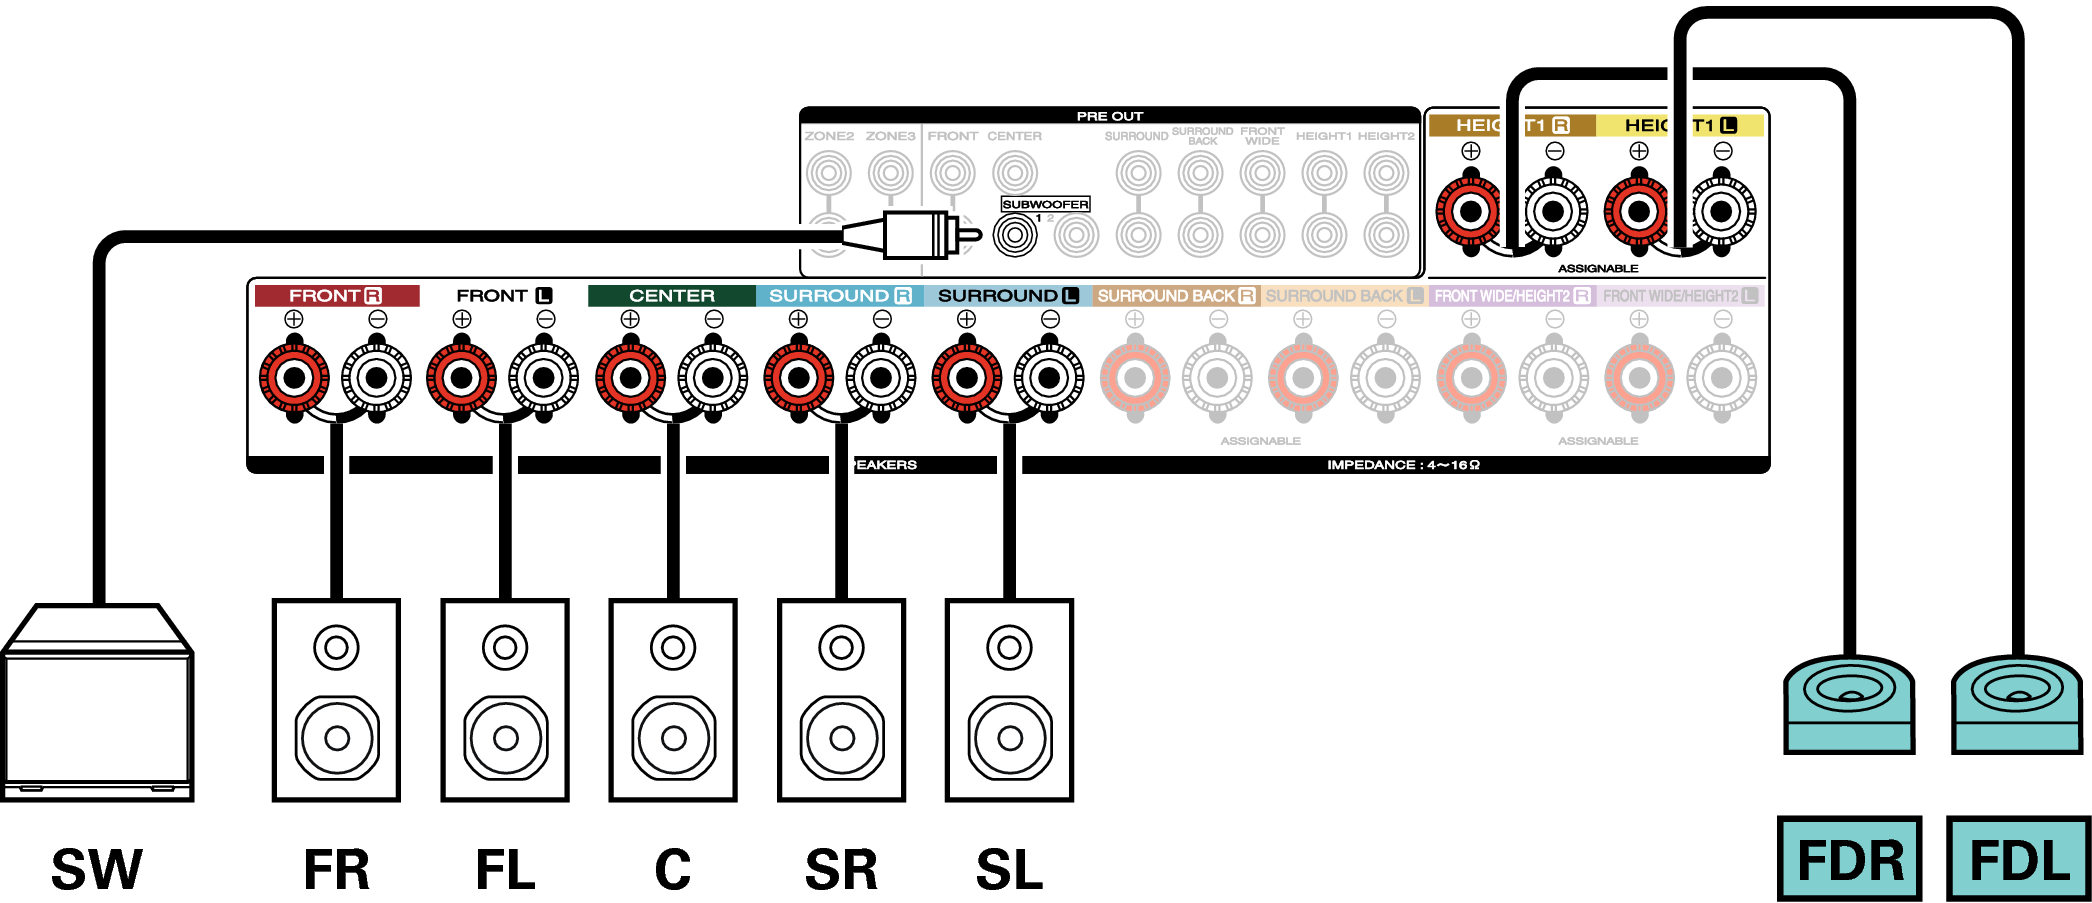
Set “Floor” - “Layout” to “5ch” and “Dolby Sp” to “2ch” in the menu when connecting in this configuration. link
The surround Dolby speakers can be connected instead of the front Dolby speakers. In this case, set the Dolby Atmos Enabled speakers to be connected under “Height” - “Layout” in the menu. link
9.1-channel playback
This system, which is based on a 5.1-channel system, plays back up to 9.1-channels at the same time.
You can connect speakers for up to 11-channels for MAIN ZONE. When you connect speakers for 10 or more channels, the output speakers automatically switch according to the input signal and sound mode.
Example connection when using surround back and front wide speakers
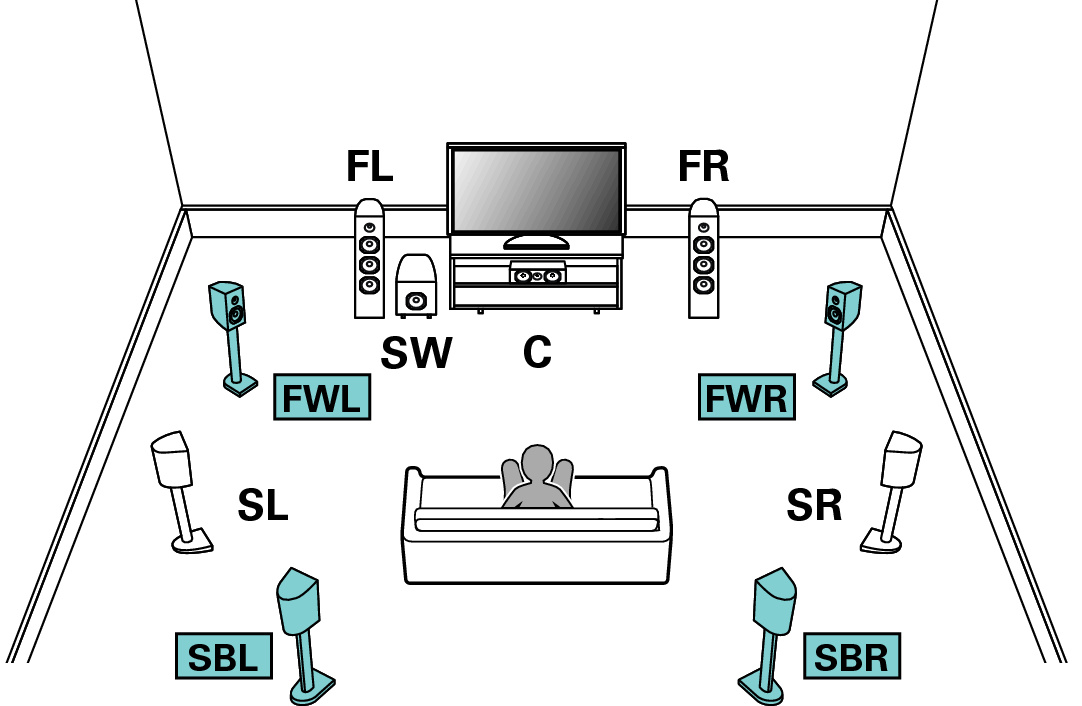
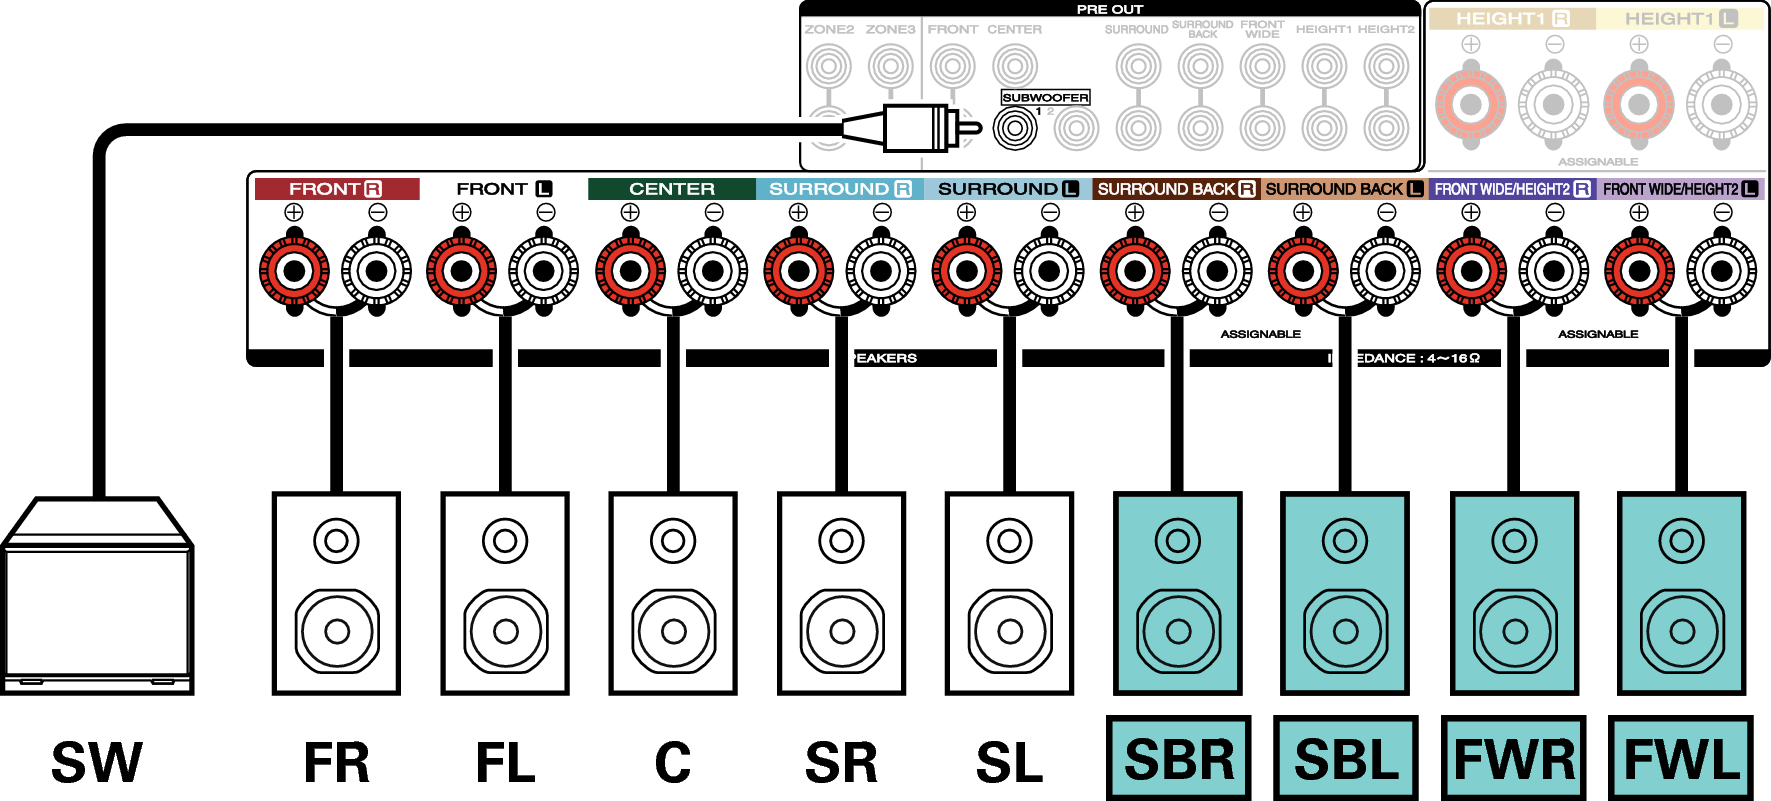
Set “Floor” - “Layout” to “5ch & SB & FW” in the menu when connecting in this configuration. link
Example connection when using one set of ceiling speakers
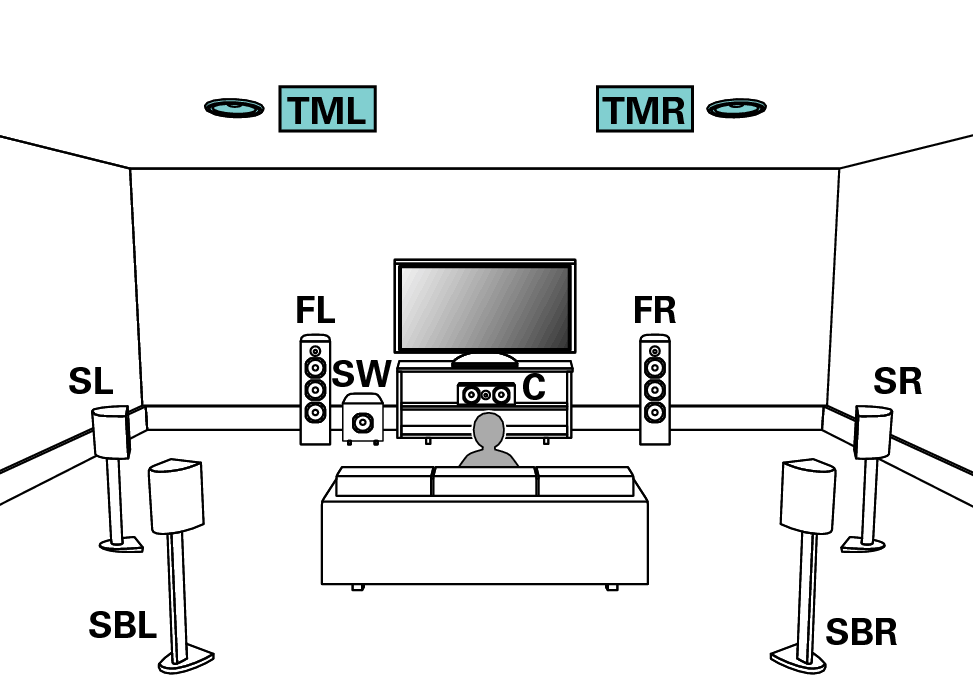
Set “Height” - “Height Sp” to “2ch” in the menu when connecting in this configuration. link
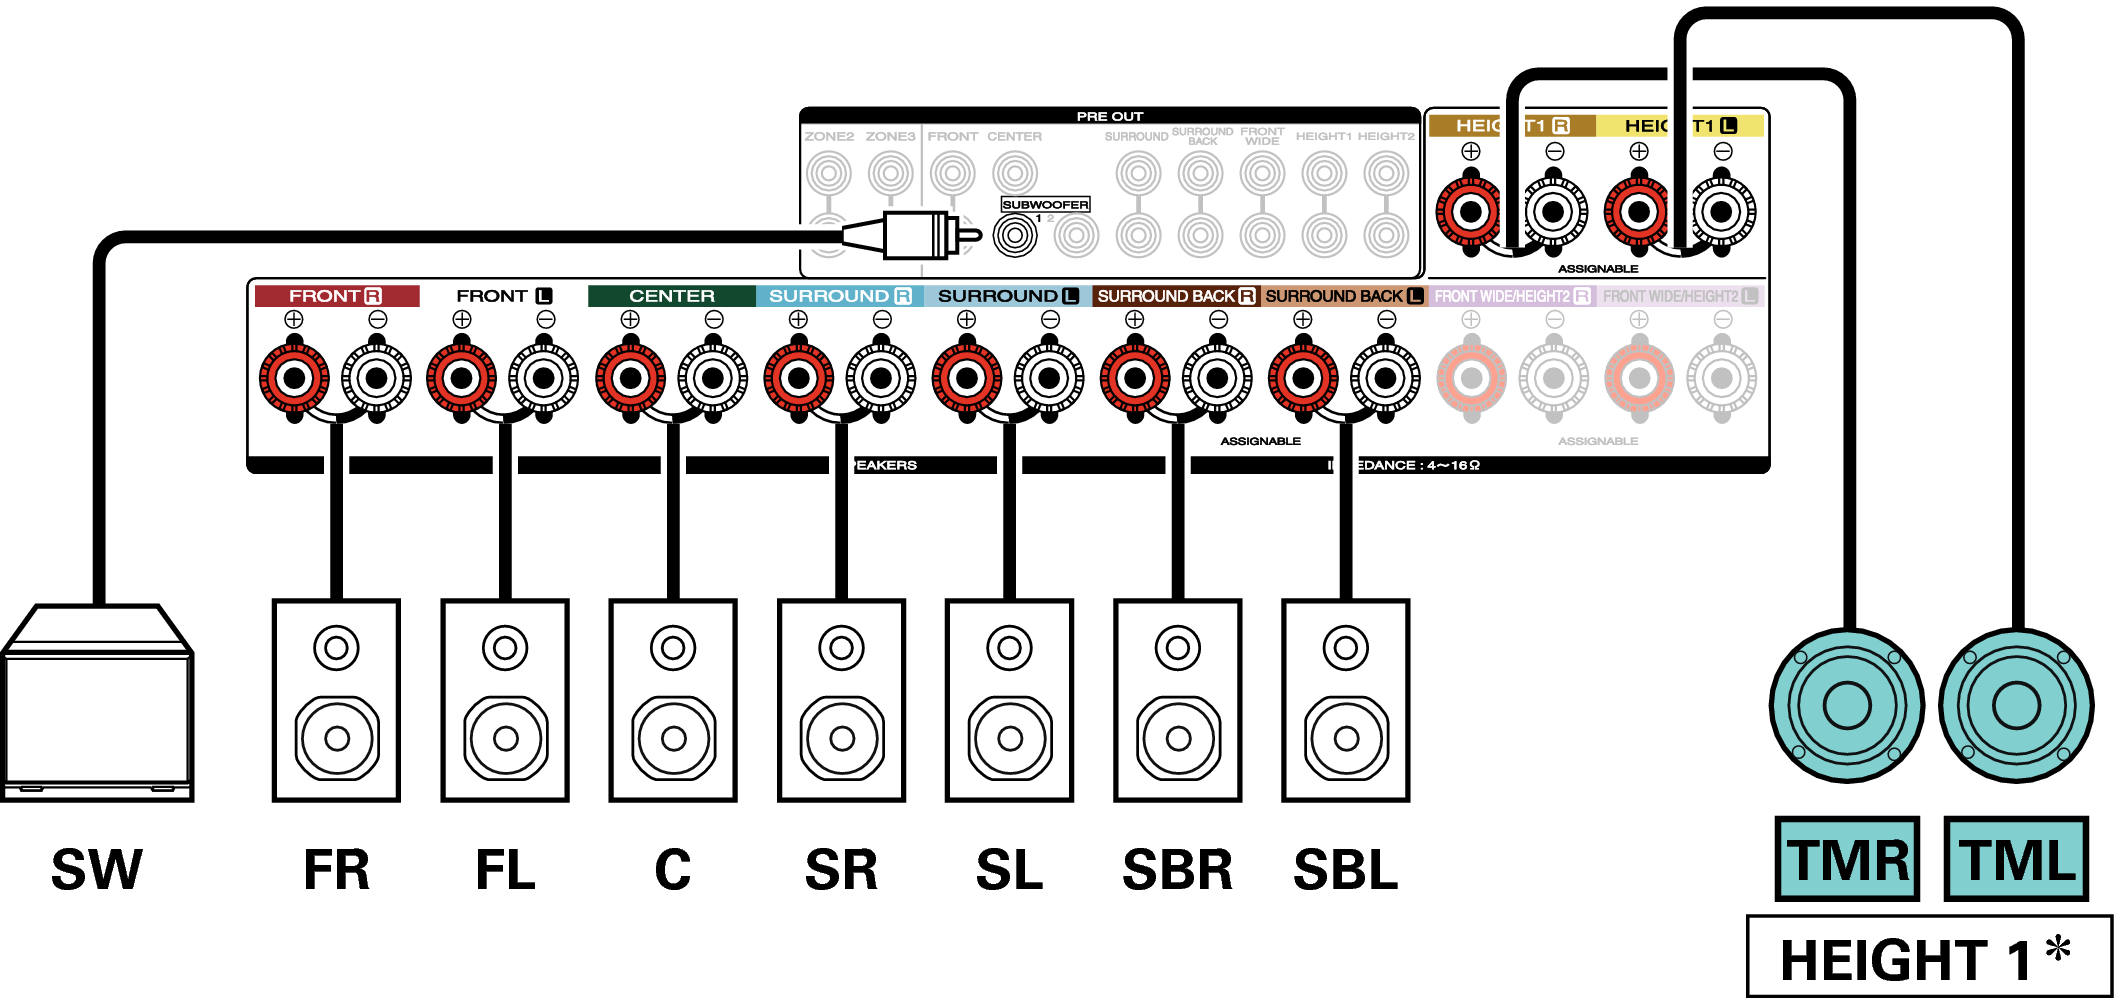
The top front or top rear speakers can be connected instead of the top middle speakers. In this case, set the ceiling speakers to be connected under “Height” - “Layout” in the menu. link
Example connection when using two sets of ceiling speakers
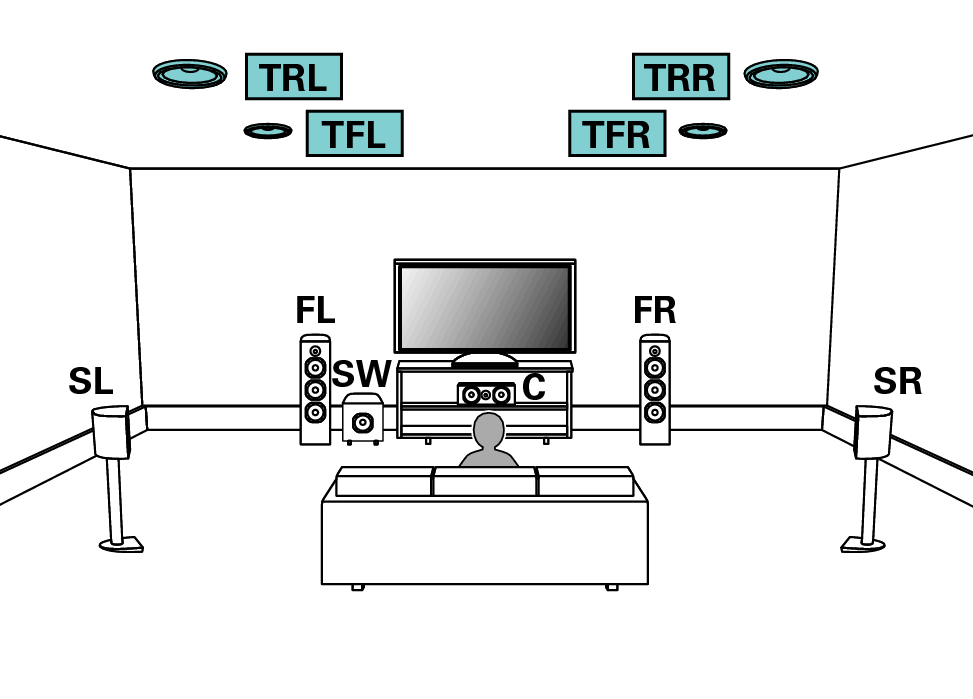
Set “Floor” - “Layout” to “5ch” or set “5ch & SB” and “Height Sp” to “4ch” in the menu when connecting in this configuration. link
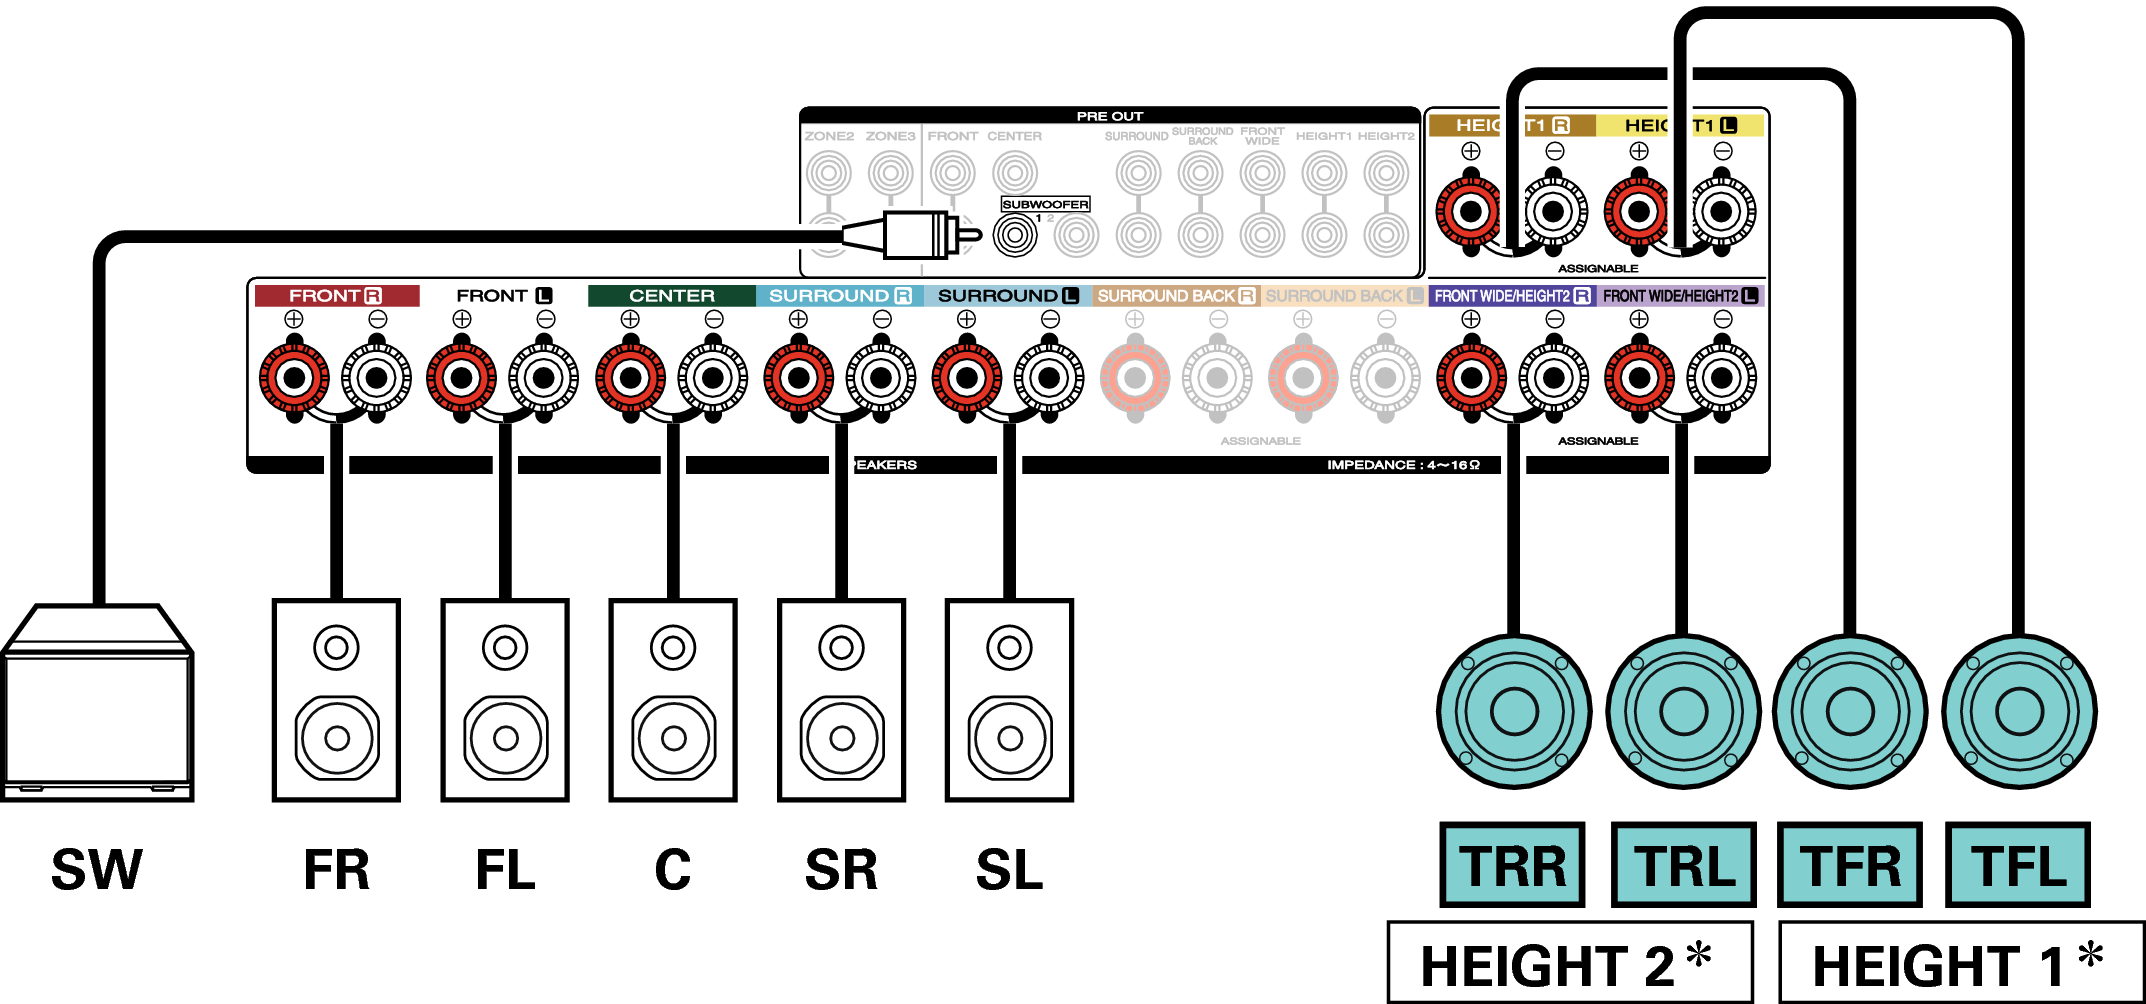
You can change the combination of the HEIGHT1 and HEIGHT2 channels in the settings. link
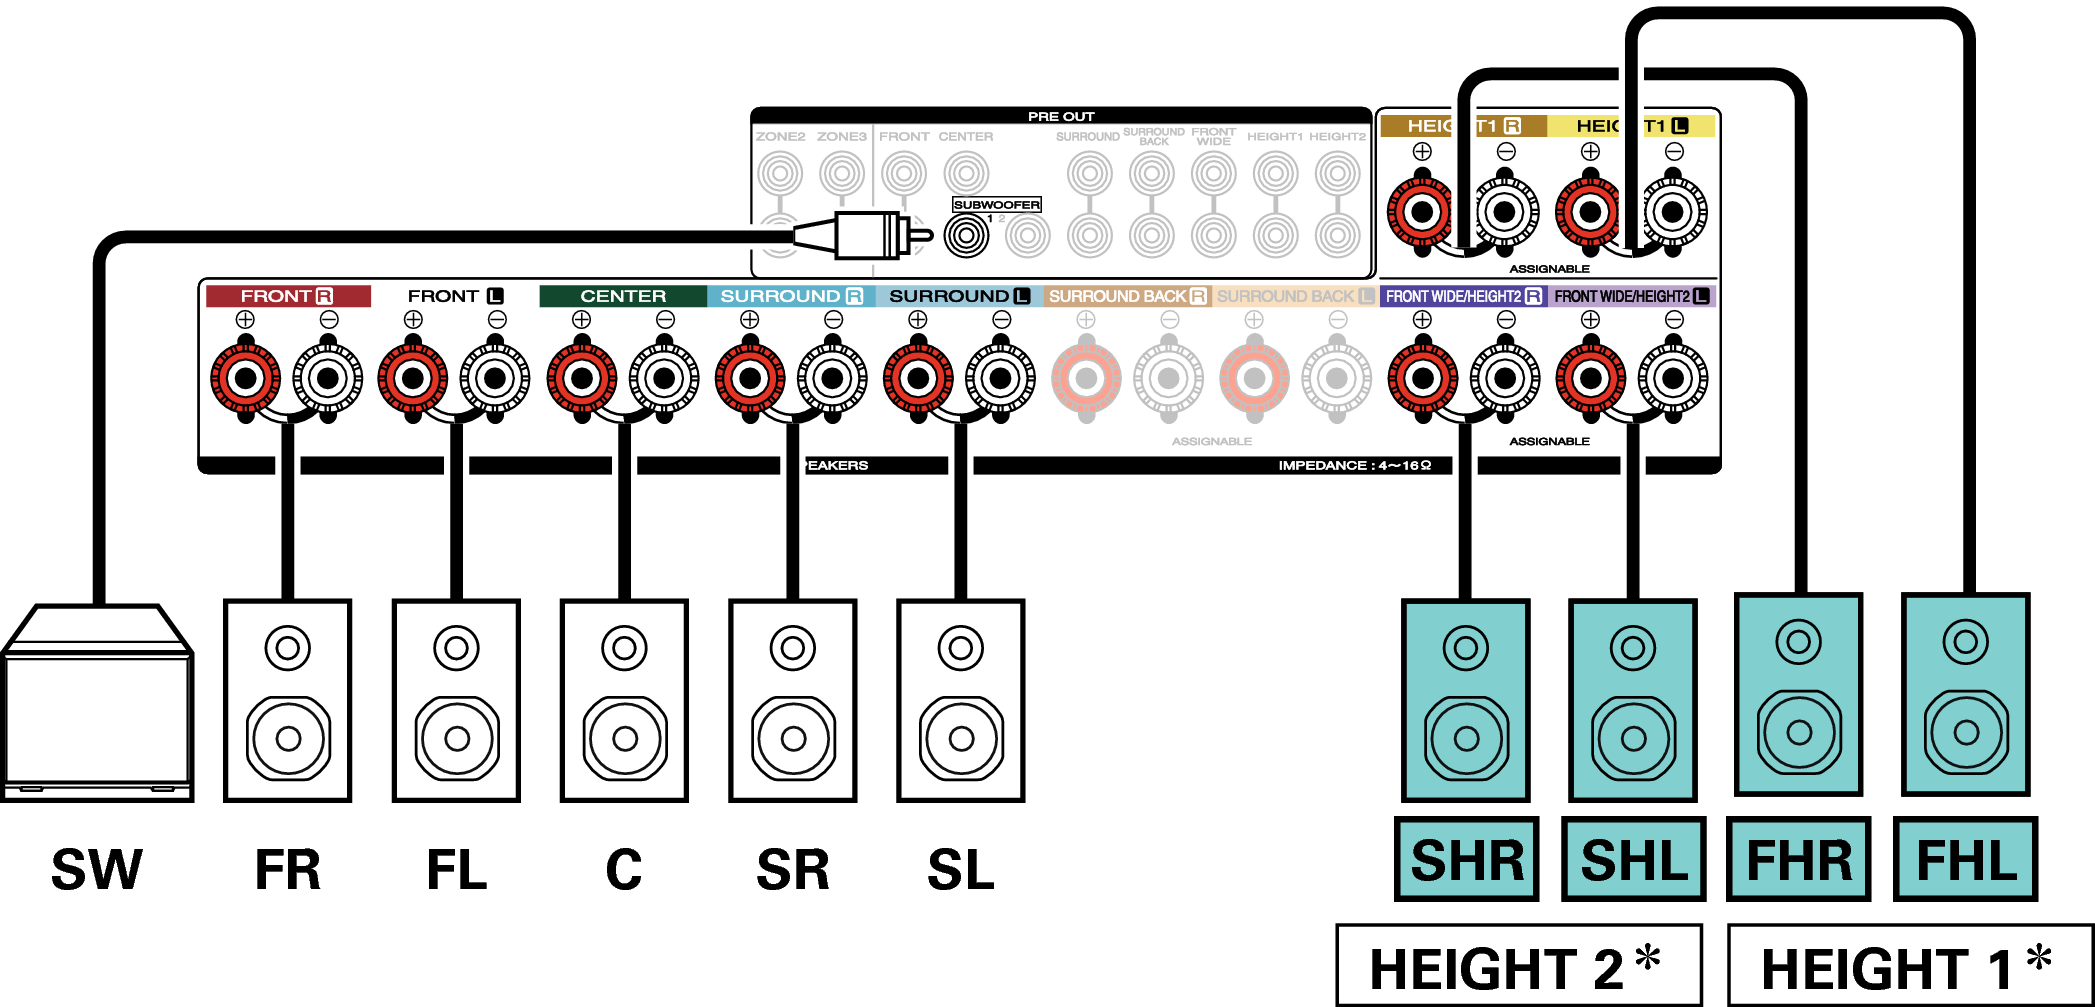
Example connection when using one set of height speakers
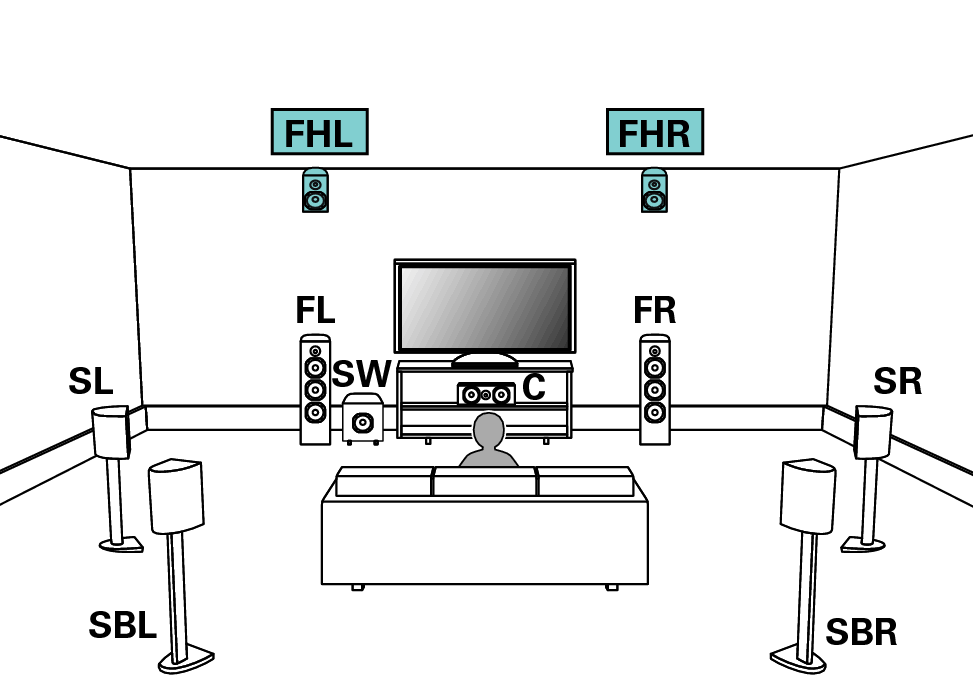
Set “Height” - “Height Sp” to “2ch” in the menu when connecting in this configuration. link
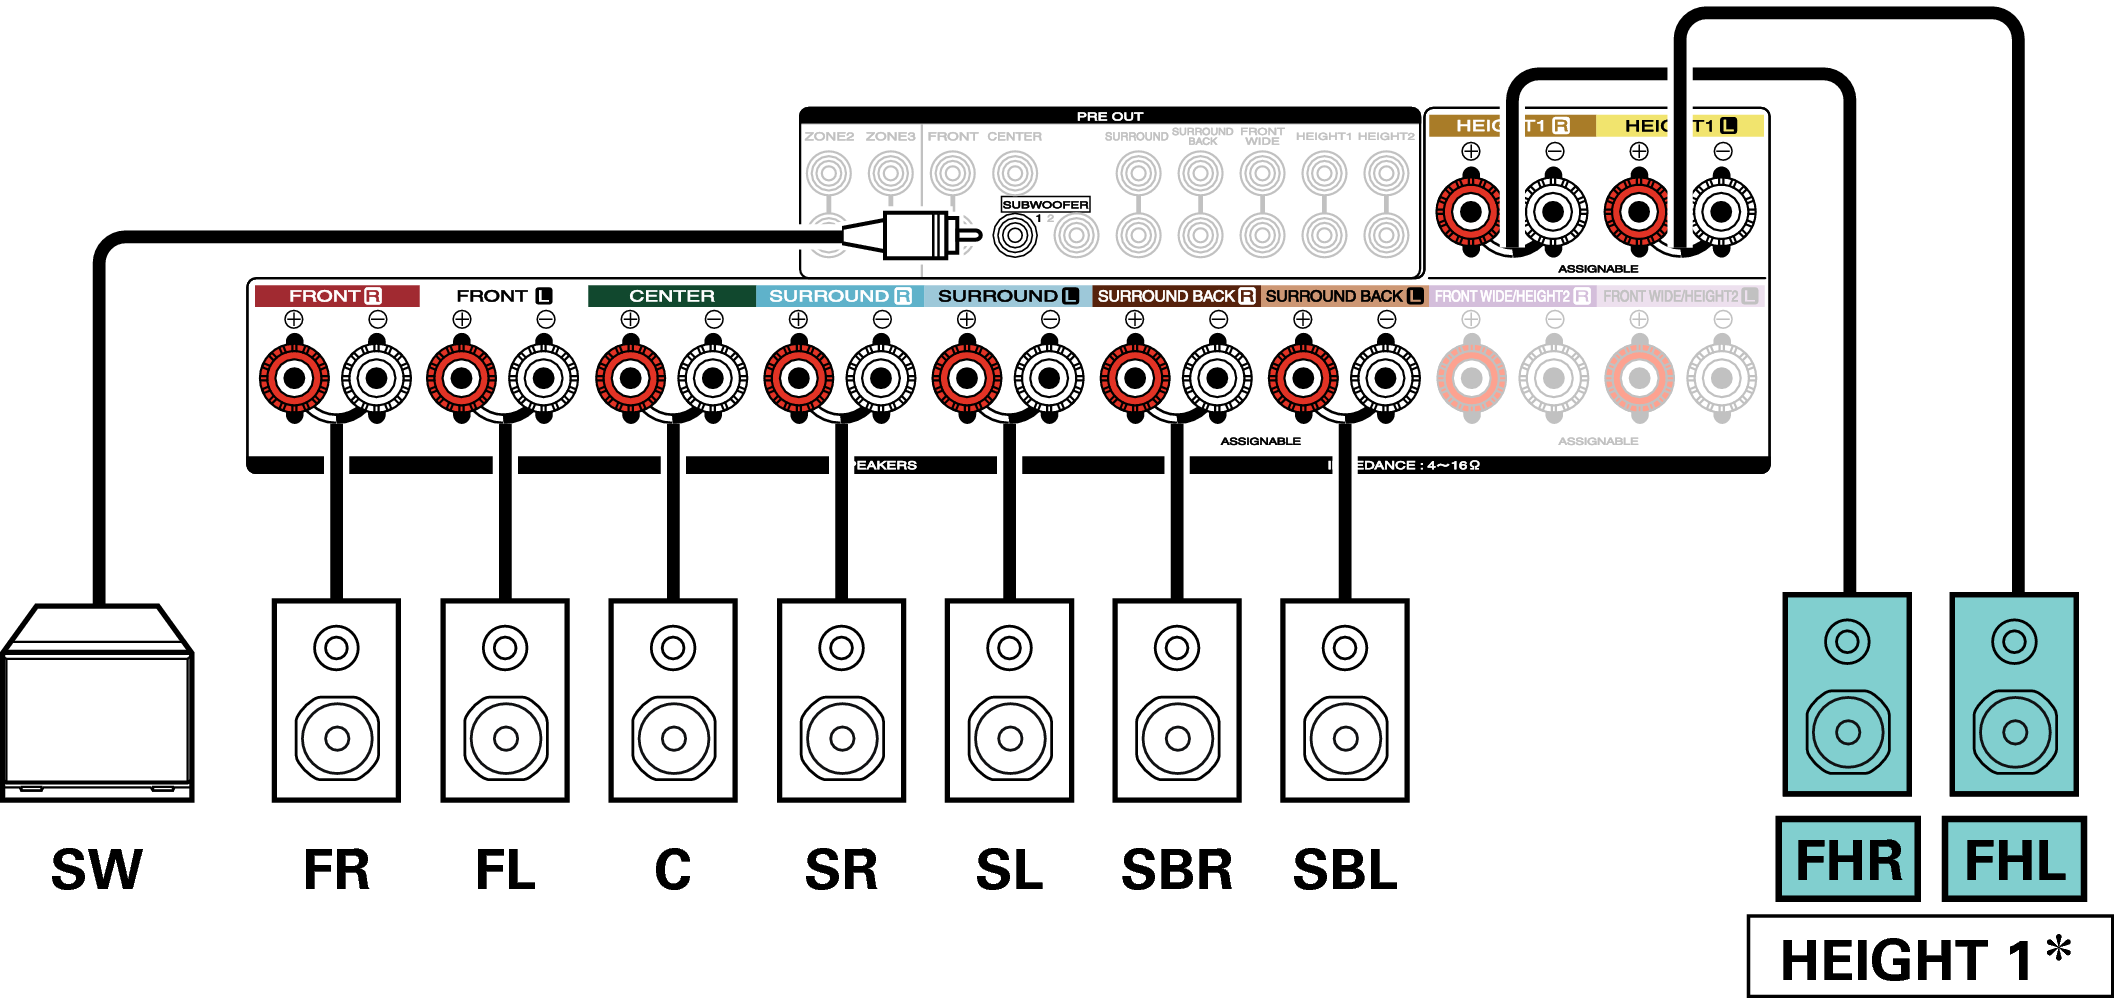
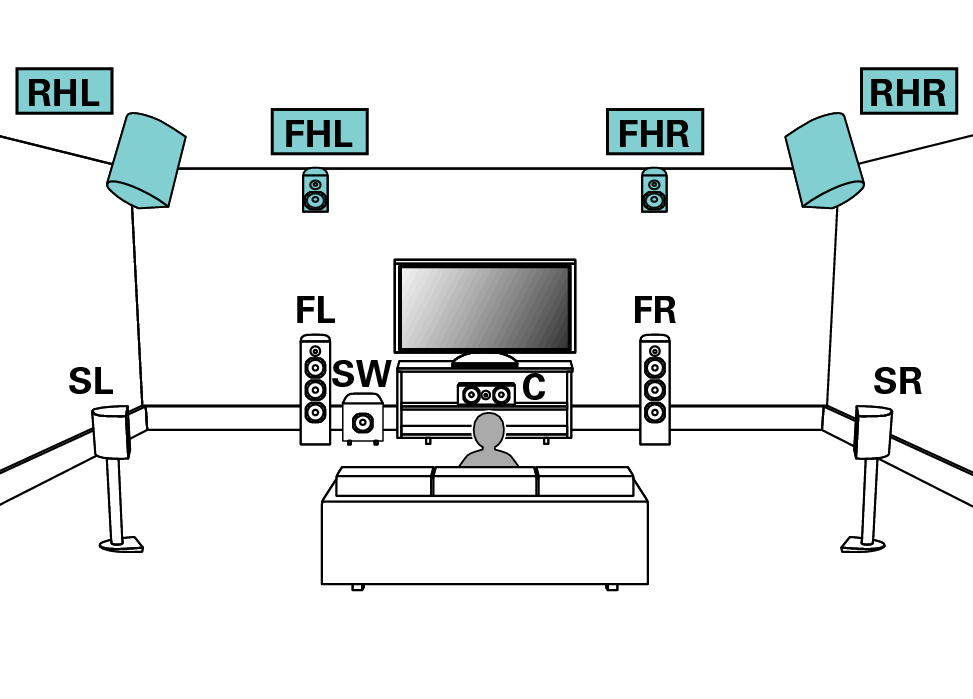
The rear height speakers can be connected instead of the front height speakers. In this case, set the height speakers to be connected under “Height” - “Layout” in the menu. link
Example connection when using two sets of height speakers
Set “Floor” - “Layout” to “5ch” or set “5ch & SB” and “Height Sp” to “4ch” in the menu when connecting in this configuration. link
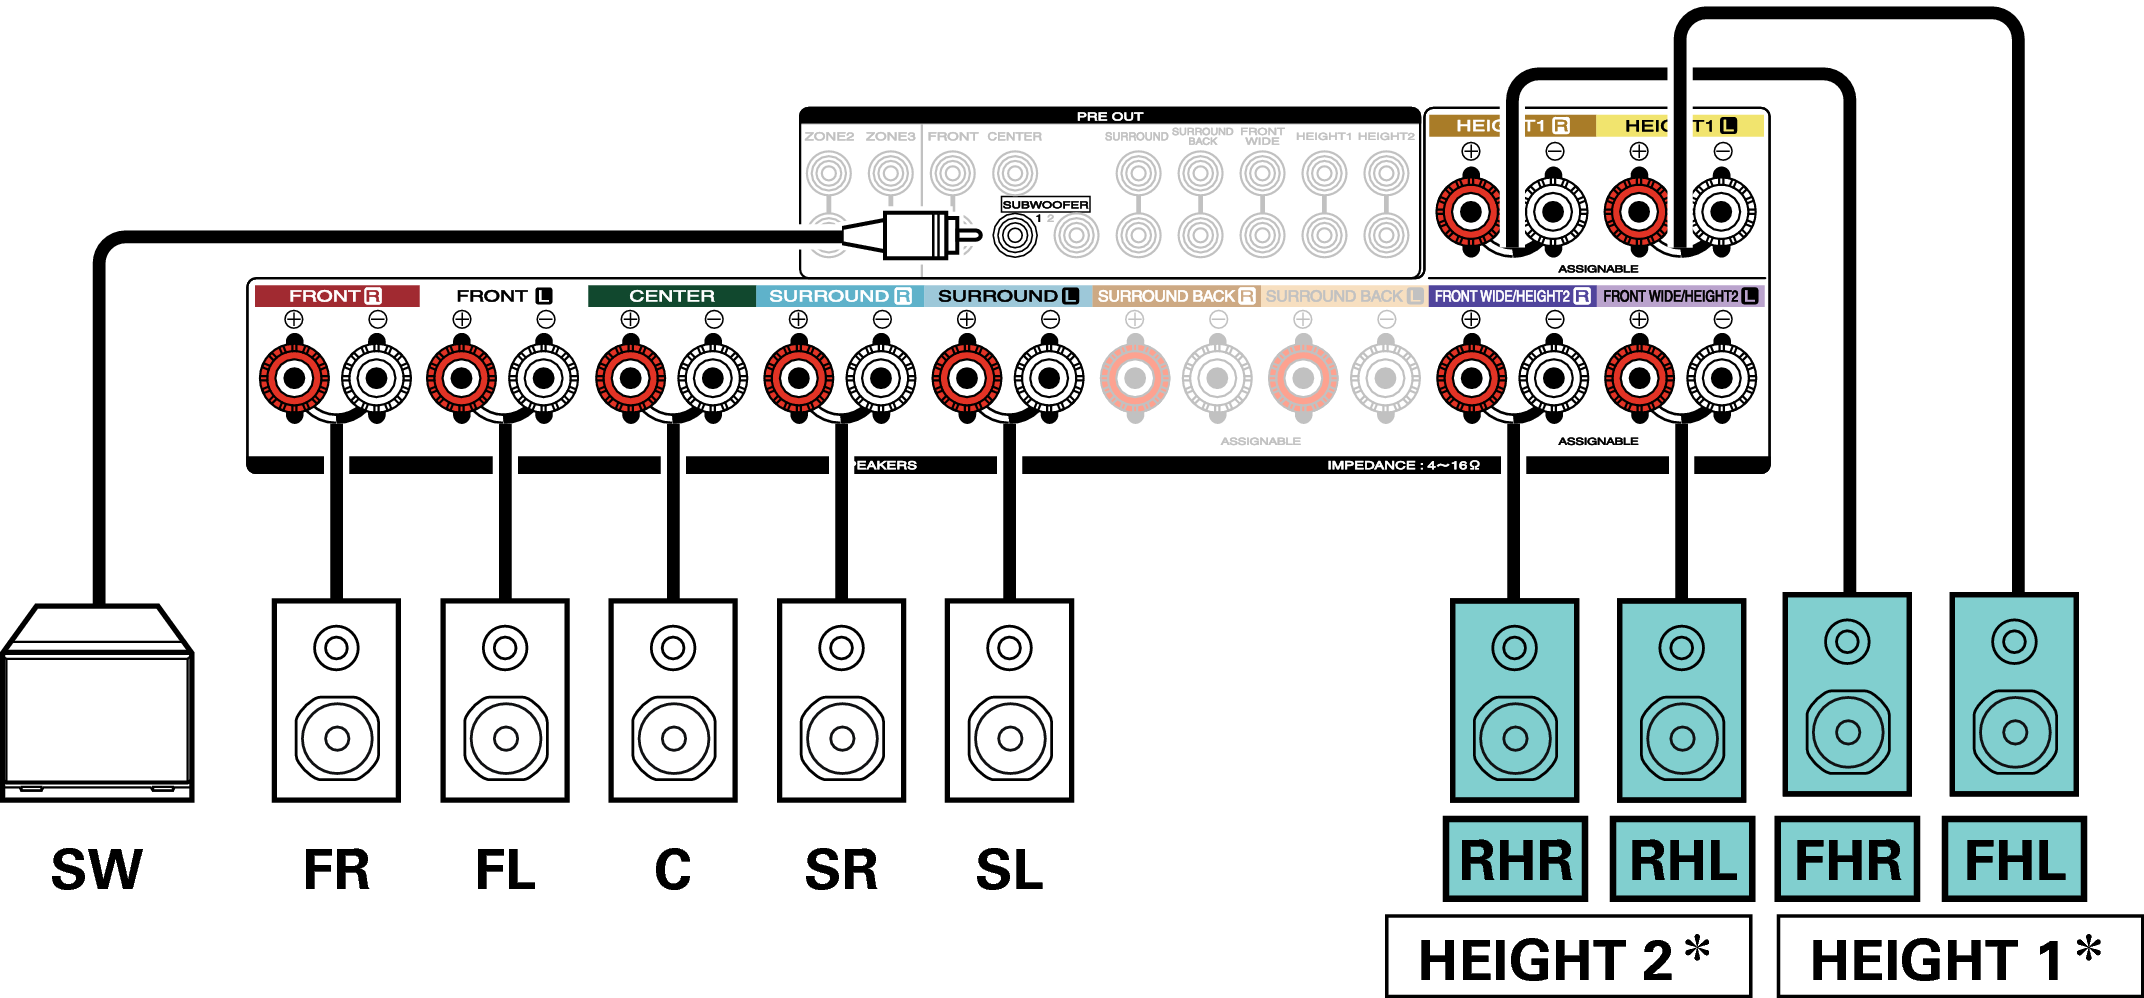
You can change the combination of the HEIGHT1 and HEIGHT2 channels in the settings. link
Example connection when using one set of Dolby Atmos Enabled speakers
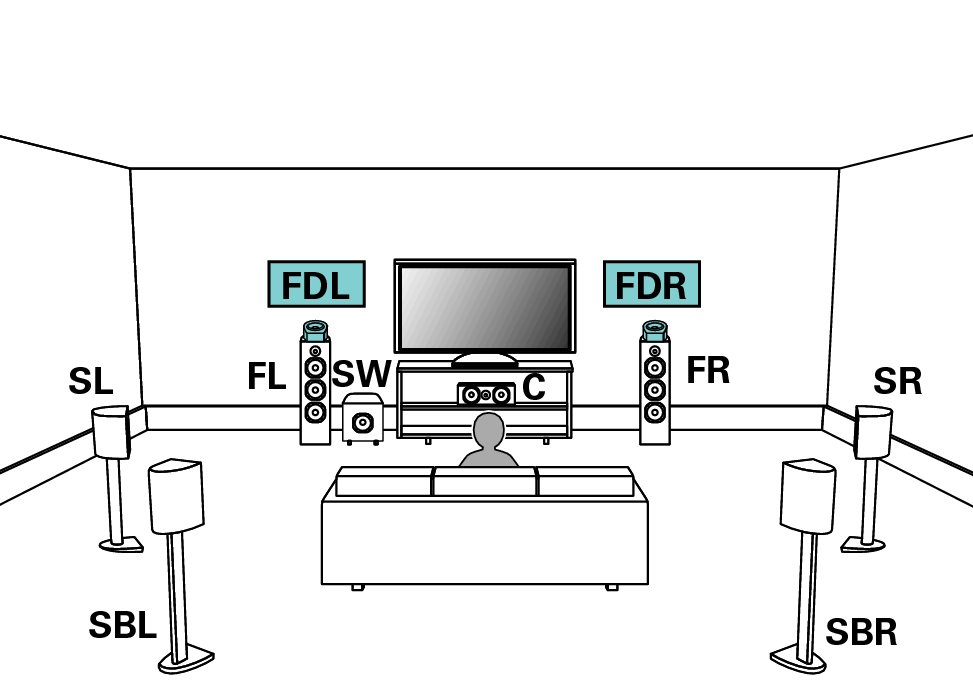
Set “Height” - “Dolby Sp” to “2ch” in the menu when connecting in this configuration. link
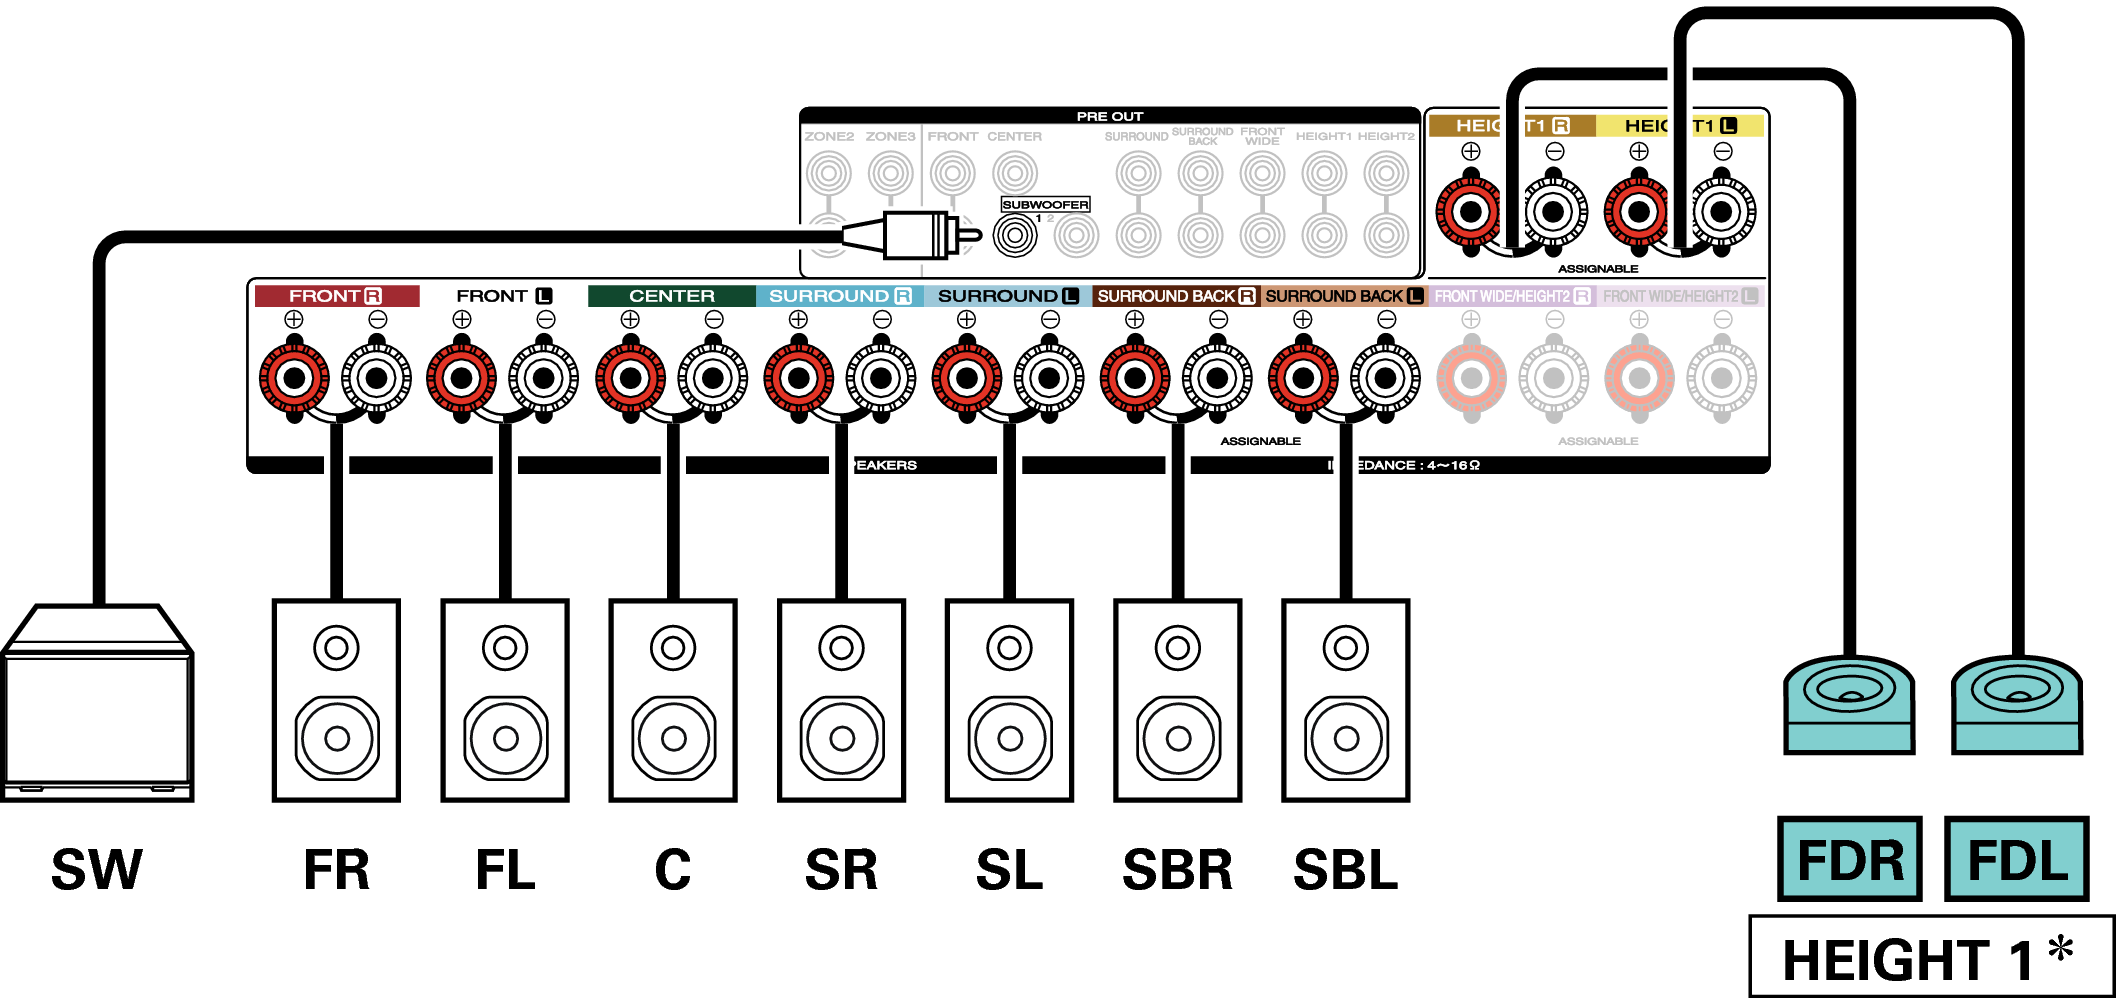
The surround Dolby speakers can be connected instead of the front Dolby speakers. In this case, set the Dolby Atmos Enabled speakers to be connected under “Height” - “Layout” in the menu. link
Example connection when using two sets of Dolby Atmos Enabled speakers
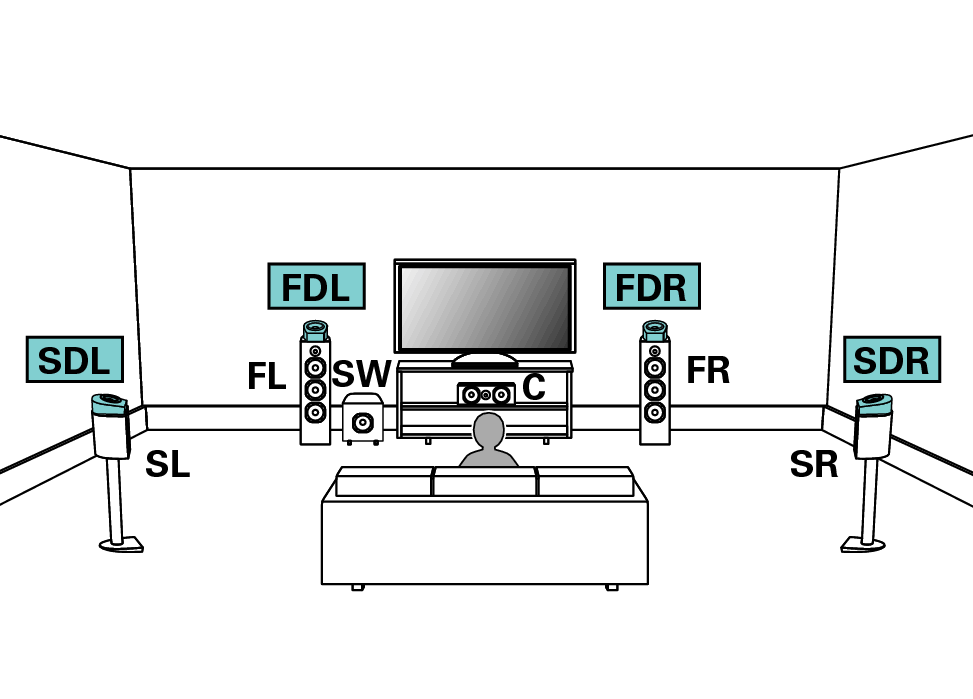
Set “Floor” - “Layout” to “5ch” or set “5ch & SB” and “Dolby Sp” to “4ch” in the menu when connecting in this configuration. link
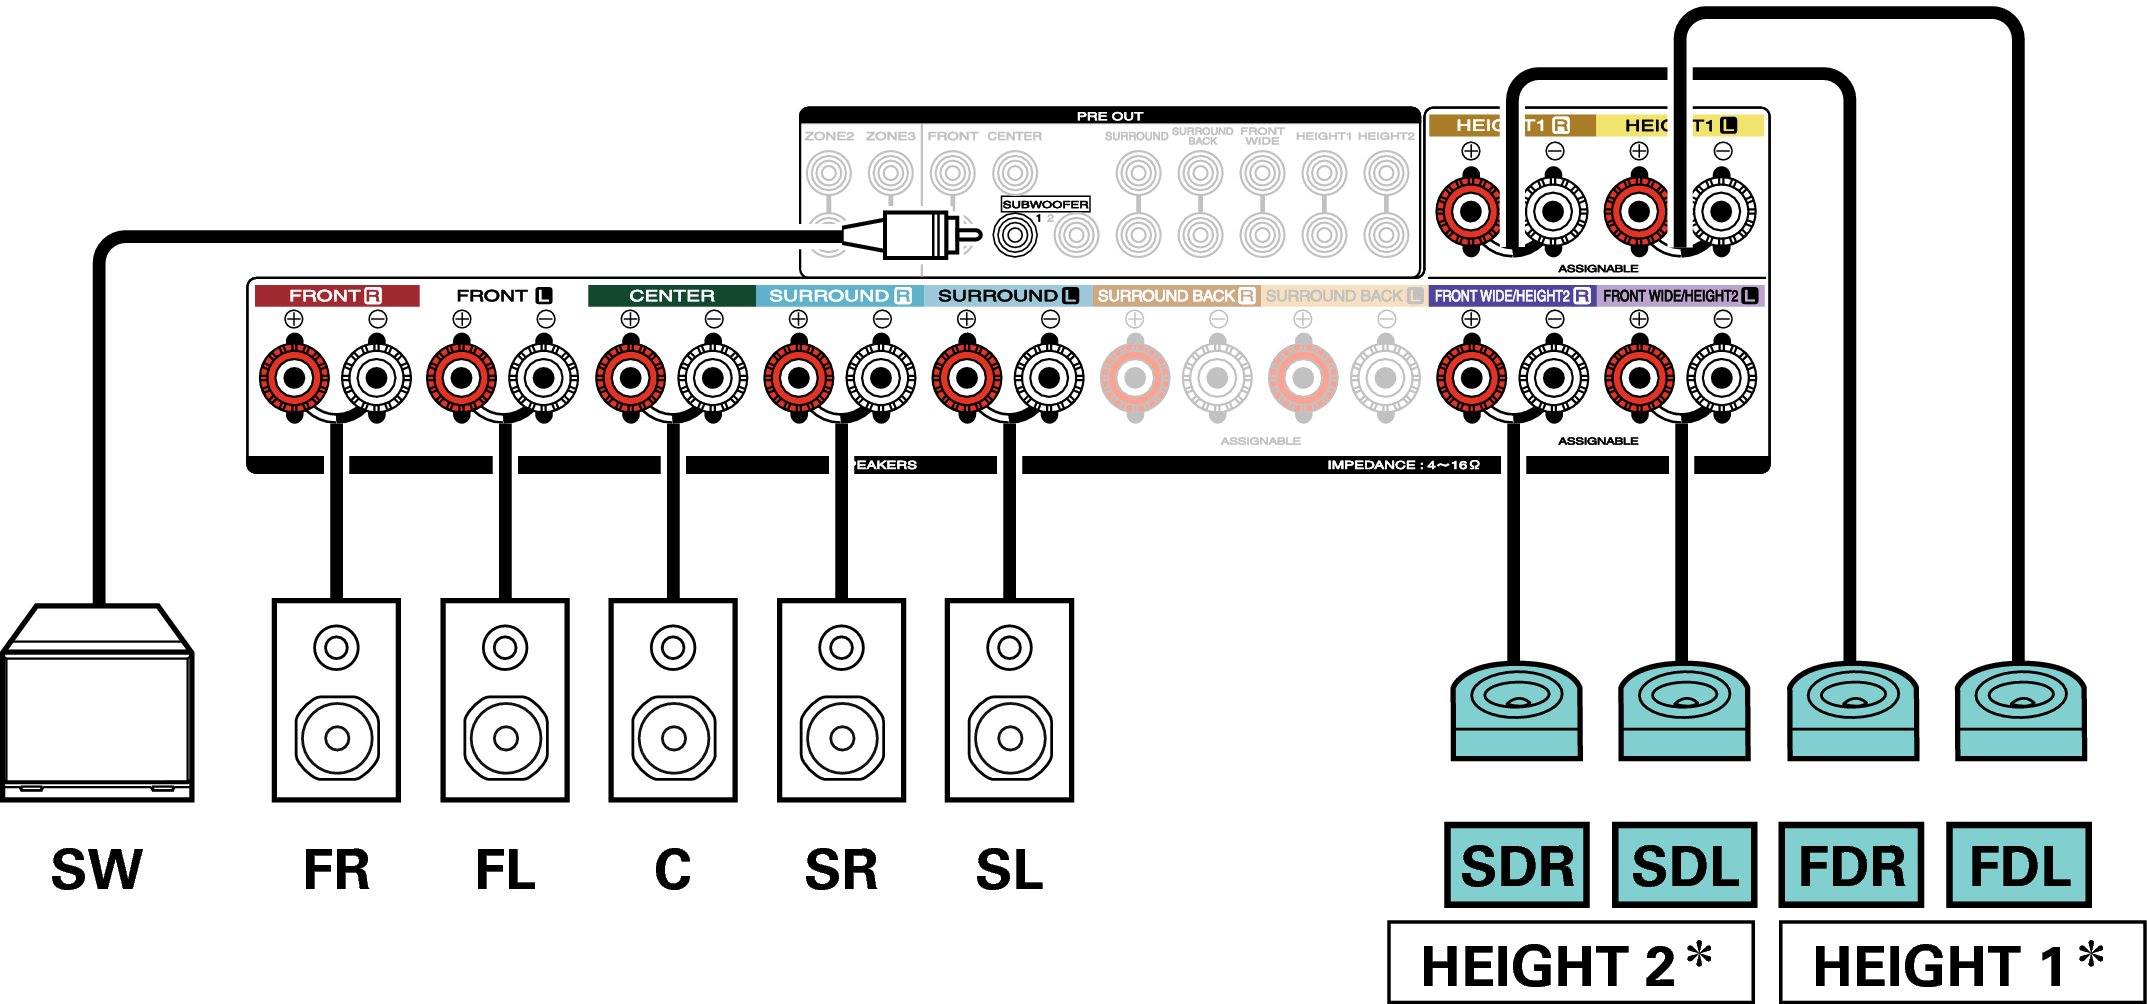
You can change the combination of the HEIGHT1 and HEIGHT2 channels in the settings. link
Upgrade (Auro-3D)
Example connection for the Auro-3D 9.1-channel system
This speaker configuration is optimized for Auro-3D playback.
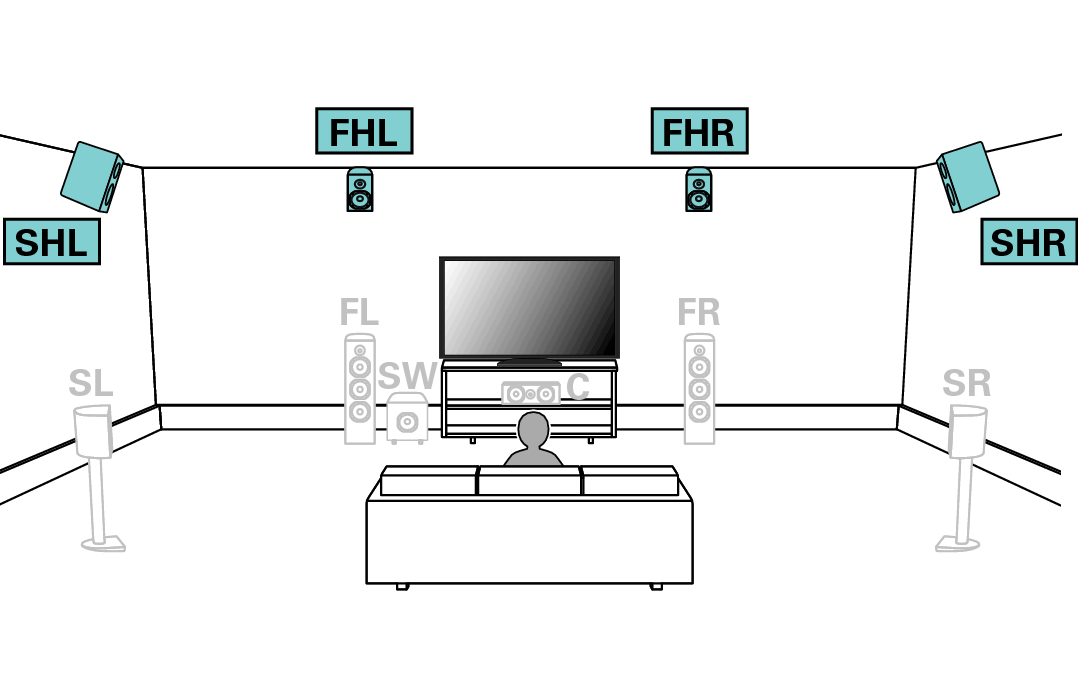
You can change the combination of the HEIGHT1 and HEIGHT2 channels in the settings. link
Channels output from the HEIGHT1 and FRONT WIDE/HEIGHT2 speaker terminals can be changed to the following patterns according to the speaker systems being used.
The two sets of height speakers can be used if you are not using the front wide speakers. Set this from “Amp Assign” in the menu. link
|
Front wide speaker |
Combination of height speakers to be used |
Connected terminals |
|||
|---|---|---|---|---|---|
|
Number of height/ceiling speakers |
Number of Dolby Speakers |
Combination pattern |
HEIGHT1 SPEAKER |
FRONT WIDE/HEIGHT2 SPEAKER |
|
|
Used |
2 speakers |
None |
Front Height |
Front Height |
Front Wide |
|
Top Front |
Top Front |
Front Wide |
|||
|
Top Middle |
Top Middle |
Front Wide |
|||
|
Top Rear |
Top Rear |
Front Wide |
|||
|
Rear Height |
Rear Height |
Front Wide |
|||
|
None |
2 speakers |
Front Dolby |
Front Dolby |
Front Wide |
|
|
Surround Dolby |
Surround Dolby |
Front Wide |
|||
|
Back Dolby |
Back Dolby |
Front Wide |
|||
|
Not used |
4 speakers |
None |
Front Height & Top Middle |
Front Height |
Top Middle |
|
Front Height & Top Rear |
Front Height |
Top Rear |
|||
|
Front Height & Rear Height |
Front Height |
Rear Height |
|||
|
Top Front & Top Rear |
Top Front |
Top Rear |
|||
|
Top Front & Rear Height |
Top Front |
Rear Height |
|||
|
Top Middle & Rear Height |
Top Middle |
Rear Height |
|||
|
2 speakers |
2 speakers |
Front Dolby & Top Rear |
Front Dolby |
Top Rear |
|
|
Front Dolby & Rear Height |
Front Dolby |
Rear Height |
|||
|
Front Height & Surr. Dolby |
Front Height |
Surround Dolby |
|||
|
Top Front & Surround Dolby |
Top Front |
Surround Dolby |
|||
|
None |
4 speakers |
Front Dolby & Surround Dolby |
Front Dolby |
Surround Dolby |
|
Upgrade (Auro-3D)
|
Front wide speaker |
Combination of height speakers to be used |
Connected terminals |
|||
|---|---|---|---|---|---|
|
Number of height/ceiling speakers |
Number of Dolby Speakers |
Combination pattern |
HEIGHT1 SPEAKER |
FRONT WIDE/HEIGHT2 SPEAKER |
|
|
Not used |
4 speakers |
None |
Front Height & Surr. Height |
Front Height |
Surround Height |
|
Front Height & Rear Height |
Front Height |
Rear Height |
|||
For the best Auro-3D experience Surround Height speakers are recommended, however you may substitute Rear Height speakers from a Dolby Atmos speaker setup in place of Surround Height speakers.
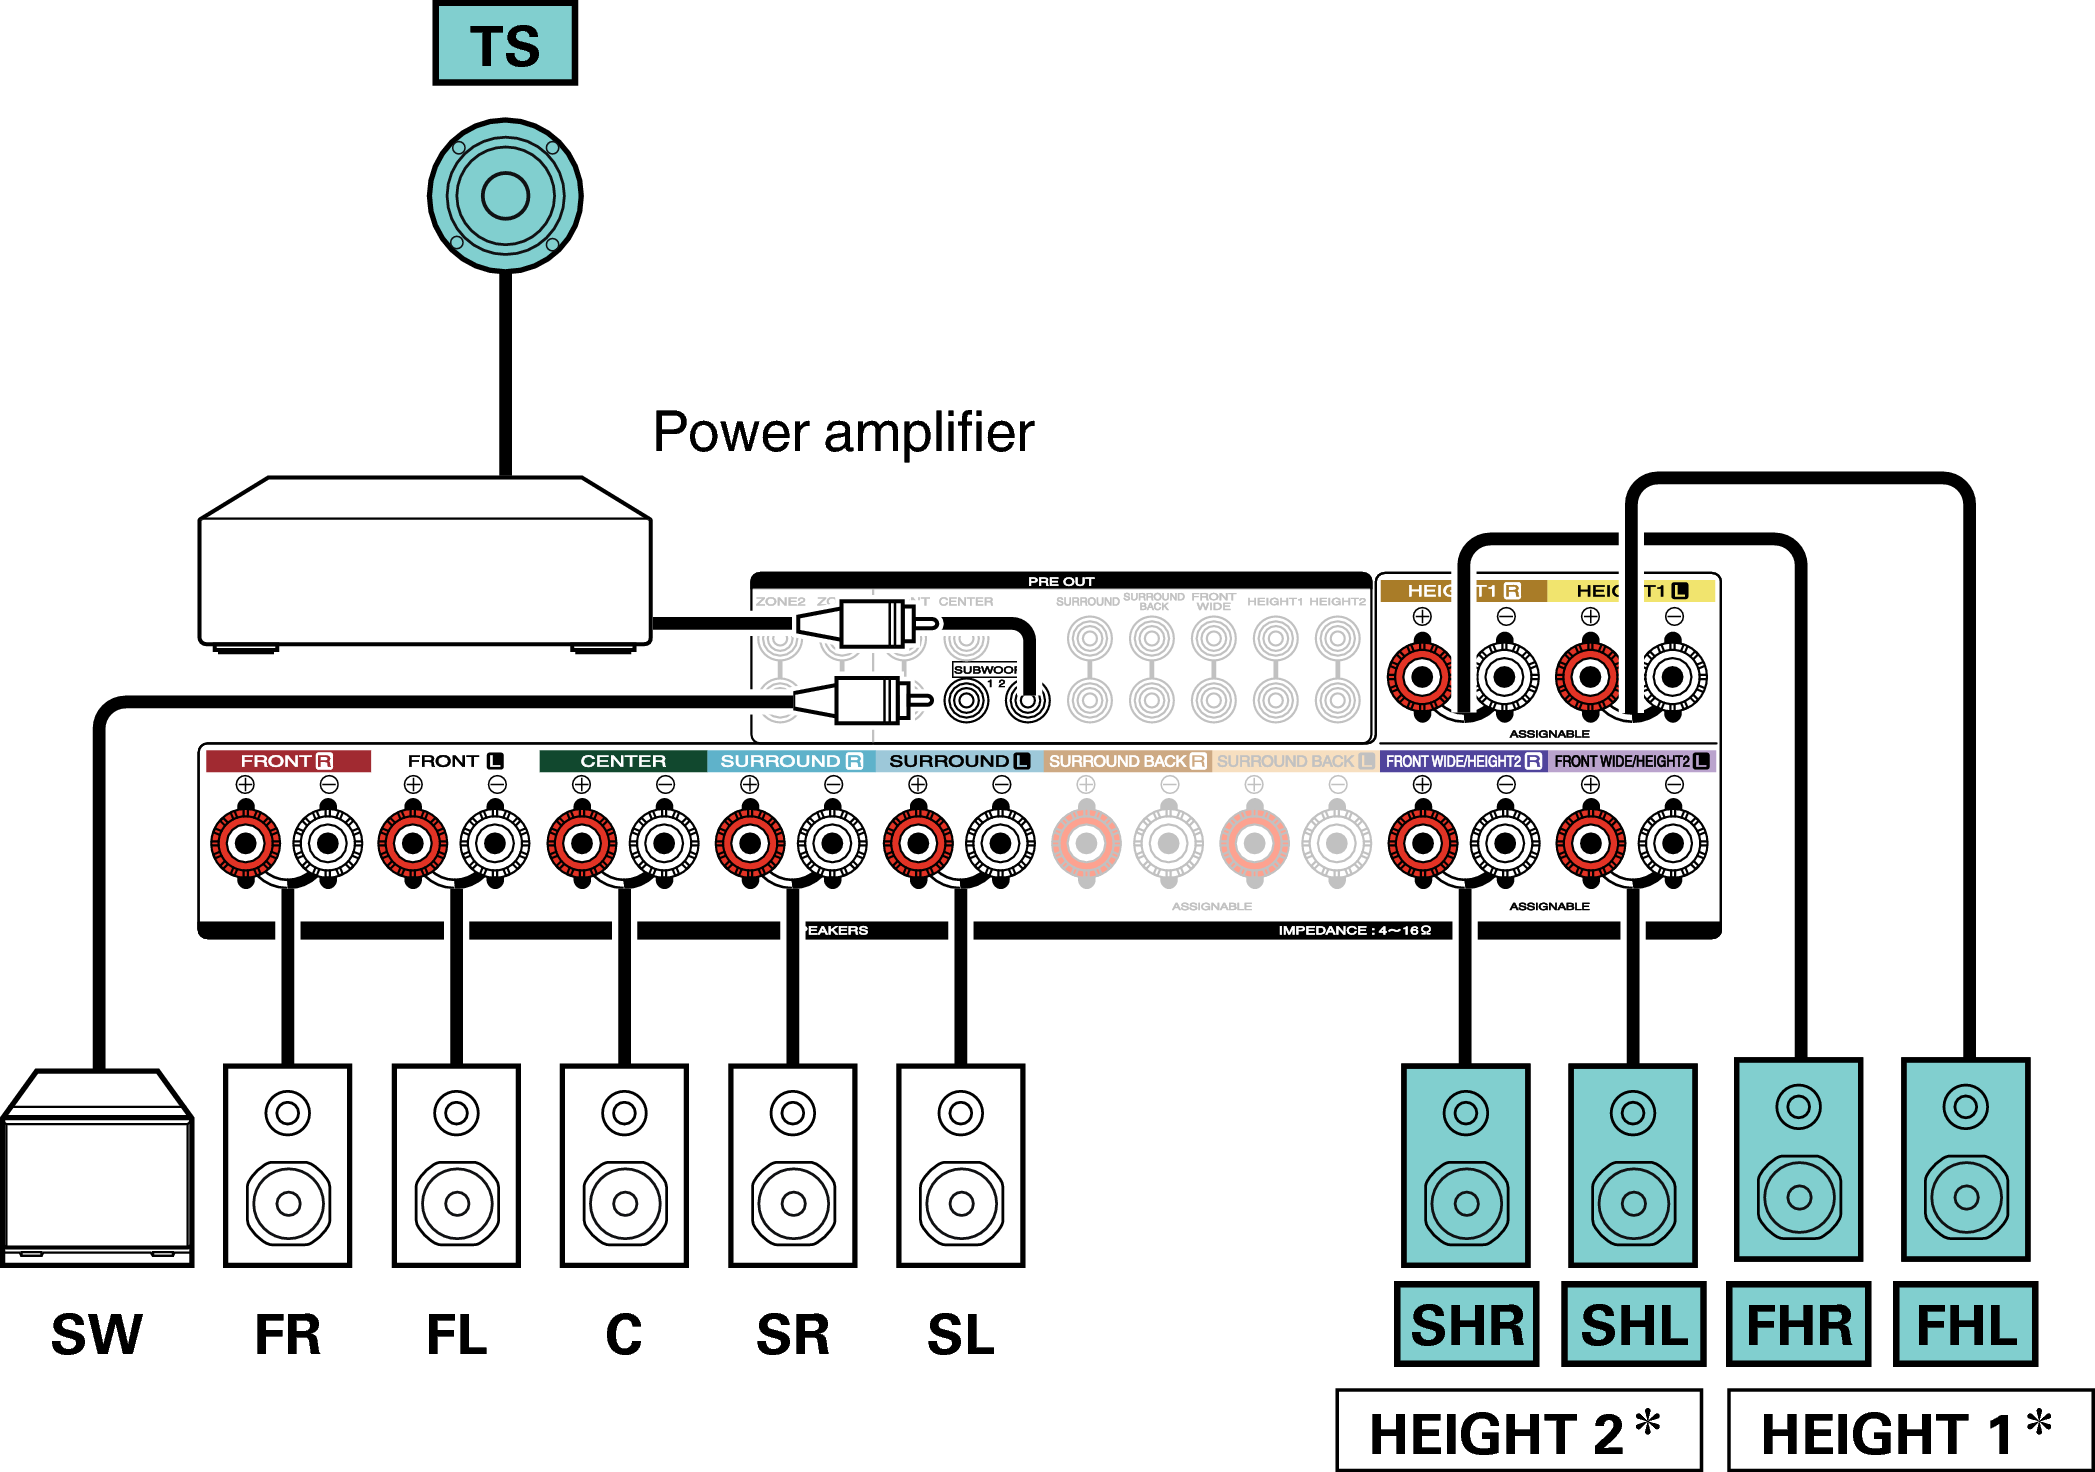
11.1-channel playback
This system, which is based on a 5.1-channel system, plays back up to 11.1-channels at the same time.
You can connect speakers for up to 13-channels for MAIN ZONE by using an external power amplifier. When you connect speakers for 12 or more channels, the output speakers automatically switch according to the input signal and sound mode.
Example connection when using two sets of ceiling speakers
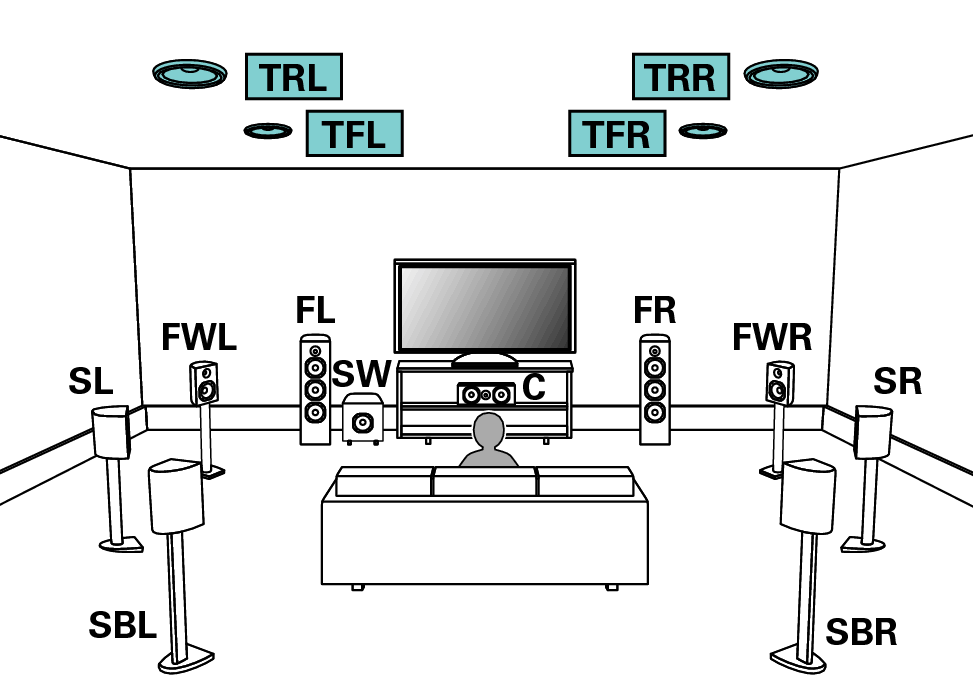
Set “Height” - “Height Sp” to “4ch” in the menu when connecting in this configuration. link
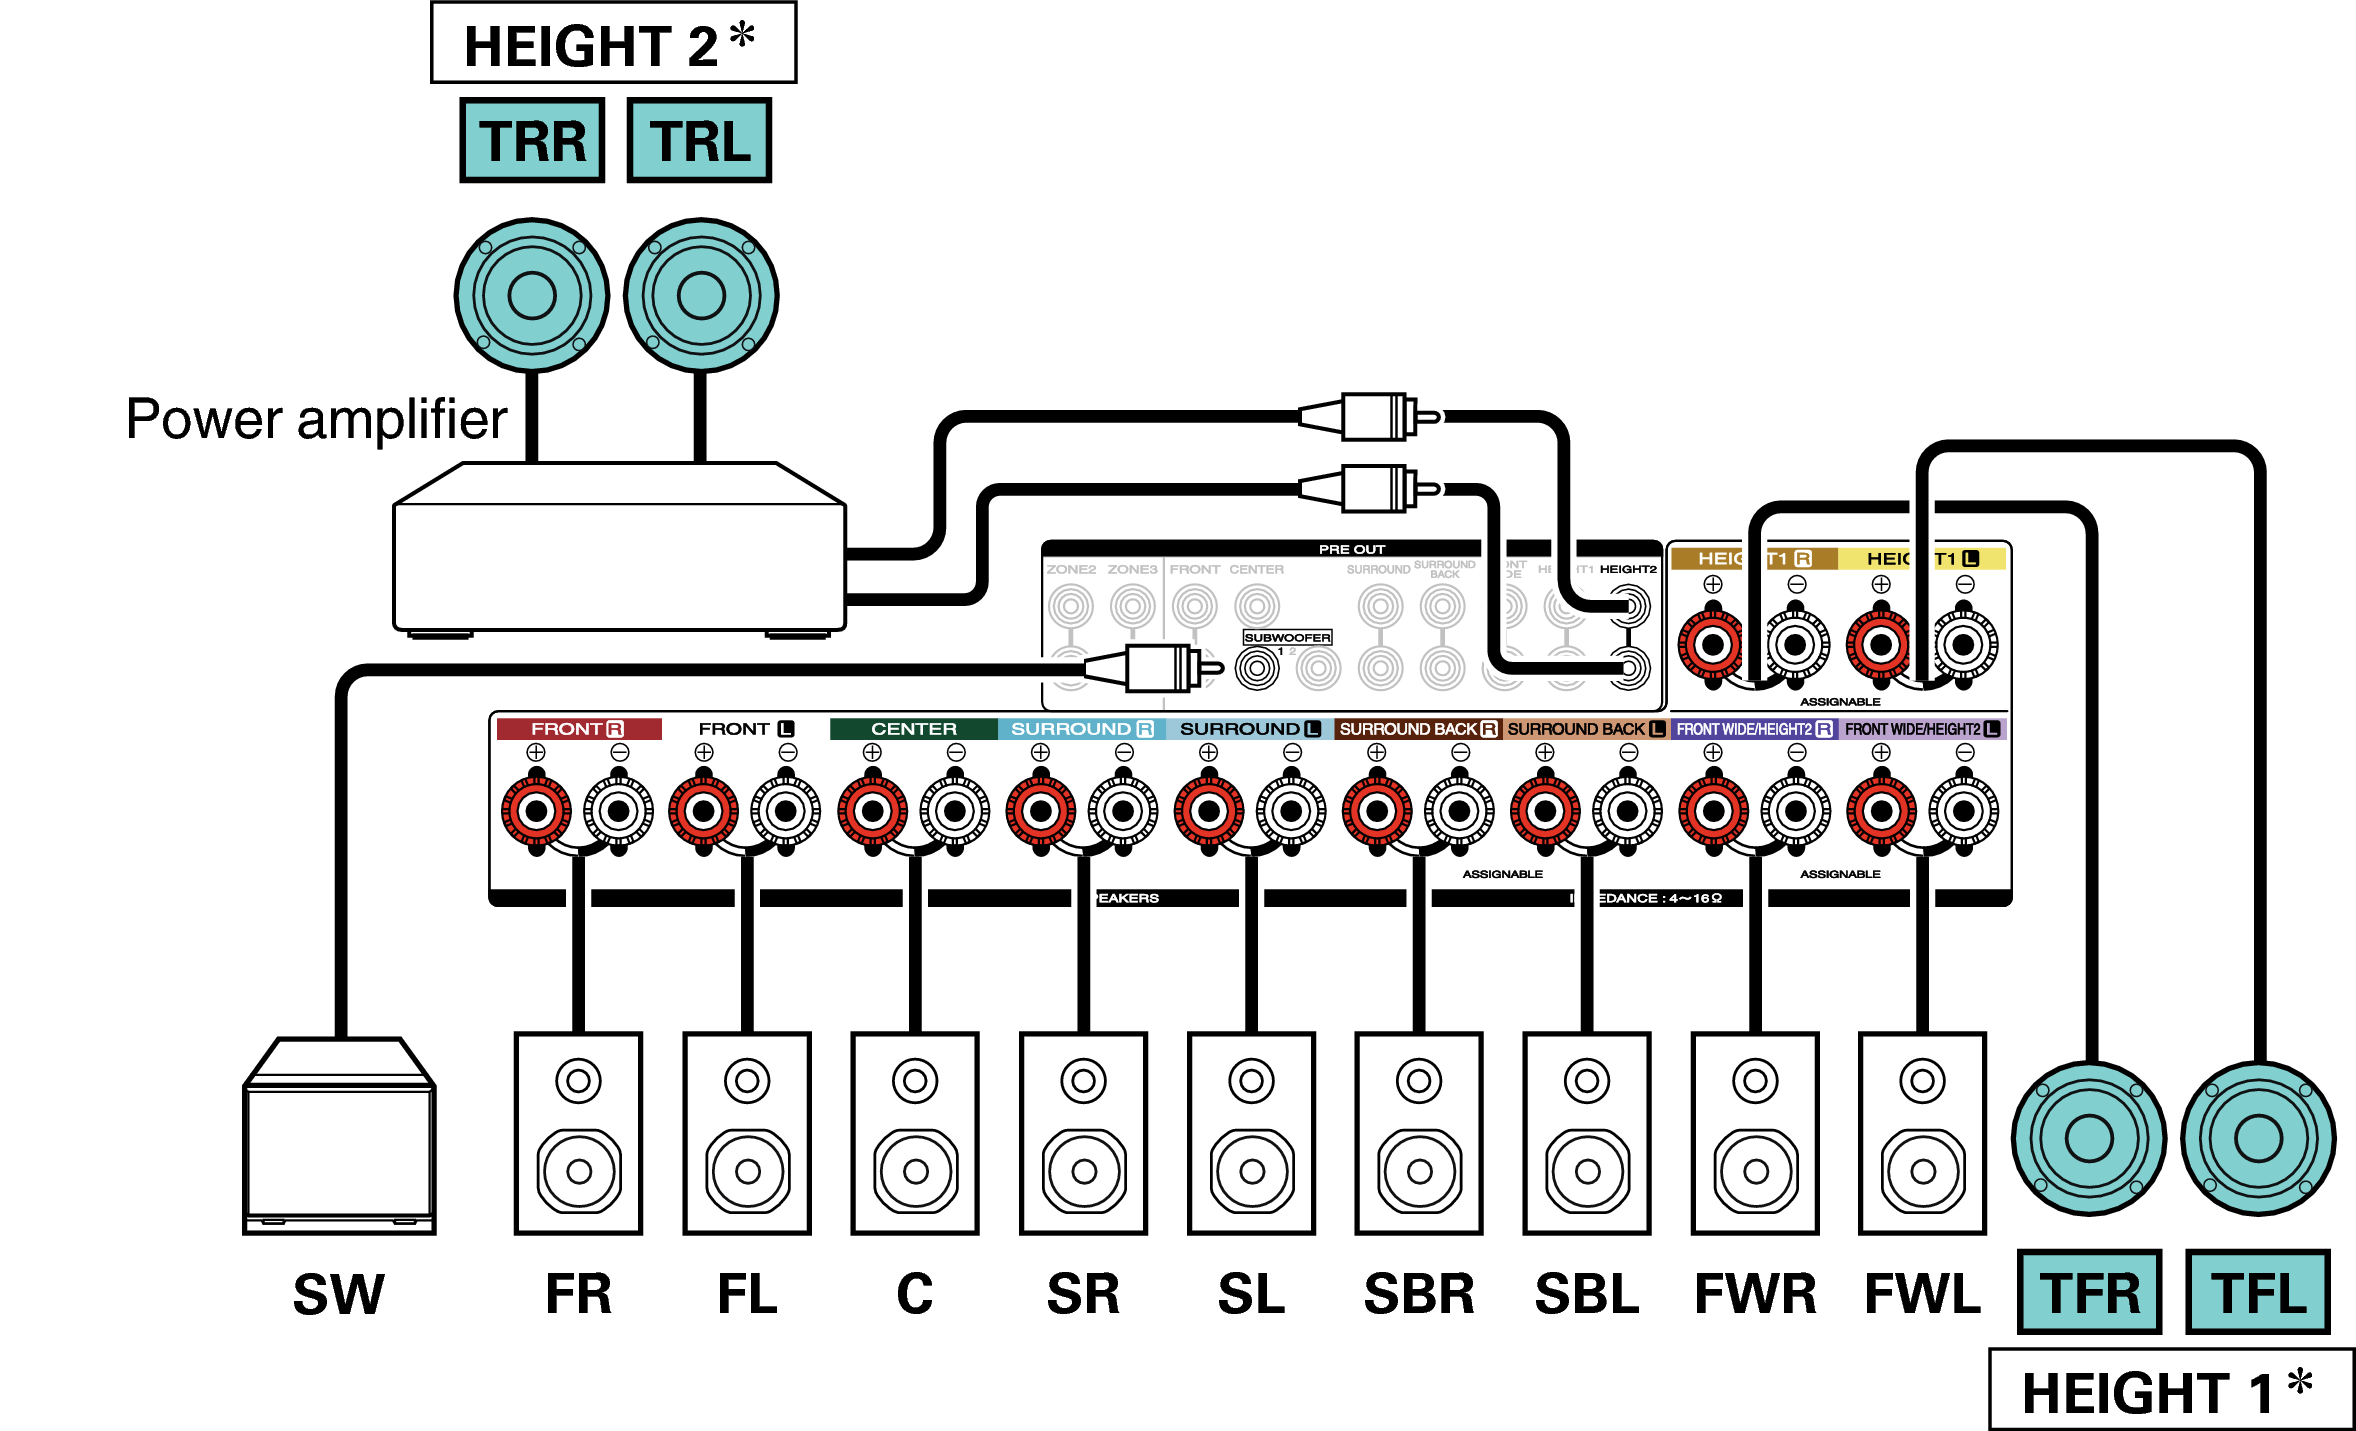
You can change the combination of the HEIGHT1 and HEIGHT2 channels in the settings. link
Example connection when using two sets of height speakers
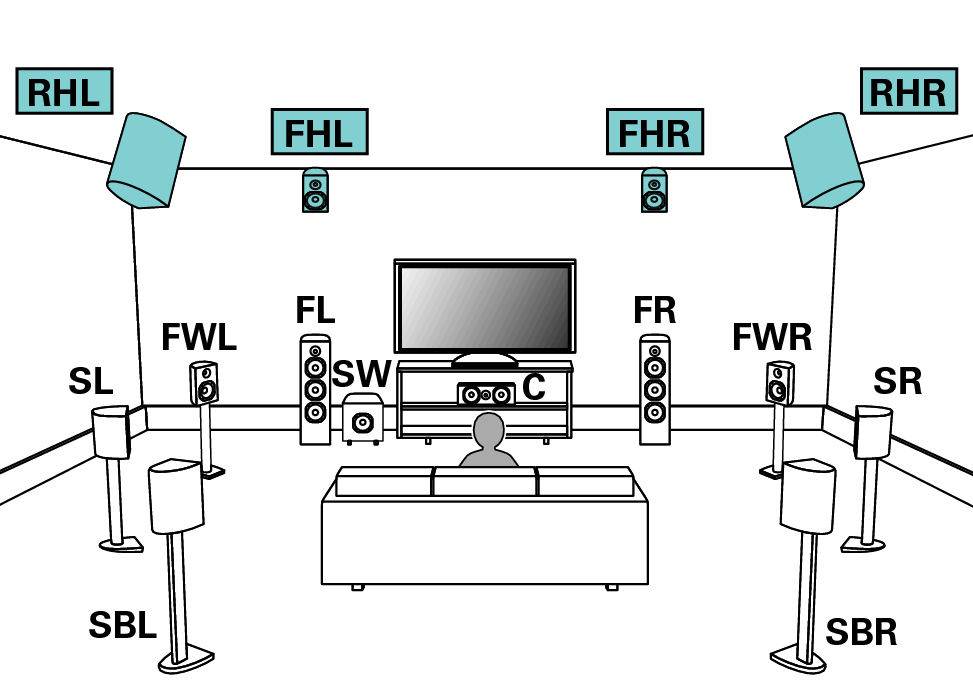
Set “Height” - “Height Sp” to “4ch” in the menu when connecting in this configuration. link
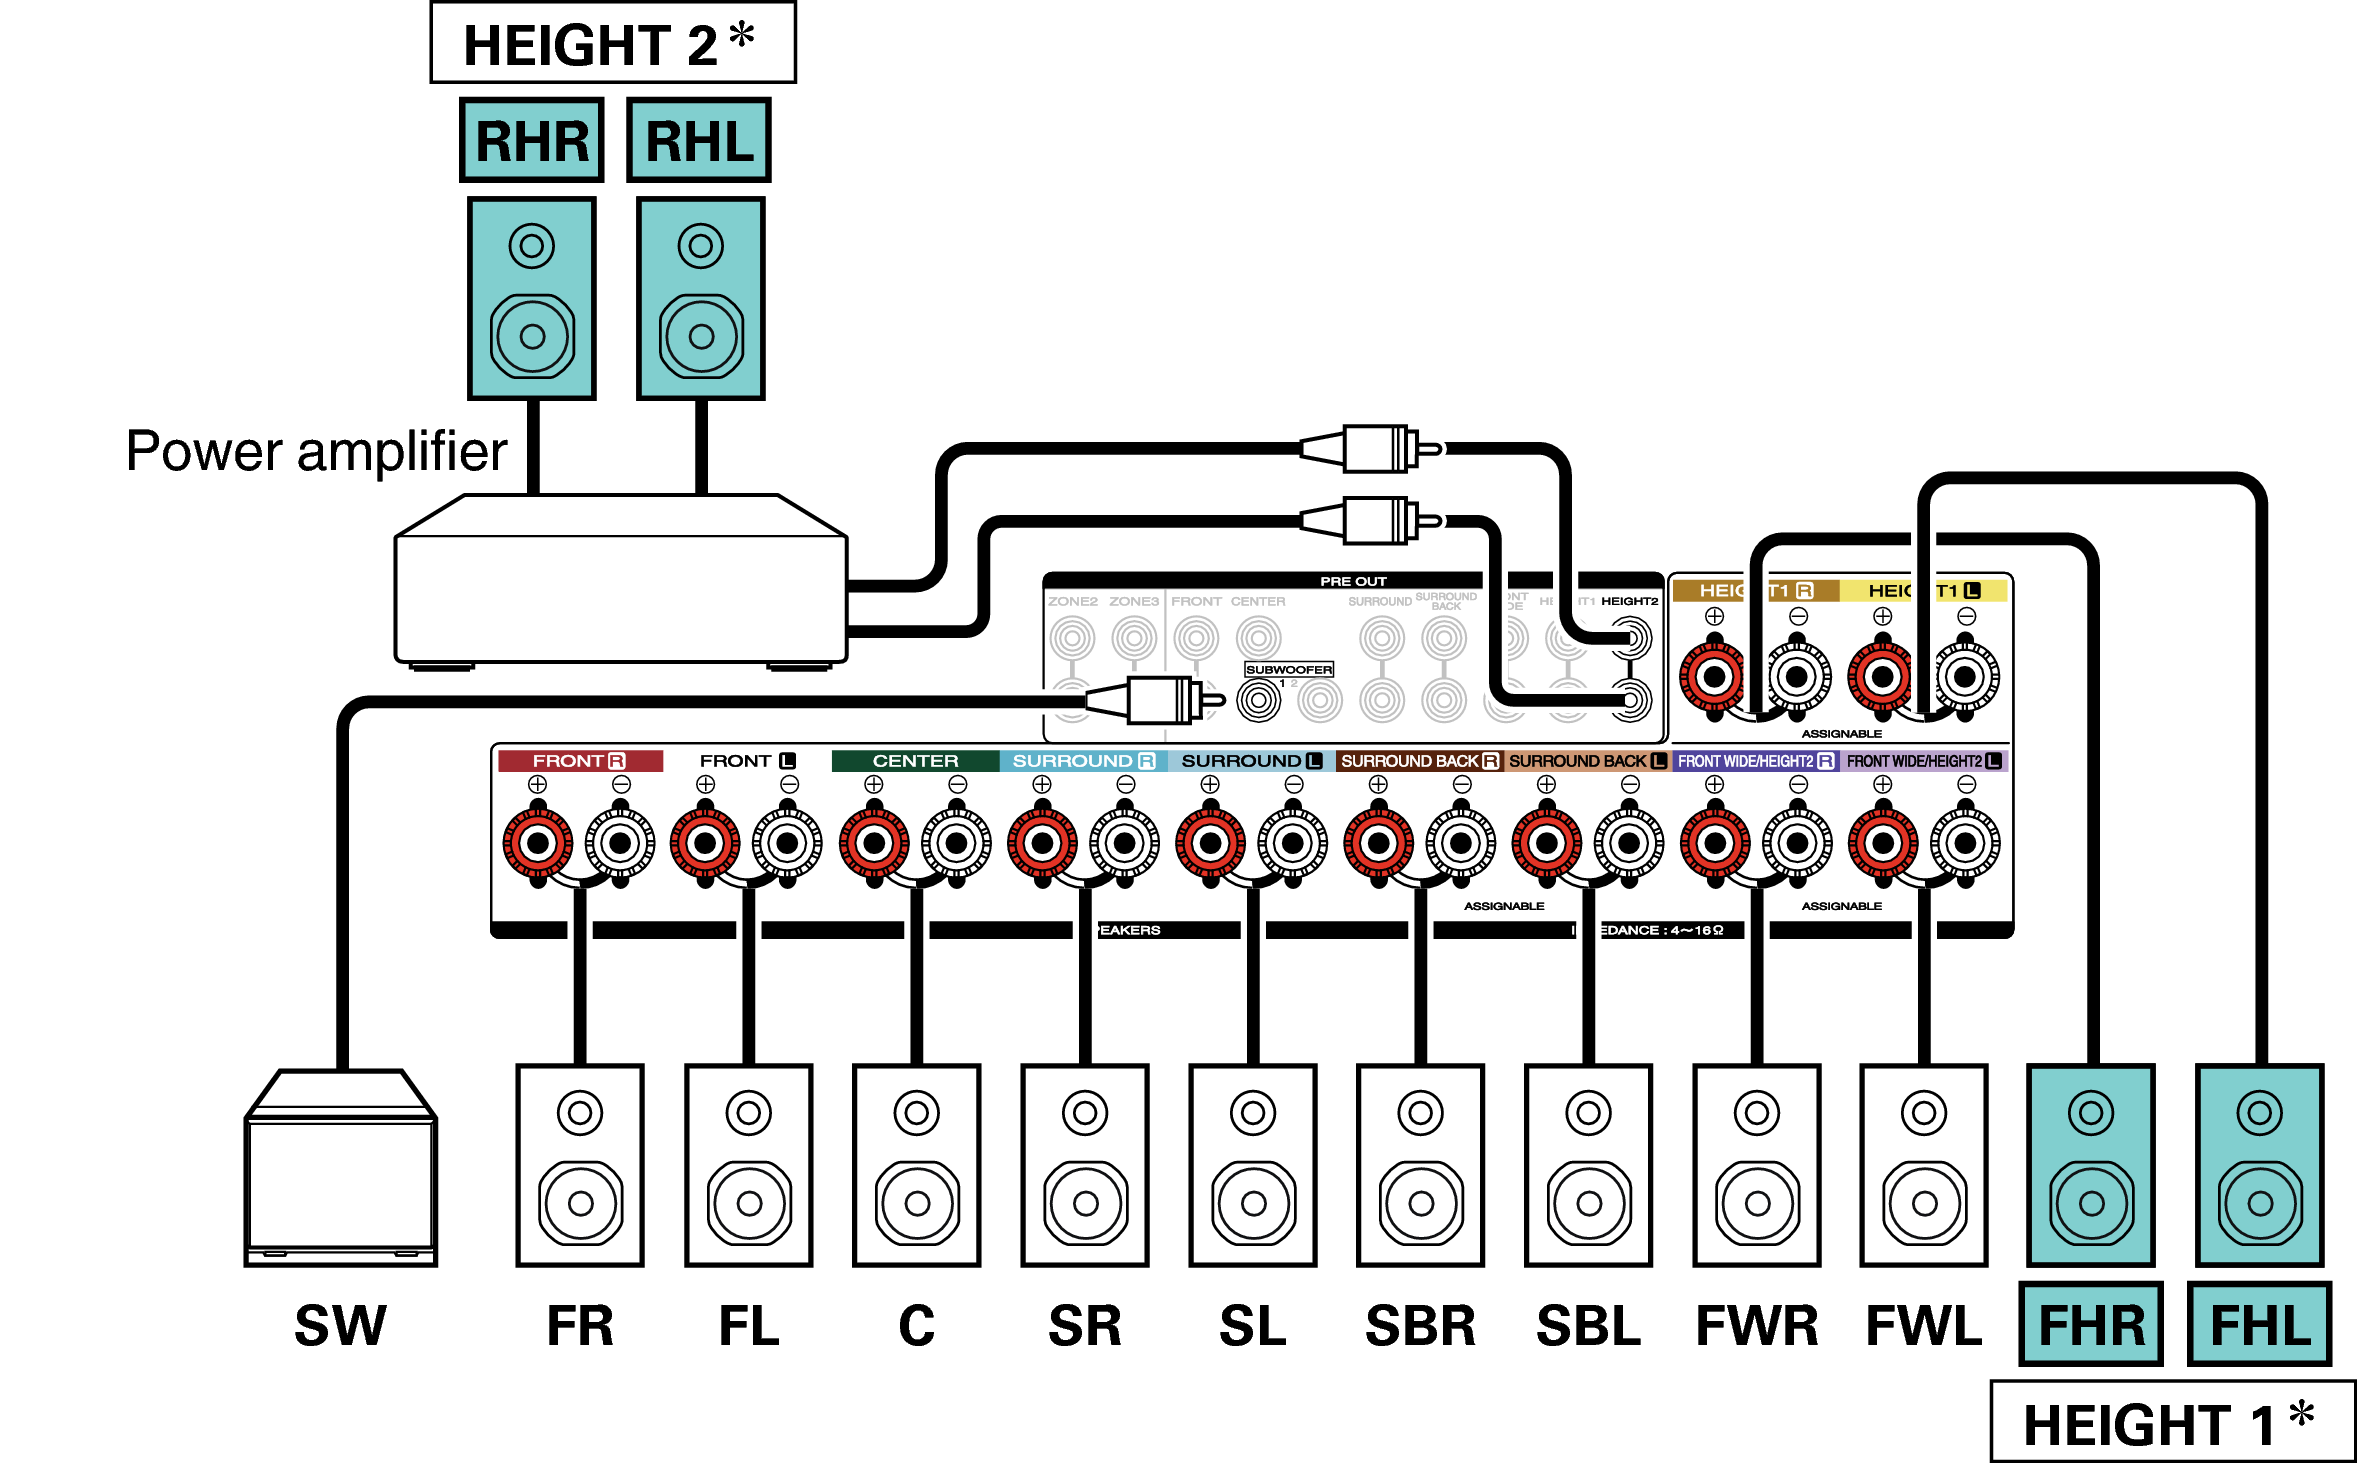
You can change the combination of the HEIGHT1 and HEIGHT2 channels in the settings. link
Example connection when using two sets of Dolby Atmos Enabled speakers
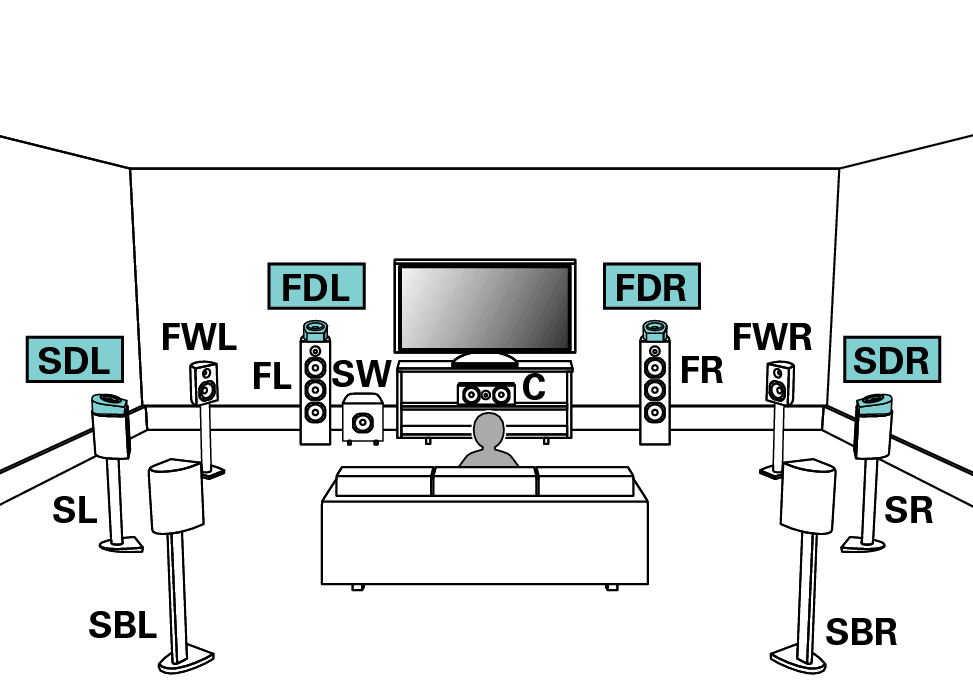
Set “Height” - “Dolby Sp” to “4ch” in the menu when connecting in this configuration. link
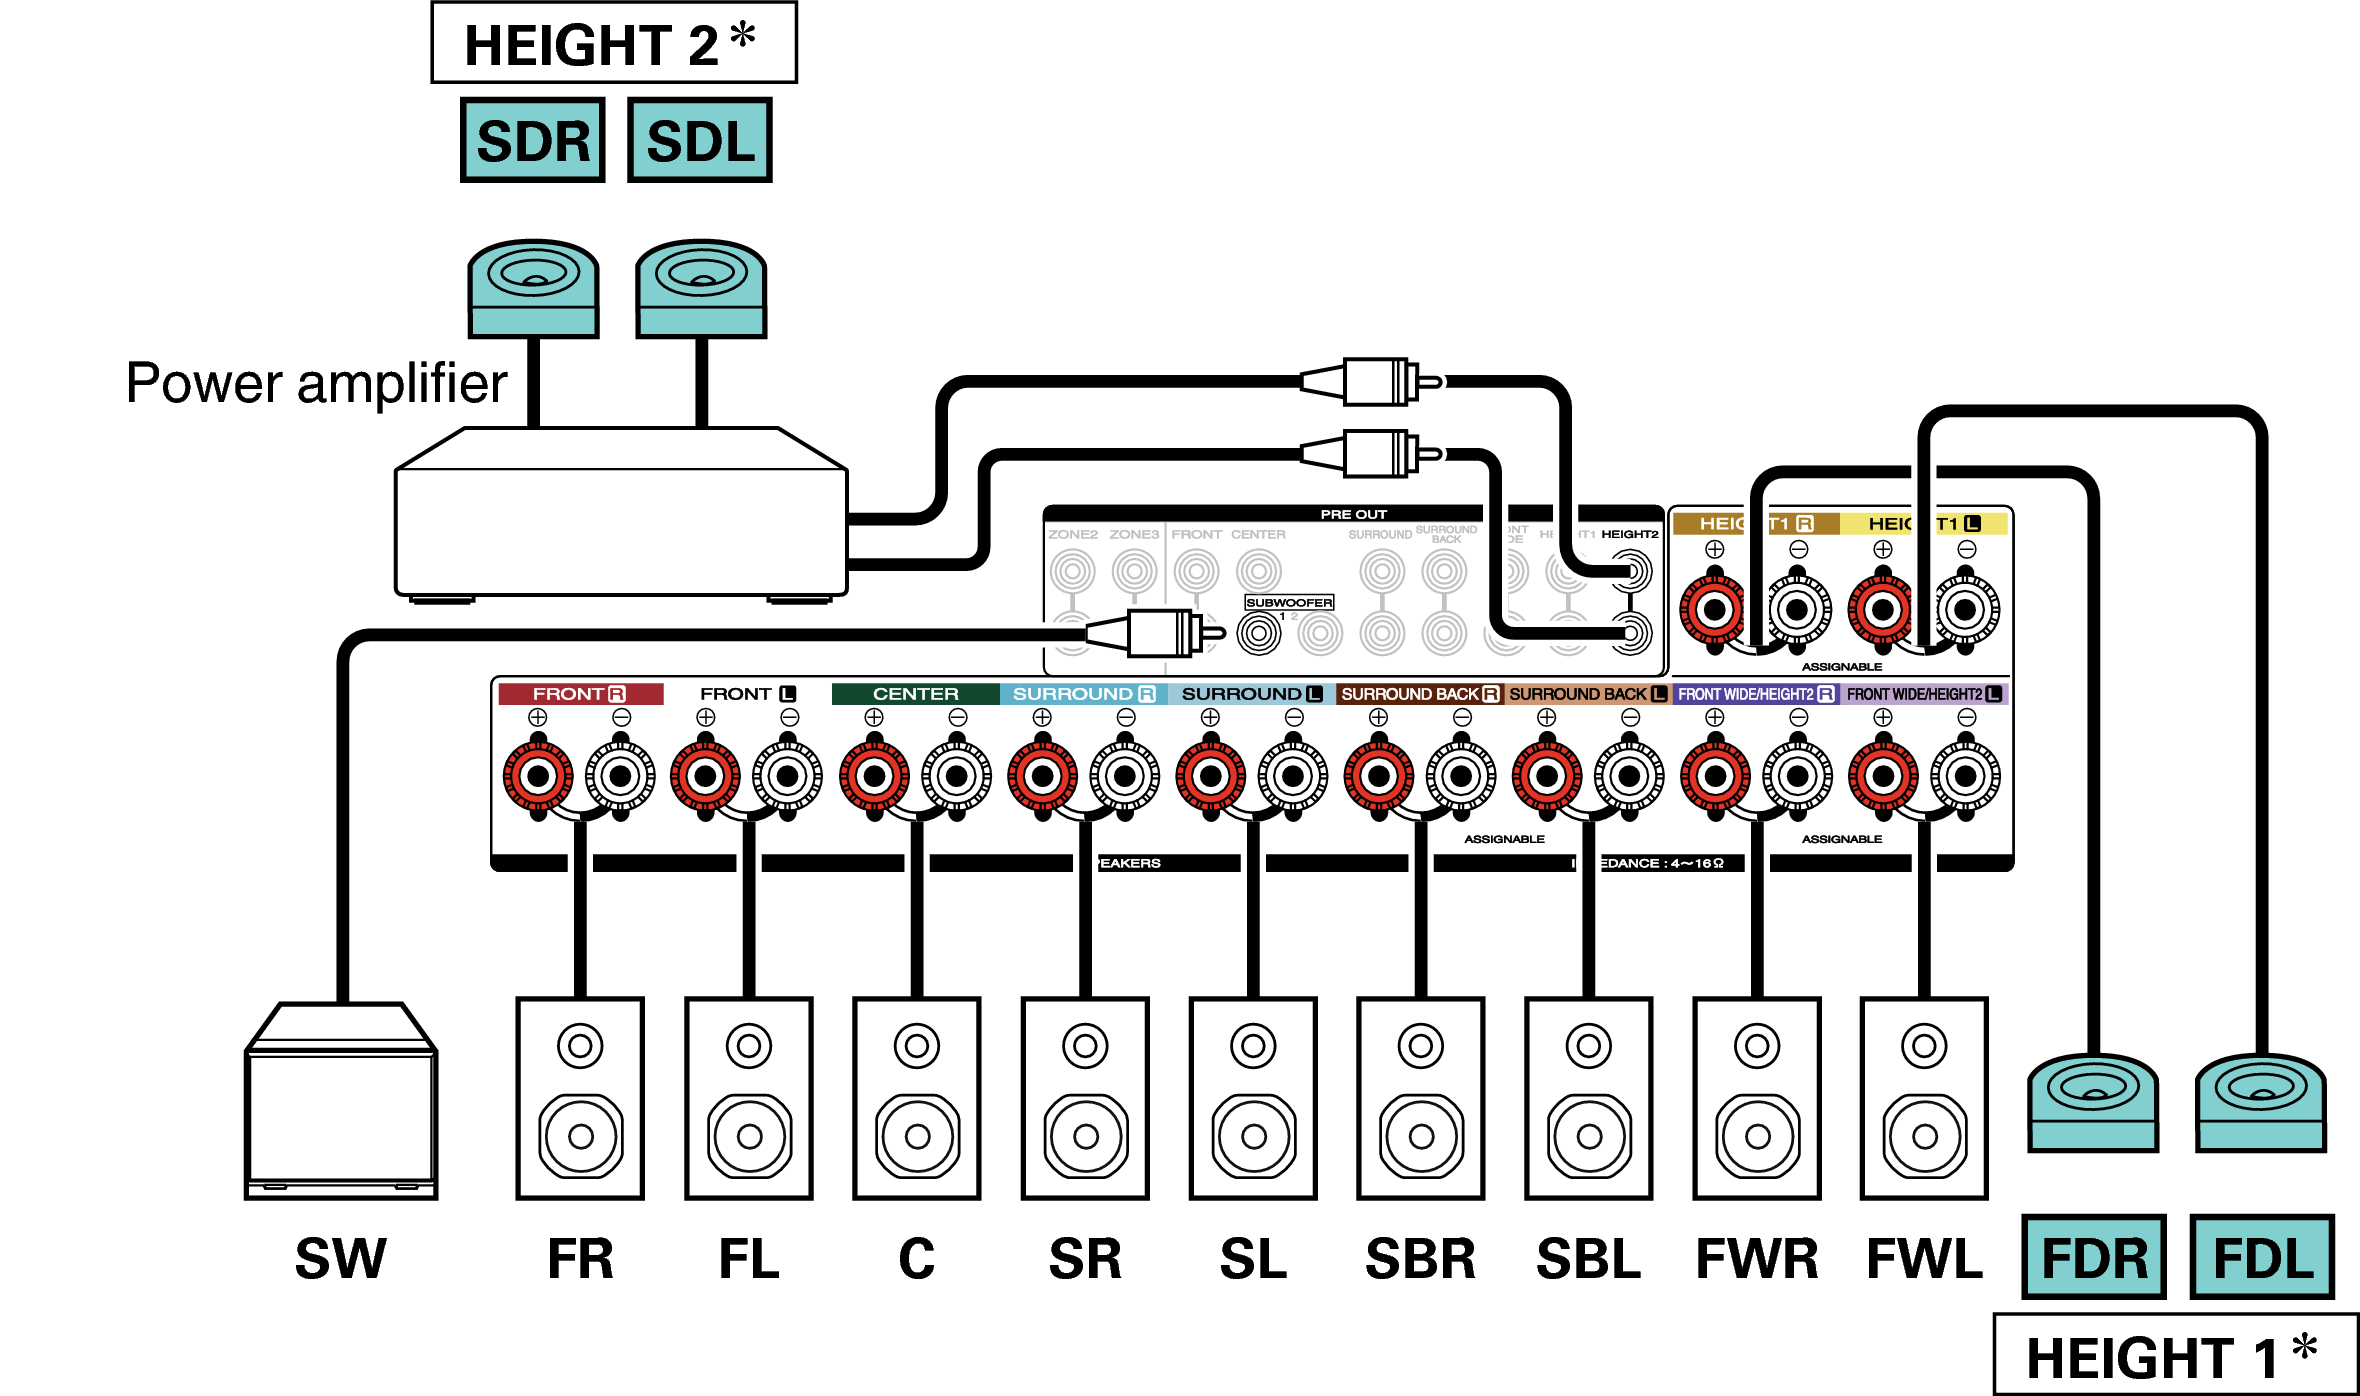
You can change the combination of the HEIGHT1 and HEIGHT2 channels in the settings. link
Upgrade (Auro-3D)
Example connection for the Auro-3D 10.1-channel system
This speaker configuration is optimized for Auro-3D playback.
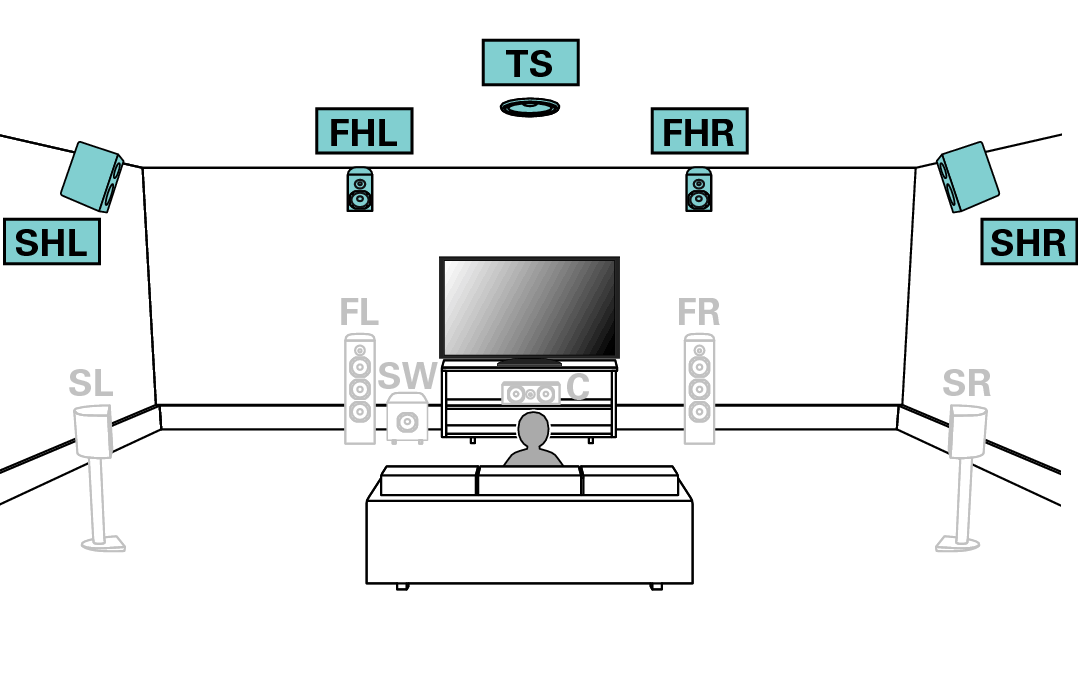
Set “Height” - “Height Sp” to “5ch” in the menu when connecting in this configuration. Next, set “Height” - “Layout” to “Front Height & Surr. Height”.
You can change the combination of the HEIGHT1 and HEIGHT2 channels in the settings. link
The combination of the HEIGHT1 and HEIGHT2 channels can be changed to the following patterns according to the speaker system being used.
Set this from “Amp Assign” in the menu. link
|
Combination of height speakers to be used |
Connected terminals |
|||
|---|---|---|---|---|
|
Number of height/ceiling speakers |
Number of Dolby Speakers |
Combination pattern |
HEIGHT1 SPEAKER |
HEIGHT2 PRE OUT |
|
2 speakers |
None |
Front Height |
Front Height |
- |
|
Top Front |
Top Front |
- |
||
|
Top Middle |
Top Middle |
- |
||
|
Top Rear |
Top Rear |
- |
||
|
Rear Height |
Rear Height |
- |
||
|
4 speakers |
None |
Front Height & Top Middle |
Front Height |
Top Middle |
|
Front Height & Top Rear |
Front Height |
Top Rear |
||
|
Front Height & Rear Height |
Front Height |
Rear Height |
||
|
Top Front & Top Rear |
Top Front |
Top Rear |
||
|
Top Front & Rear Height |
Top Front |
Rear Height |
||
|
Top Middle & Rear Height |
Top Middle |
Rear Height |
||
|
None |
2 speakers |
Front Dolby |
Front Dolby |
- |
|
Surround Dolby |
Surround Dolby |
- |
||
|
Back Dolby |
Back Dolby |
- |
||
|
2 speakers |
2 speakers |
Front Dolby & Top Rear |
Front Dolby |
Top Rear |
|
Front Dolby & Rear Height |
Front Dolby |
Rear Height |
||
|
Front Height & Surr. Dolby |
Front Height |
Surround Dolby |
||
|
Front Height & Back Dolby |
Front Height |
Back Dolby |
||
|
Top Front & Surround Dolby |
Top Front |
Surround Dolby |
||
|
Top Front & Back Dolby |
Top Front |
Back Dolby |
||
|
None |
4 speakers |
Front Dolby & Surround Dolby |
Front Dolby |
Surround Dolby |
|
Front Dolby & Back Dolby |
Front Dolby |
Back Dolby |
||
Upgrade (Auro-3D)
|
Combination of height speakers to be used |
Connected terminals |
||||
|---|---|---|---|---|---|
|
Number of height/ceiling speakers |
Number of Dolby Speakers |
Combination pattern |
HEIGHT1 SPEAKER |
HEIGHT2 PRE OUT |
SUBWOOFER2 PRE OUT |
|
5 speakers |
None |
Front Height & Surr. Height & Top Surround |
Front Height |
Surround Height |
Top Surround |
|
Front Height & Rear Height & Top Surround |
Front Height |
Rear Height |
Top Surround |
||
For the best Auro-3D experience Surround Height speakers are recommended, however you may substitute Rear Height speakers from a Dolby Atmos speaker setup in place of Surround Height speakers.
7.1-channel playback (bi-amp connection of front speakers)
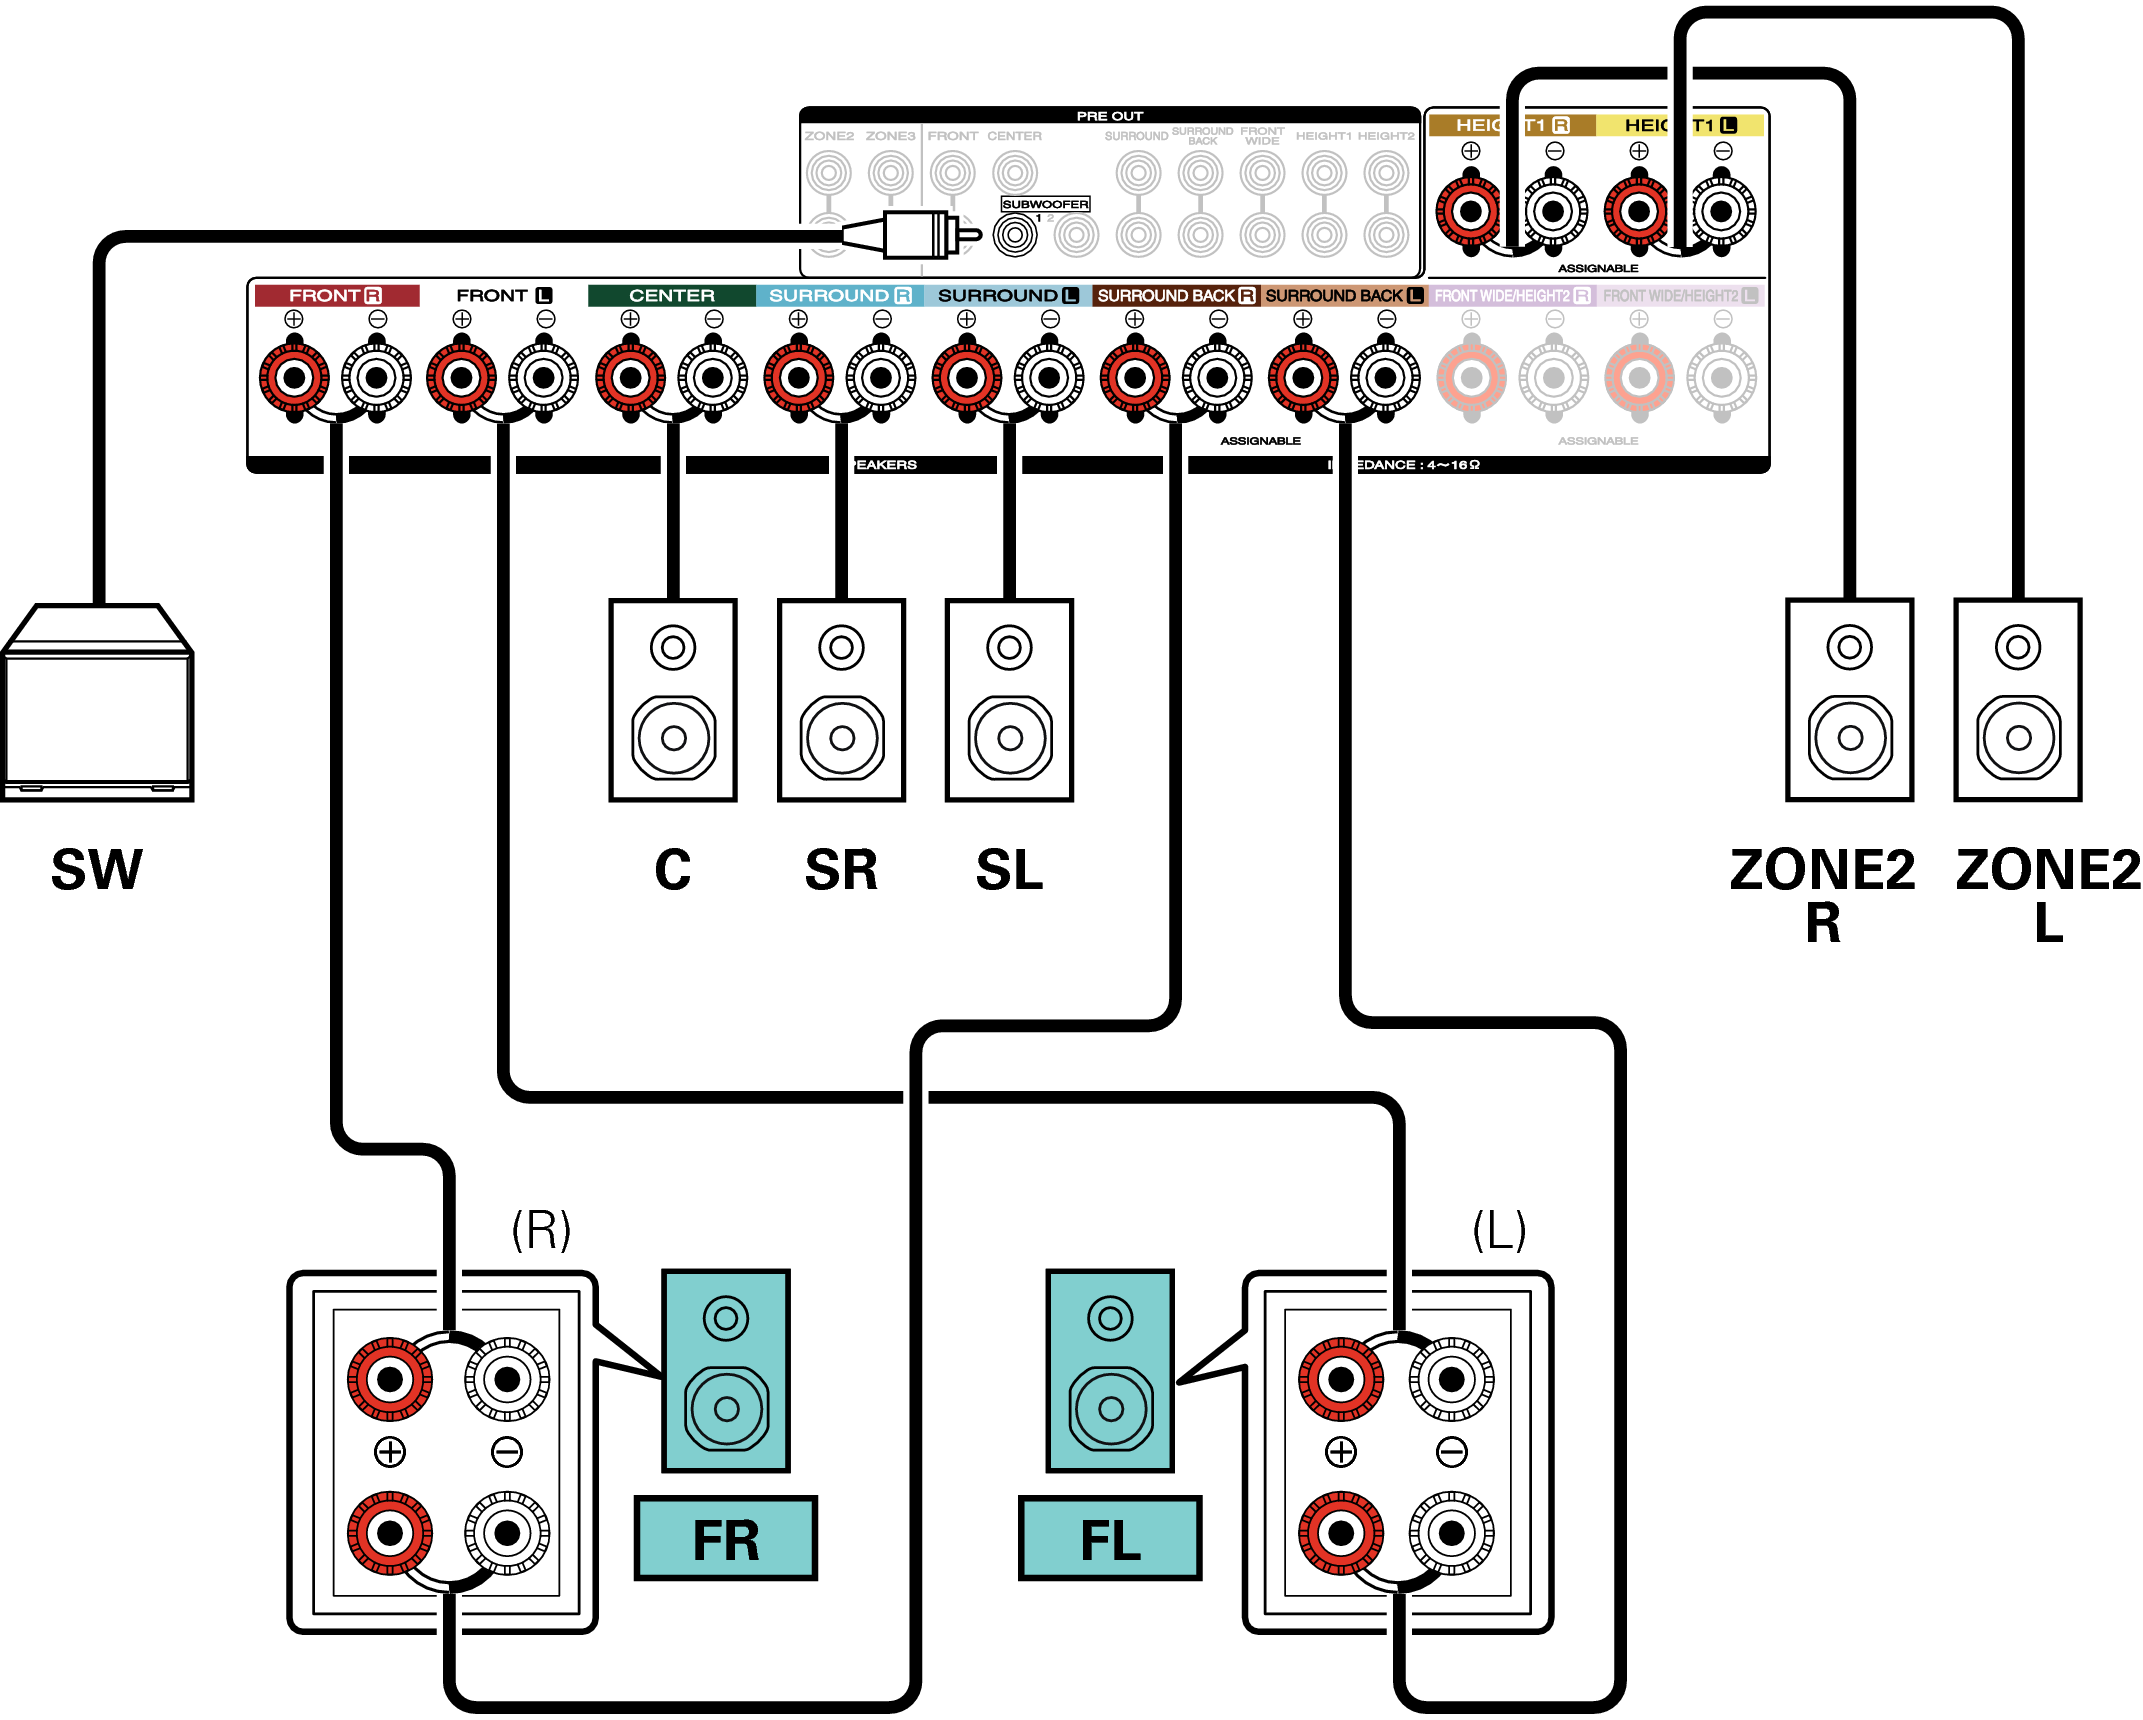
This system plays back 7.1-channels. You can use the bi-amp connection for front speakers. Bi-amp connection is a method to connect separate amplifiers to the tweeter terminal and woofer terminal of a speaker that supports bi-amplification. This connection enables back EMF (power returned without being output) from the woofer to flow into the tweeter without affecting the sound quality, producing a higher sound quality.
You can connect speakers for up to 9-channels for MAIN ZONE. When you connect speakers for 8 or more channels, the output speakers automatically switch according to the input signal and sound mode.
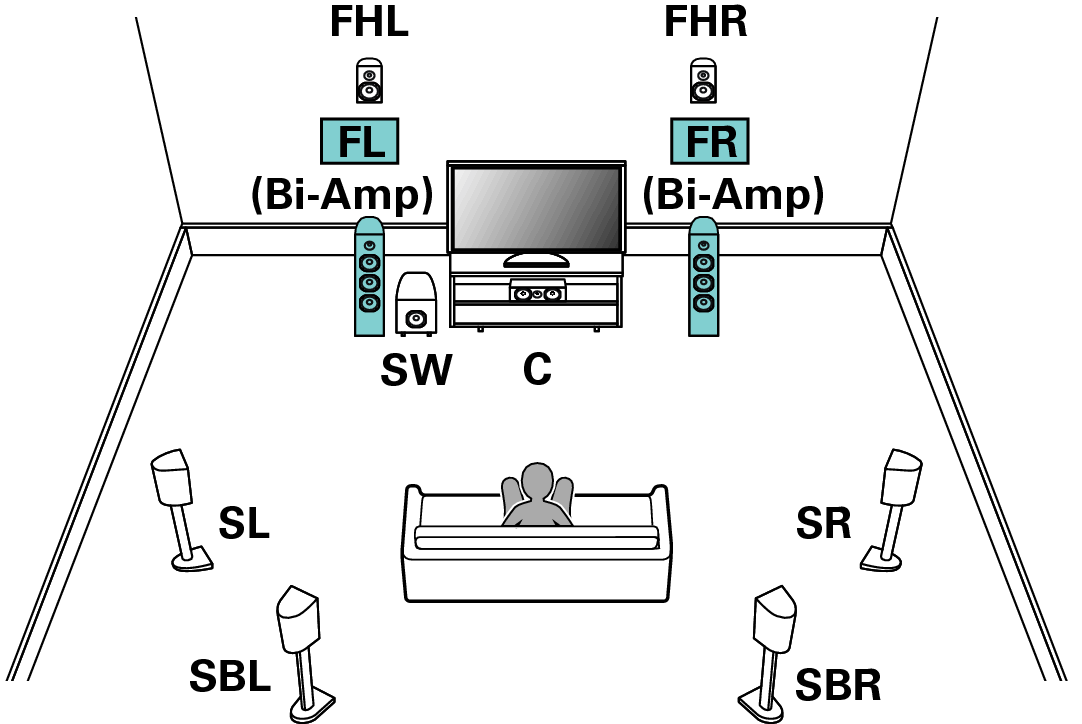
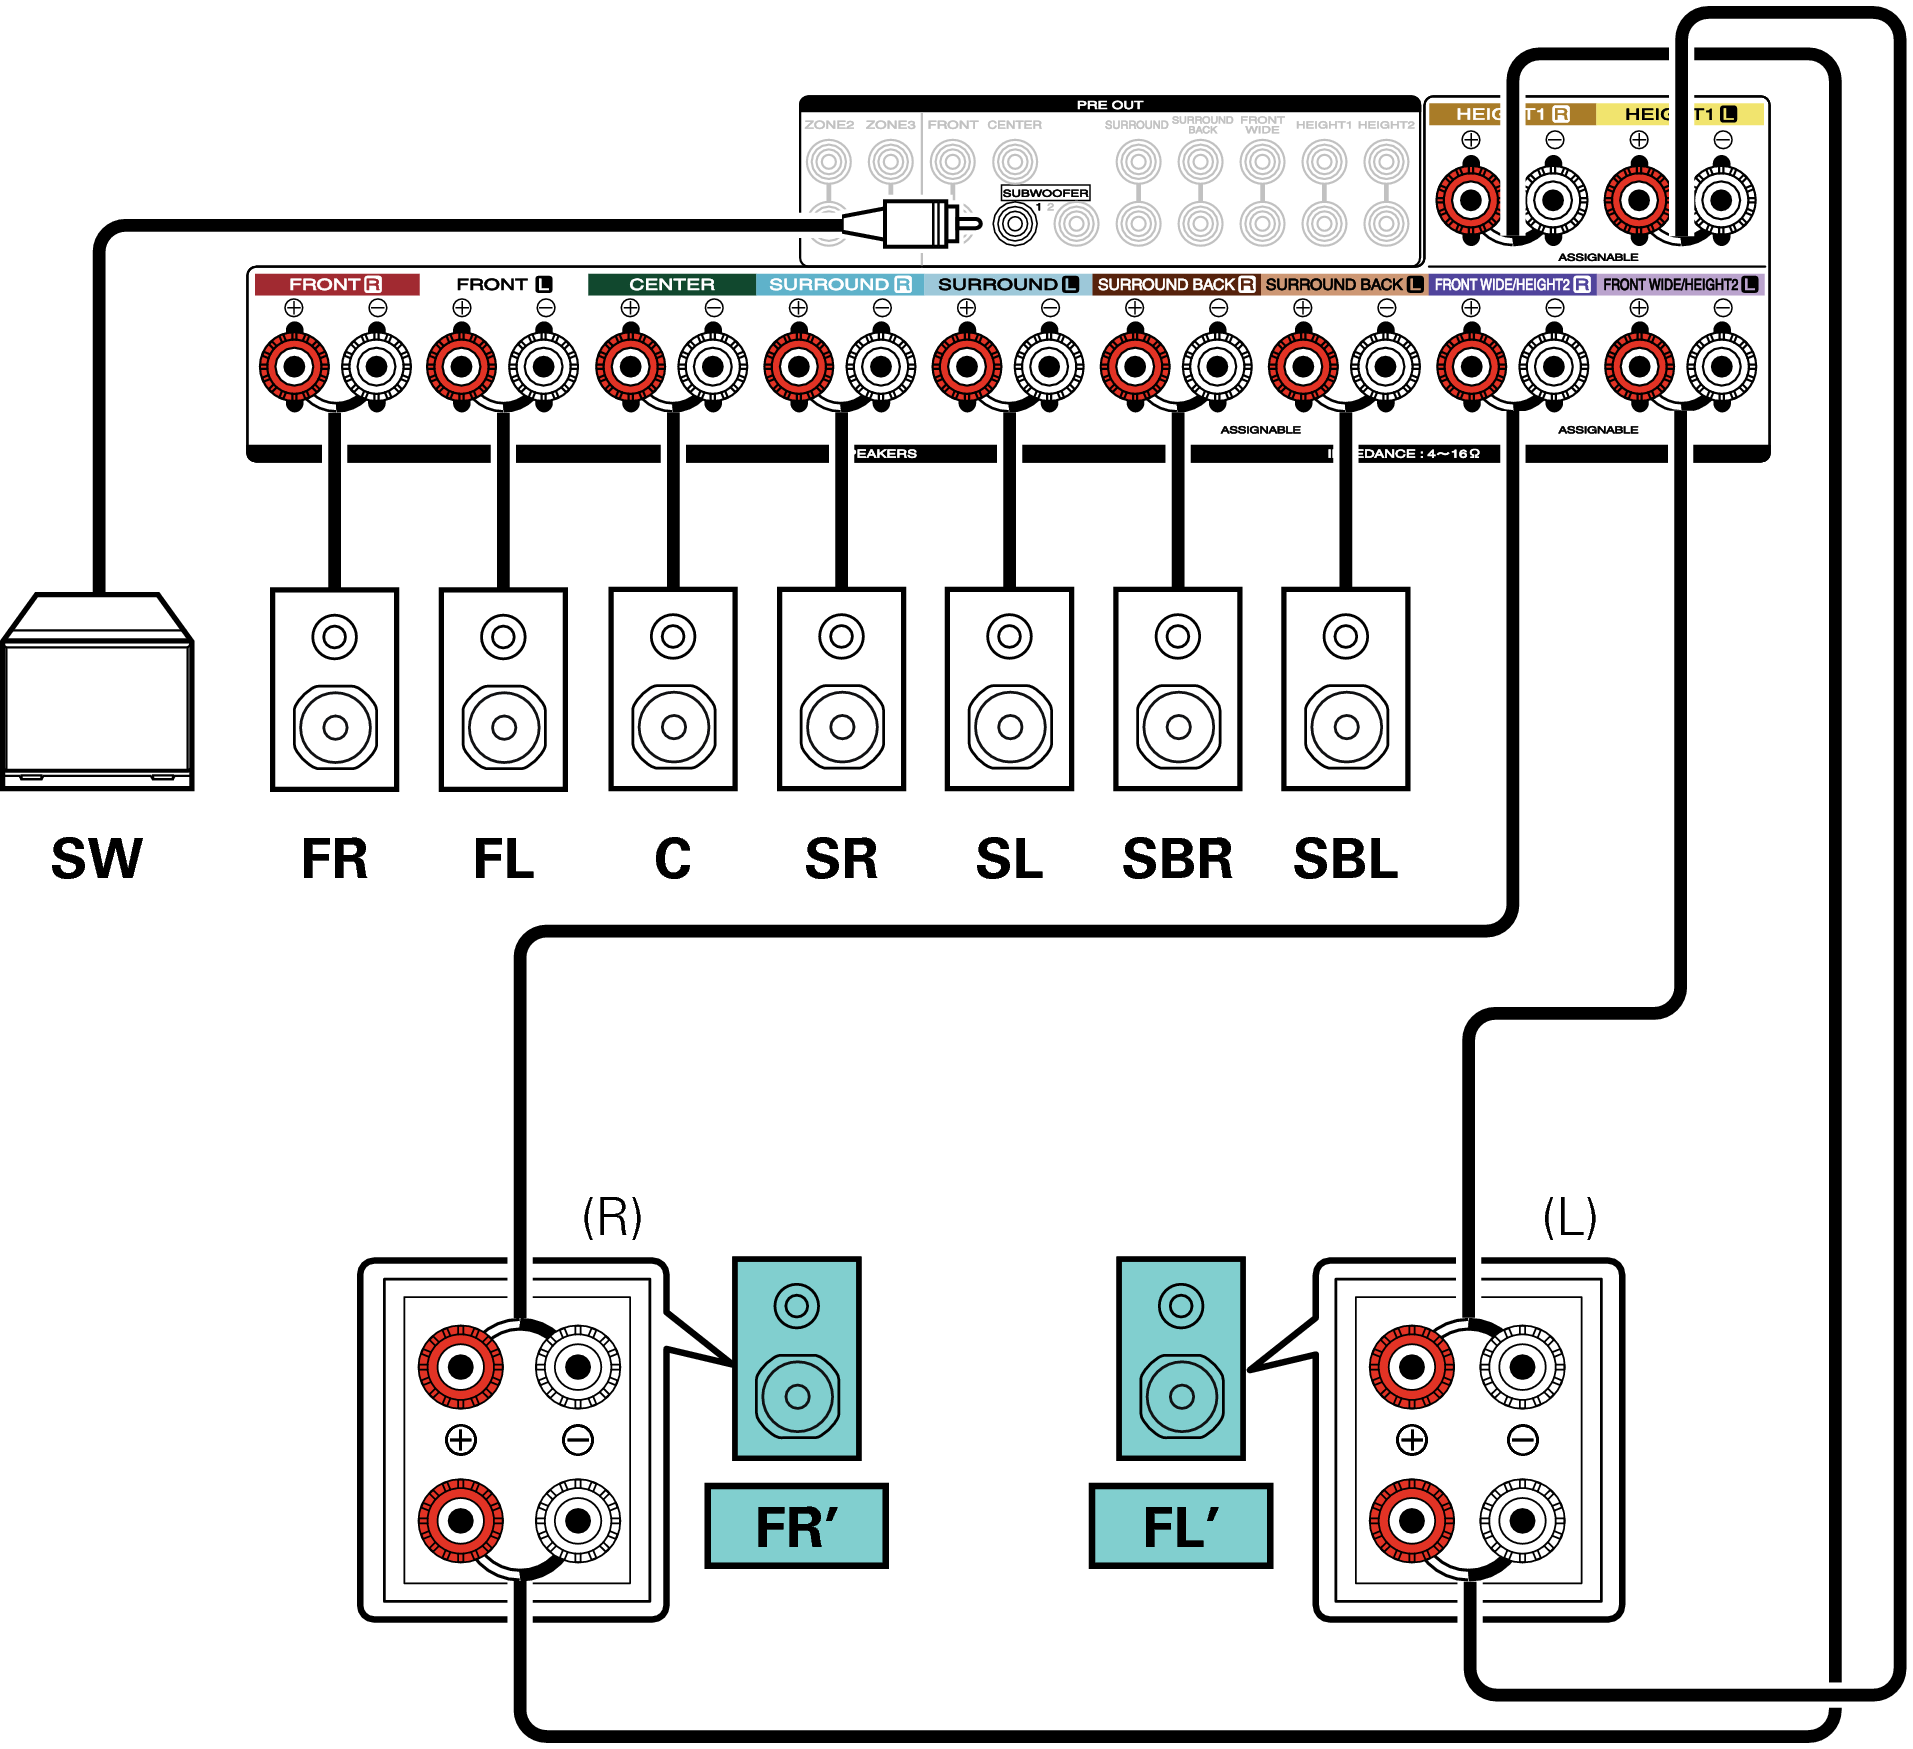
When making bi-amp connections, be sure to remove the short-circuiting plate or wire between the speaker’s woofer and tweeter terminals.
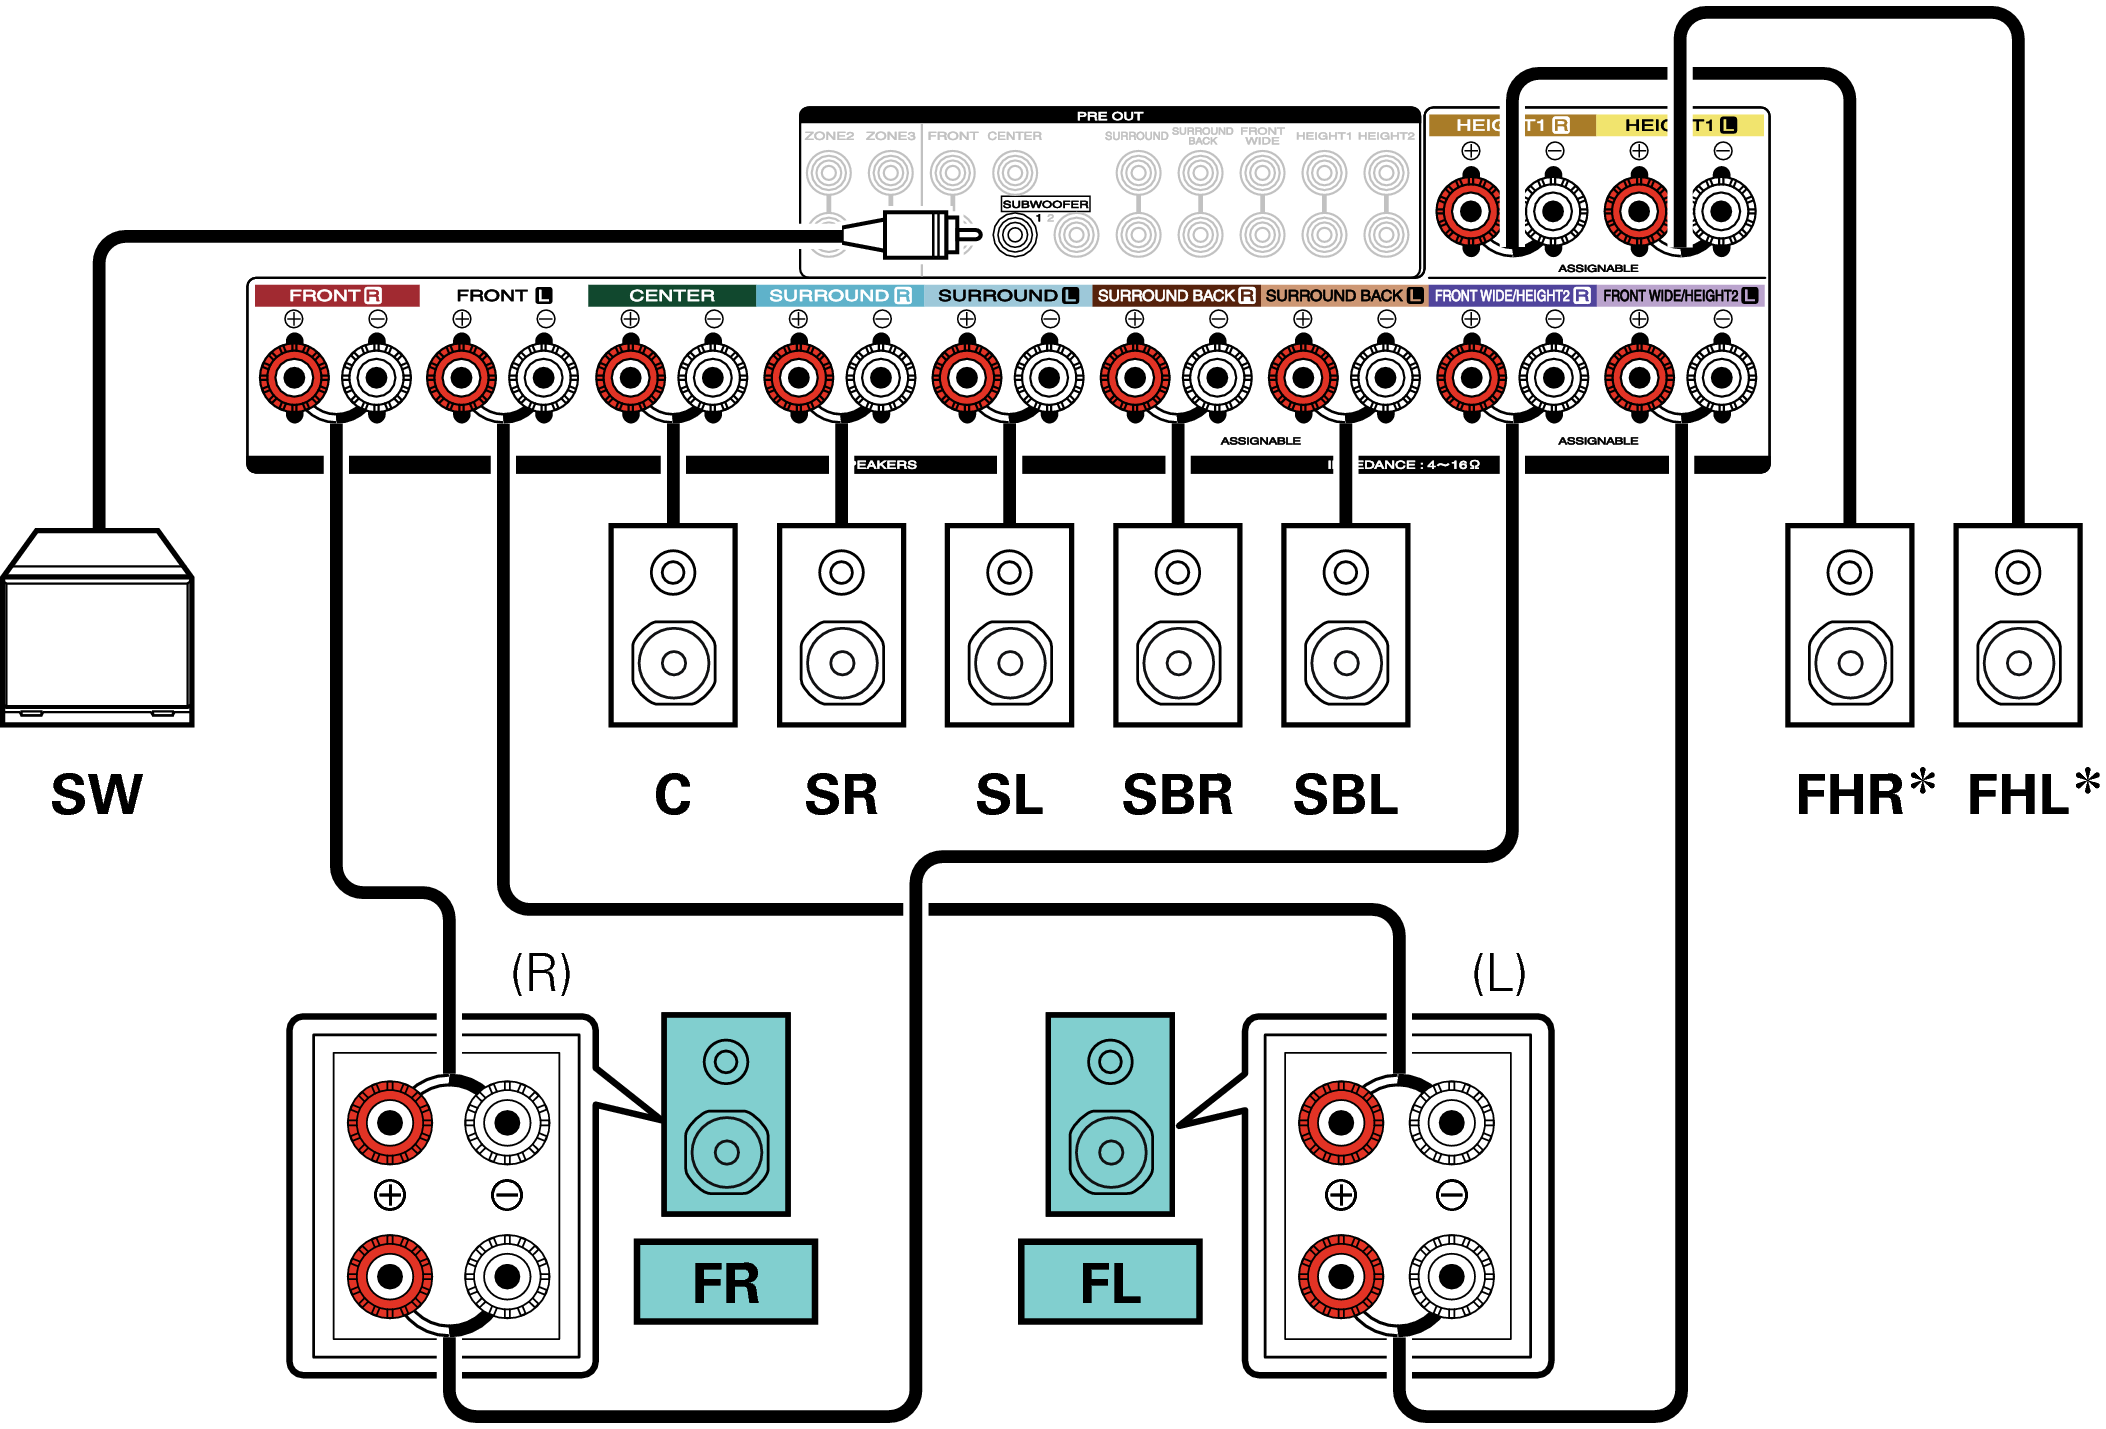
The height speakers, ceiling speakers and Dolby Atmos Enabled speakers can be connected to the HEIGHT1 speaker terminals. Set the speaker to be connected from “Height” - “Layout” in the menu. link
Exclusive 9.1-channel playback + 2-channel playback speakers
You can connect speakers used exclusively for 2-channel playback, which are used for the direct and stereo modes, and speakers used exclusively for 9.1 multi-channel playback. The speakers used exclusively for multi-channel playback and the speakers used exclusively for 2-channel playback are automatically switched for playback in accordance with the sound mode.

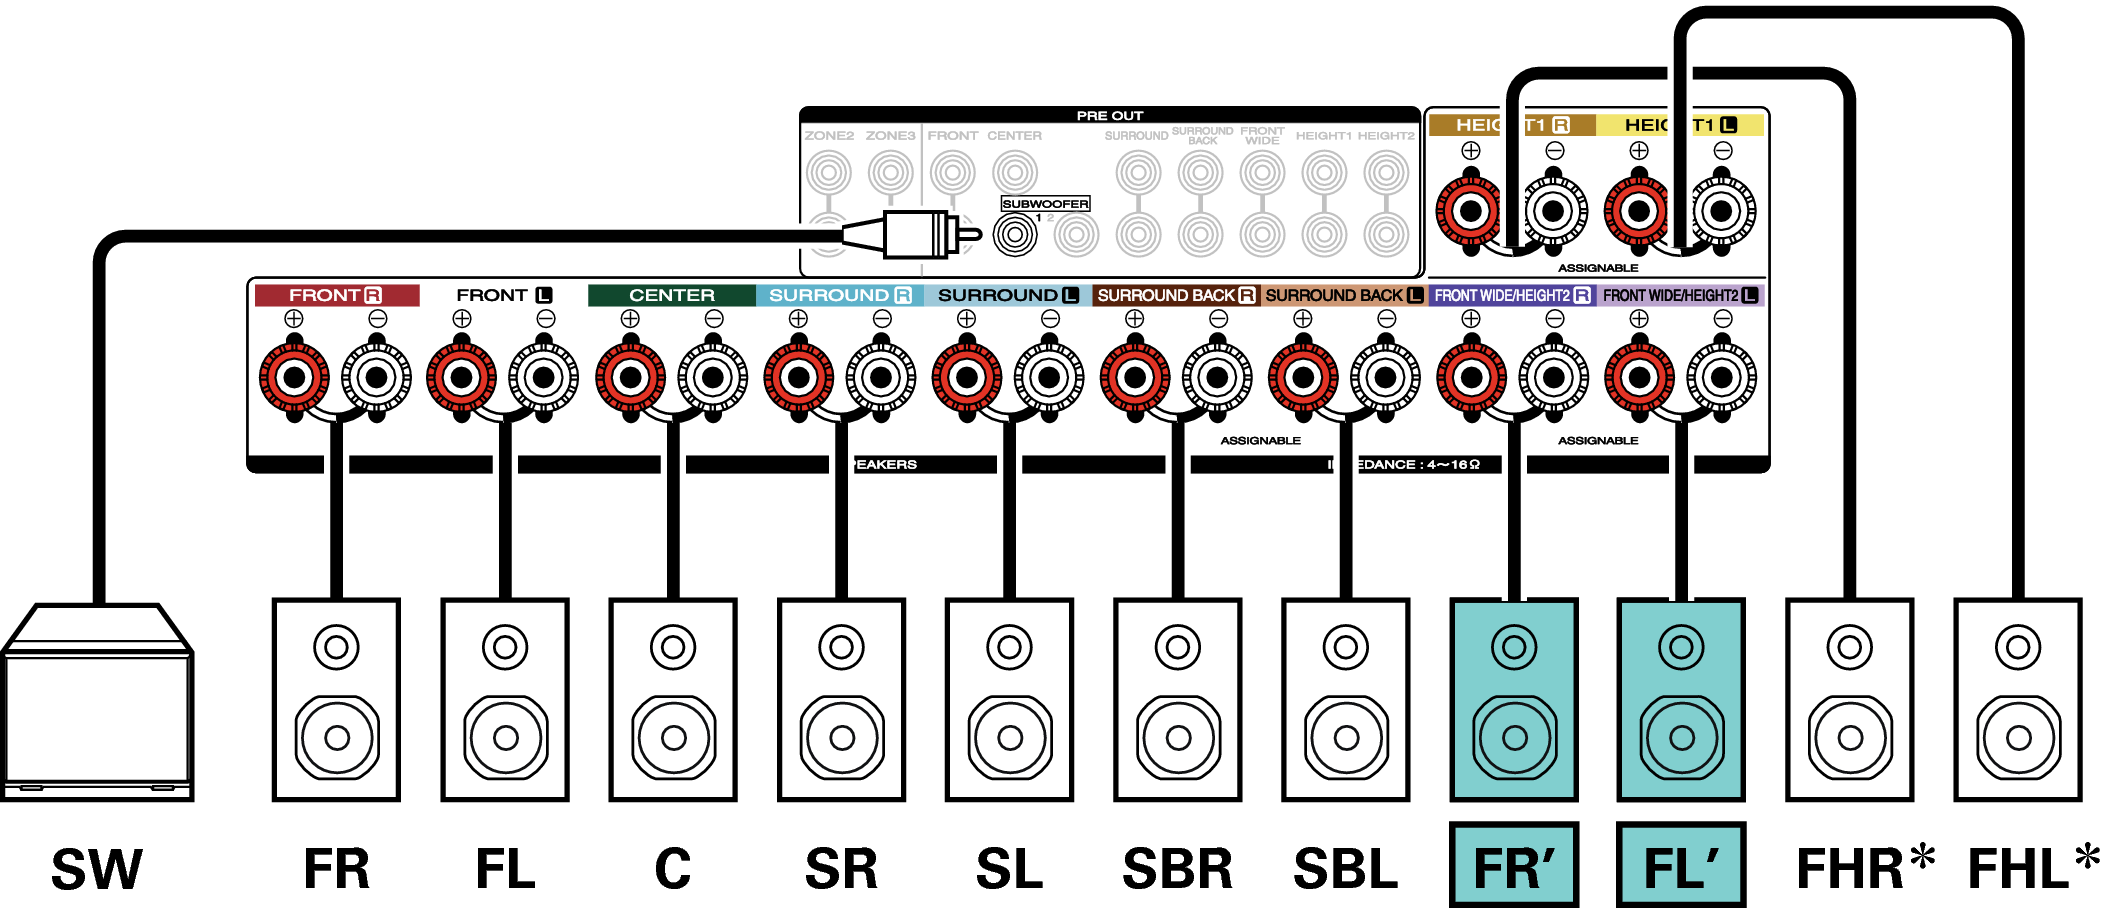
The height speakers, ceiling speakers and Dolby Atmos Enabled speakers can be connected to the HEIGHT1 speaker terminals. Set the speaker to be connected from “Height” - “Layout” in the menu. link
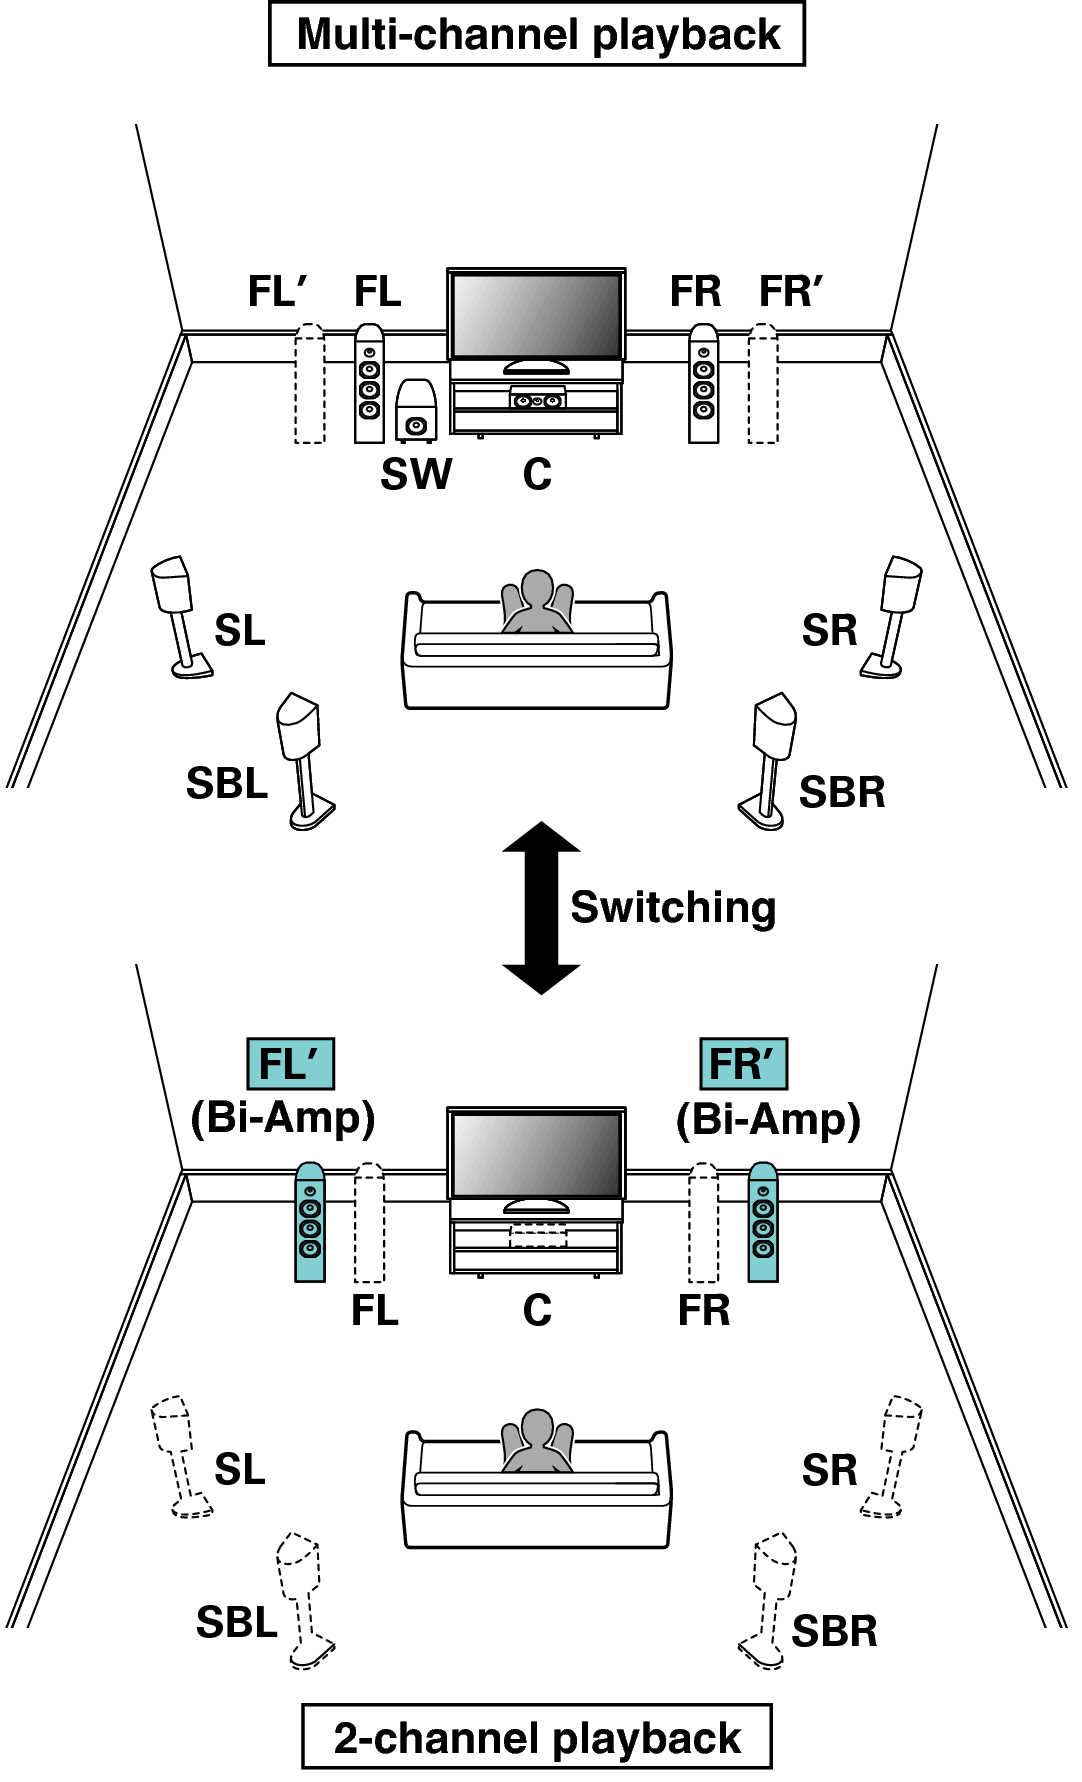
Exclusive 7.1-channel playback + 2-channel playback (bi-amp connection) speakers
You can connect speakers used exclusively for 2-channel playback, which are used for the direct and stereo modes, and speakers used exclusively for 7.1 multi-channel playback. You can use the bi-amp connection for the speakers exclusively used for 2-channel playback. The speakers used exclusively for multi-channel playback and the speakers used exclusively for 2-channel playback are automatically switched for playback in accordance with the sound mode.
7.1-channel playback + second pair of front speakers
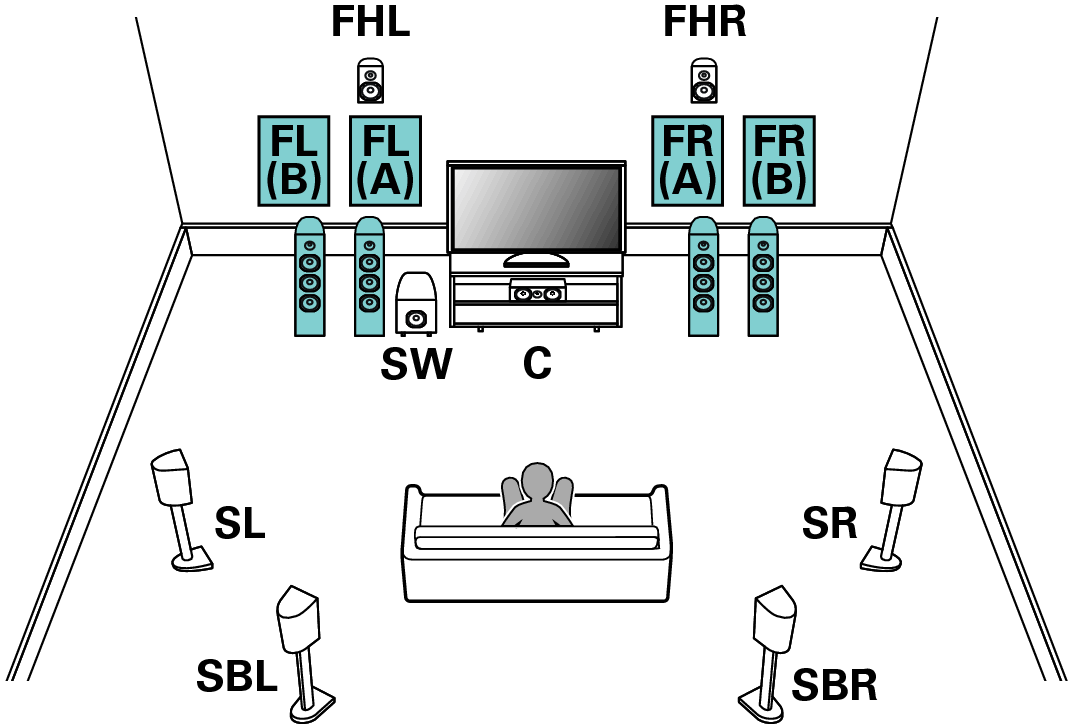
This system enables switching playback between front speakers A and B as desired.
You can connect speakers for up to 9-channels for MAIN ZONE. When you connect speakers for 8 or more channels, the output speakers automatically switch according to the input signal and sound mode.
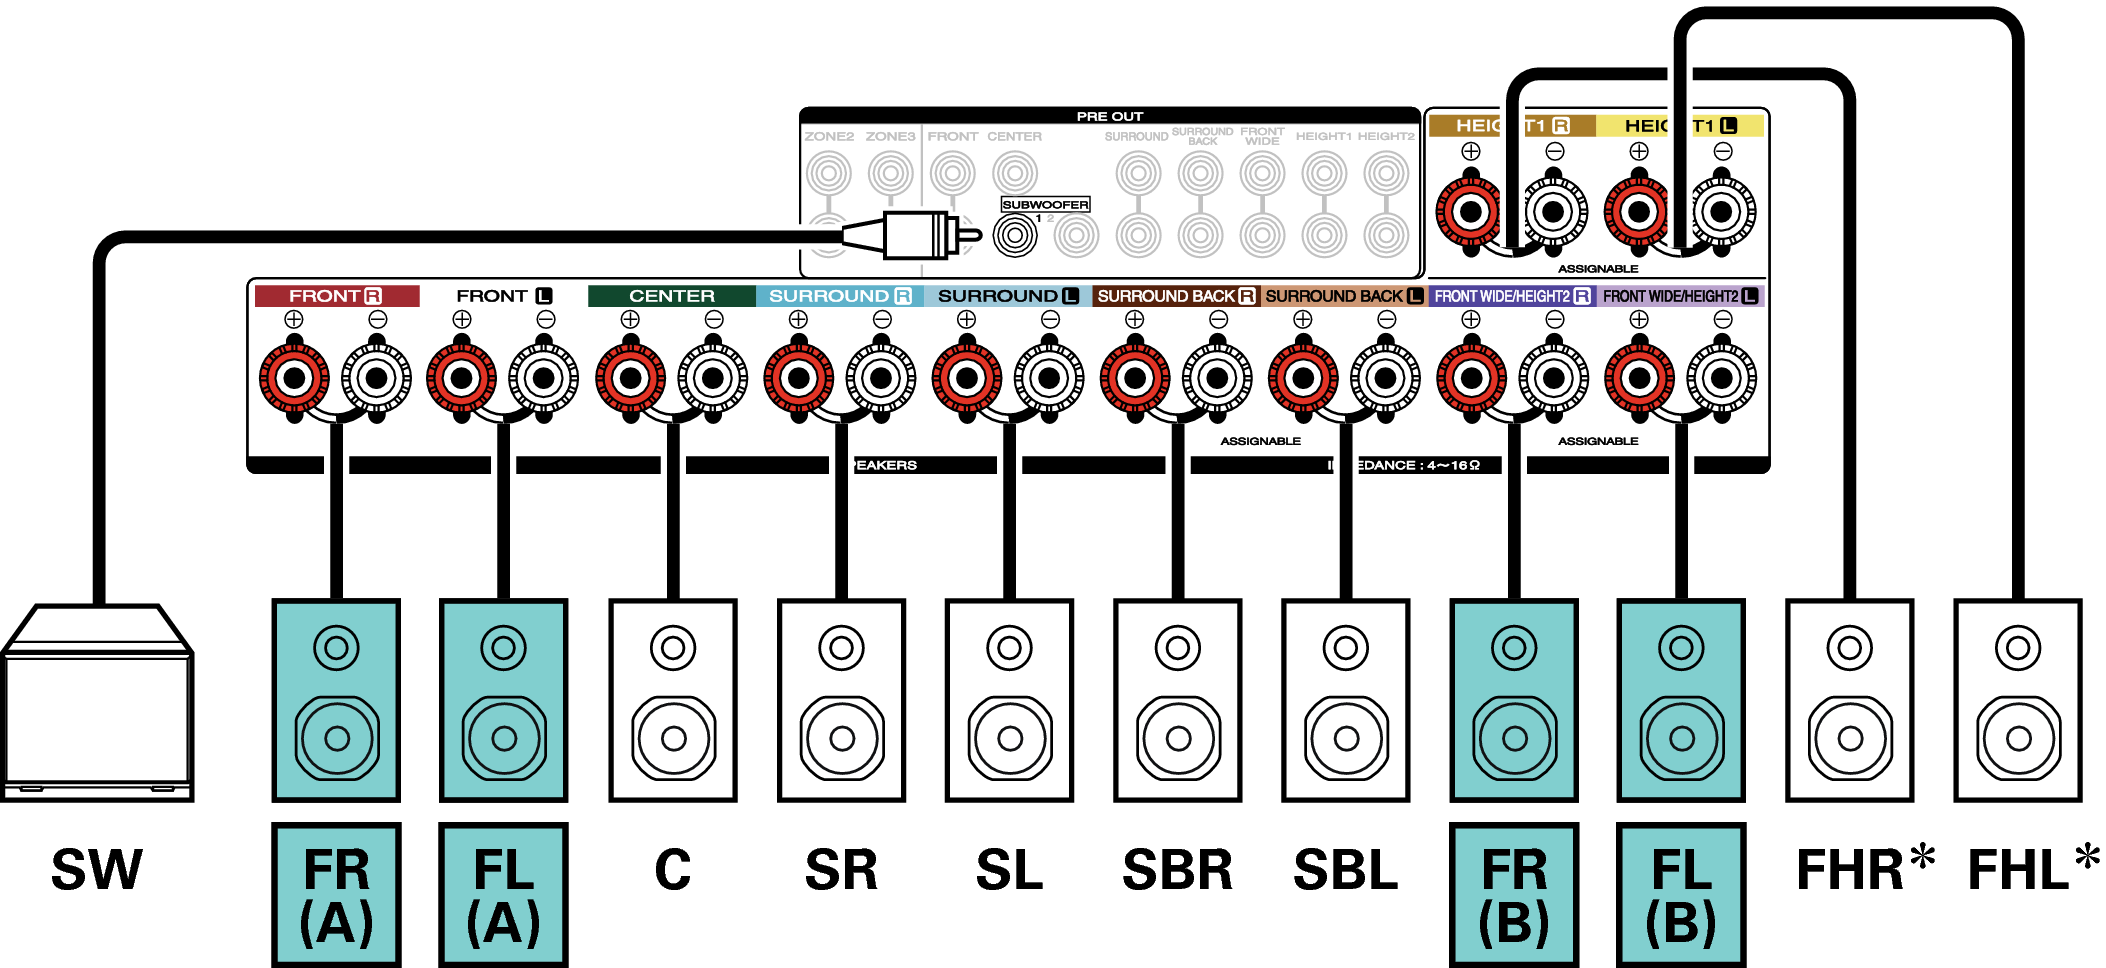
The height speakers, ceiling speakers and Dolby Atmos Enabled speakers can be connected to the HEIGHT1 speaker terminals. Set the speaker to be connected from “Height” - “Layout” in the menu. link
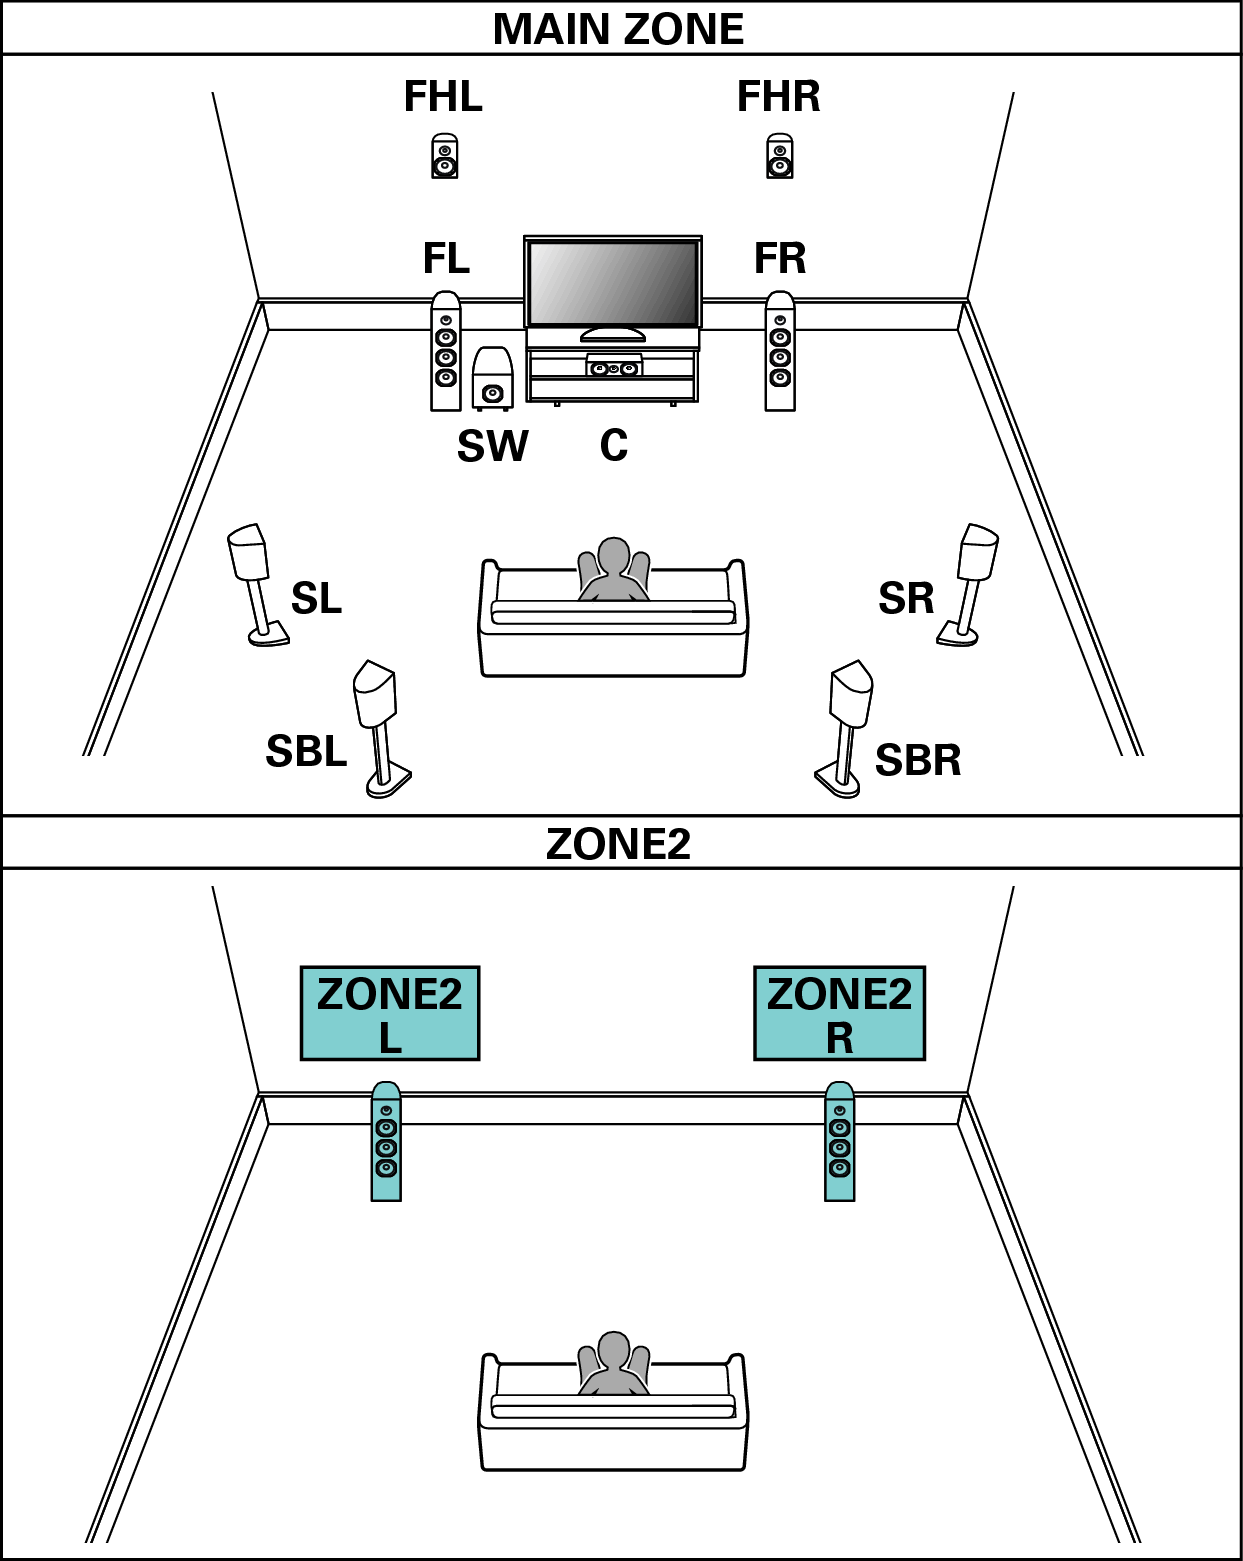
7.1-channel playback (MAIN ZONE) + 2-channel playback (ZONE2 or ZONE3)
This type of configuration plays back 7.1-channels in MAIN ZONE and 2-channels in ZONE2.
(Speakers can output audio from ZONE3 instead of ZONE2 (Assign Mode: 7.1ch + ZONE3)).
You can connect speakers for up to 9-channels for MAIN ZONE. When you connect speakers for 8 or more channels, the output speakers automatically switch according to the input signal and sound mode.
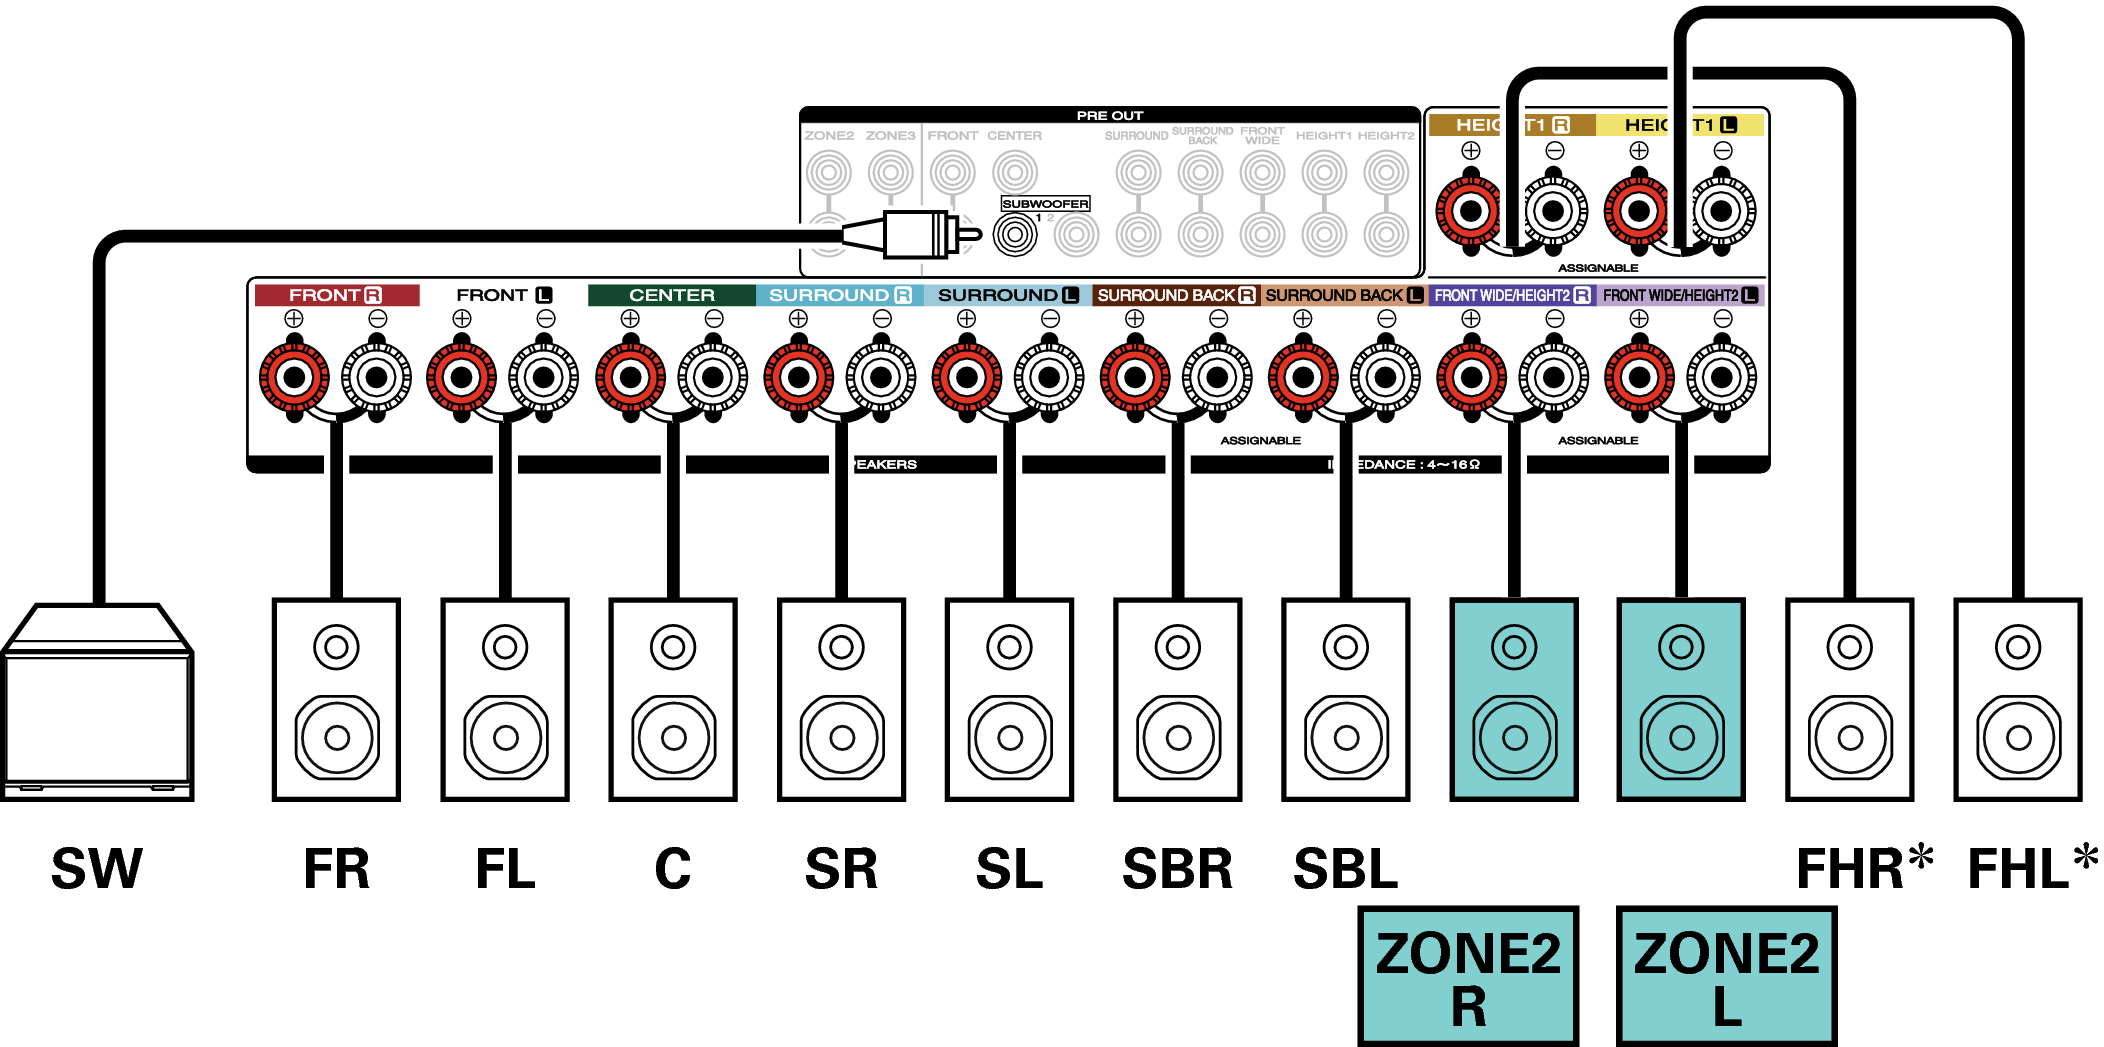
The height speakers, ceiling speakers and Dolby Atmos Enabled speakers can be connected to the HEIGHT1 speaker terminals. Set the speaker to be connected from “Height” - “Layout” in the menu. link
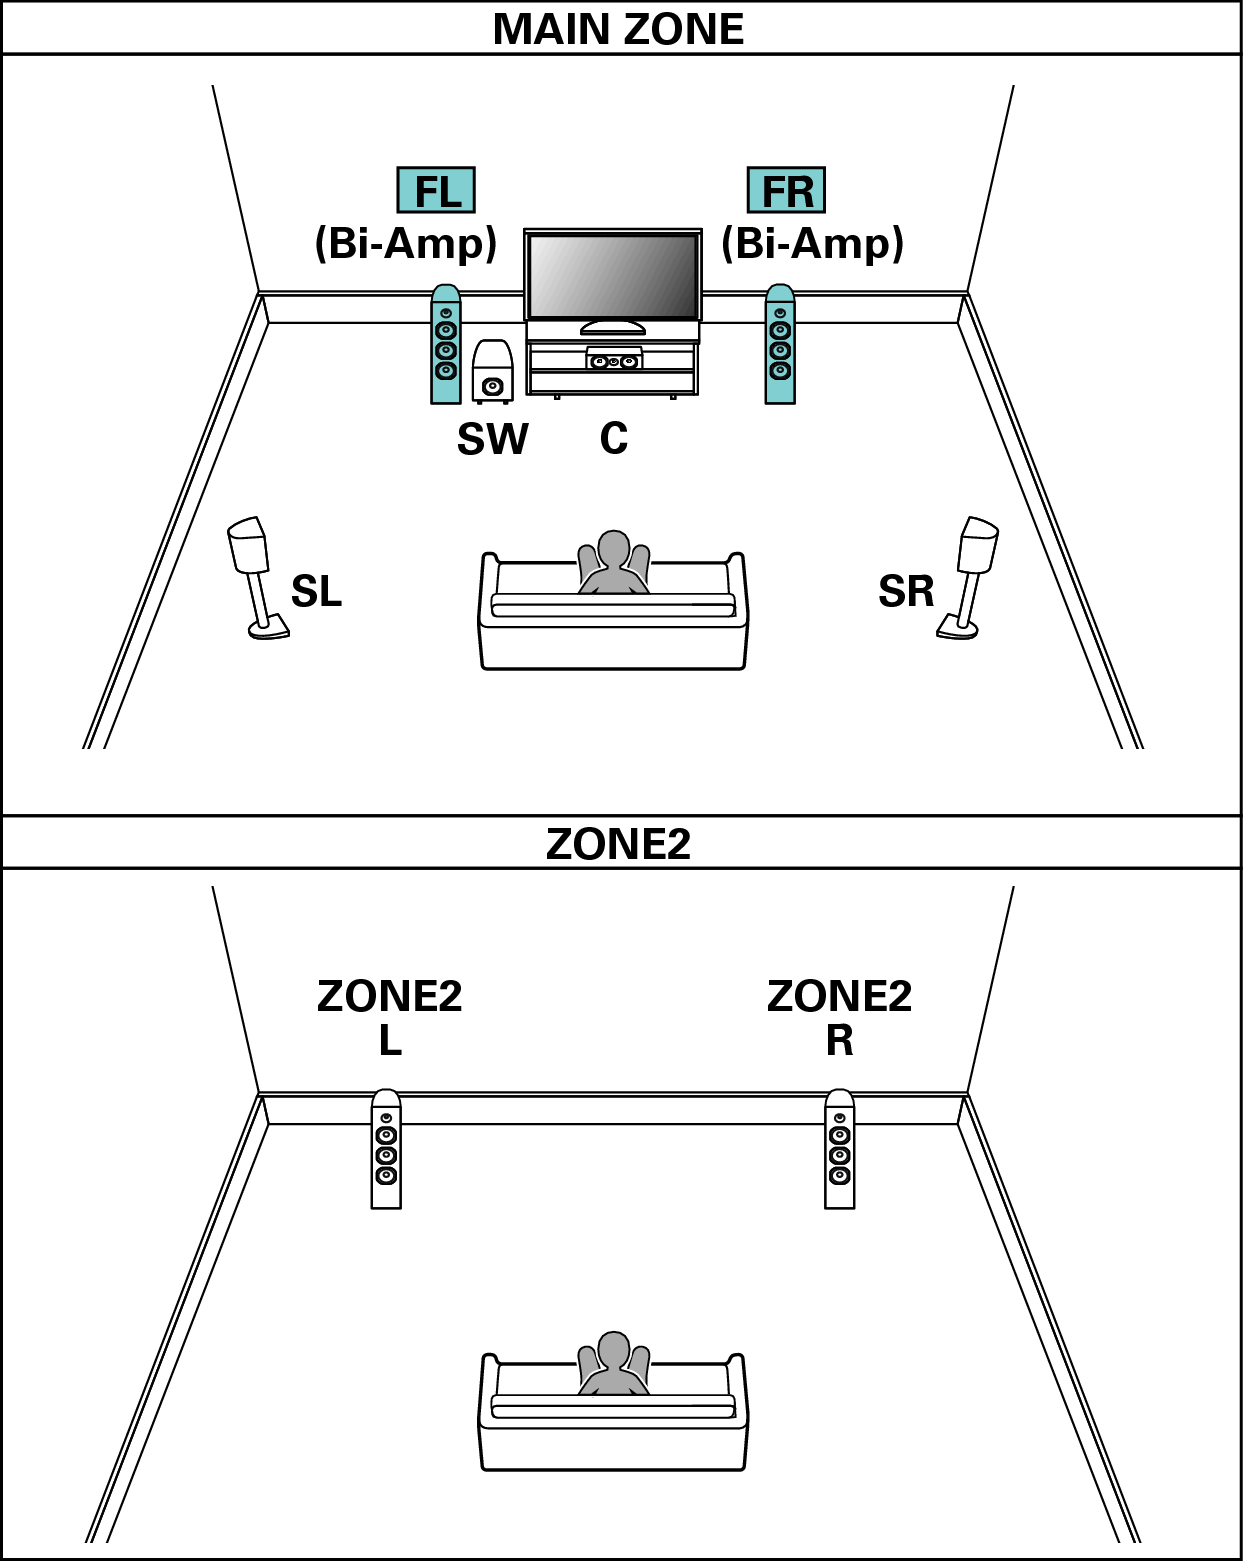
5.1-channel playback (bi-amp connection of front speakers: MAIN ZONE) + 2-channel playback (ZONE2)
This type of configuration plays back 5.1-channels in MAIN ZONE and 2-channels in ZONE2. You can use the bi-amp connection for front speakers in MAIN ZONE.
5.1-channel playback (MAIN ZONE) + 2-channel playback (ZONE2) + 2-channel playback (ZONE3)
This type of configuration plays back 5.1-channels in MAIN ZONE and 2-channels in ZONE2 and ZONE3.
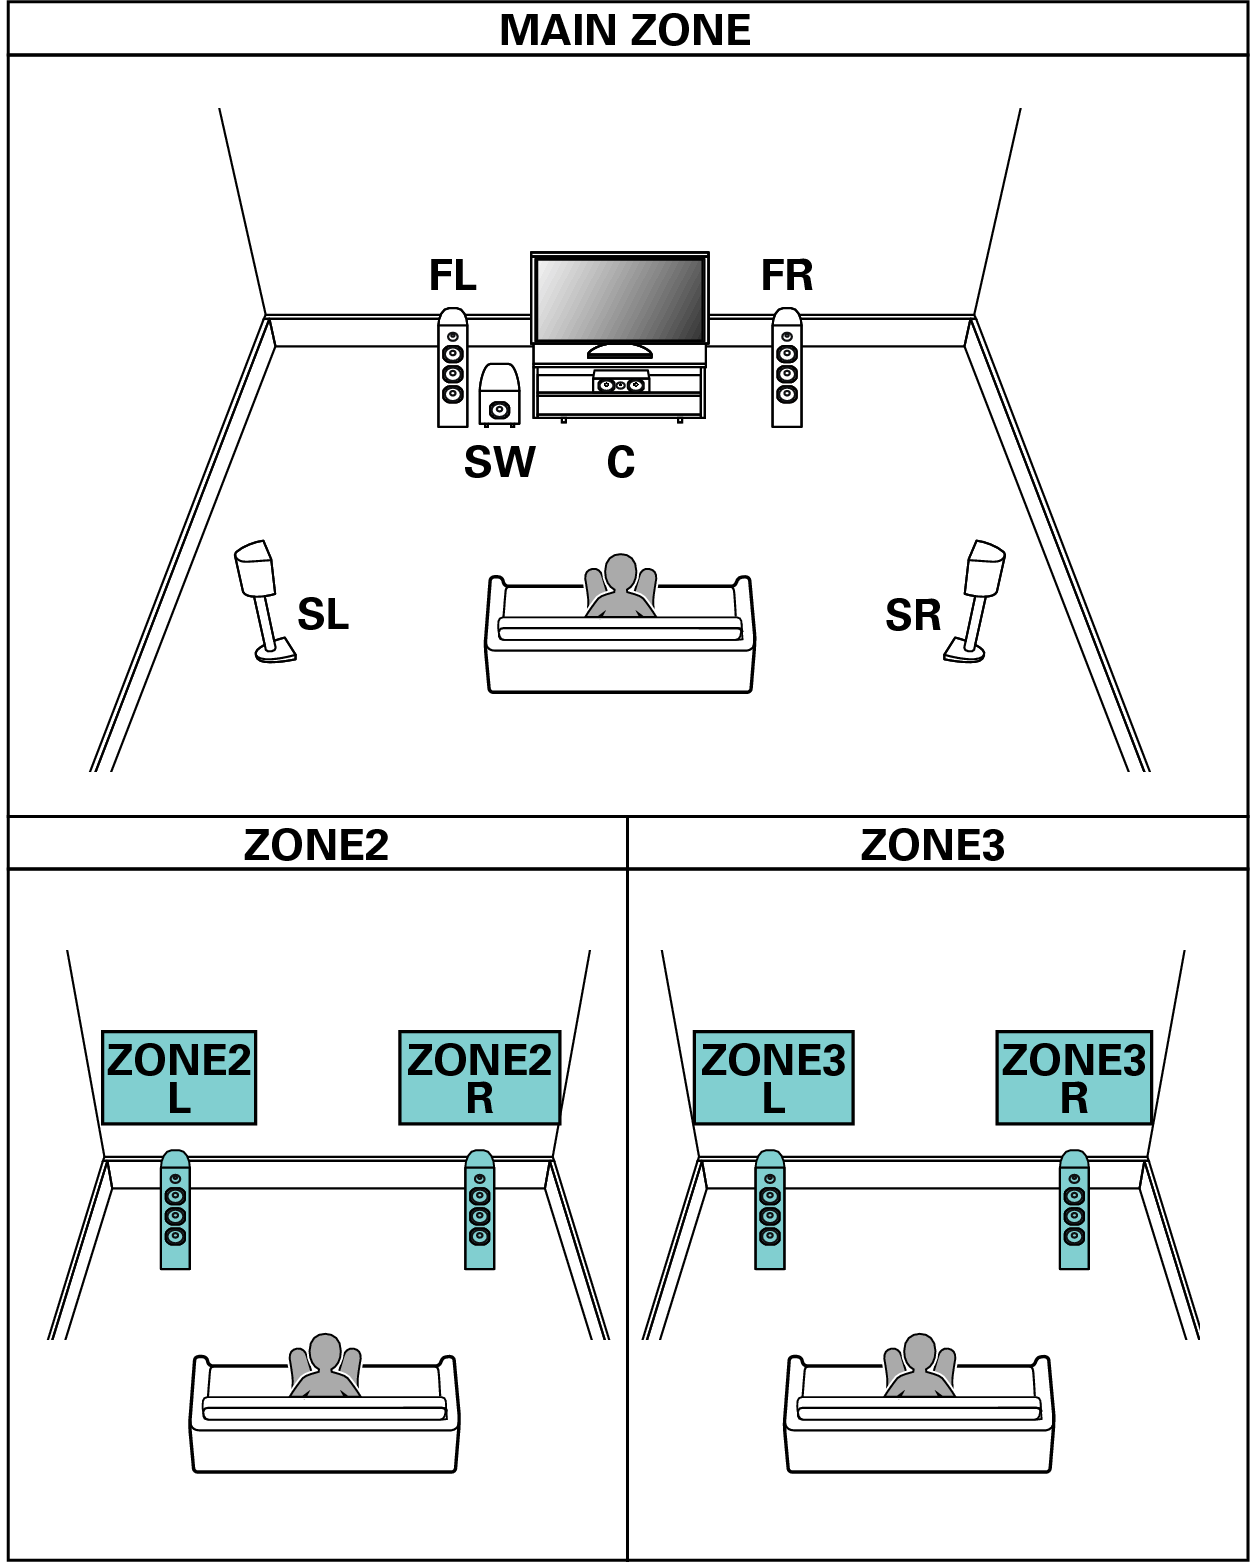
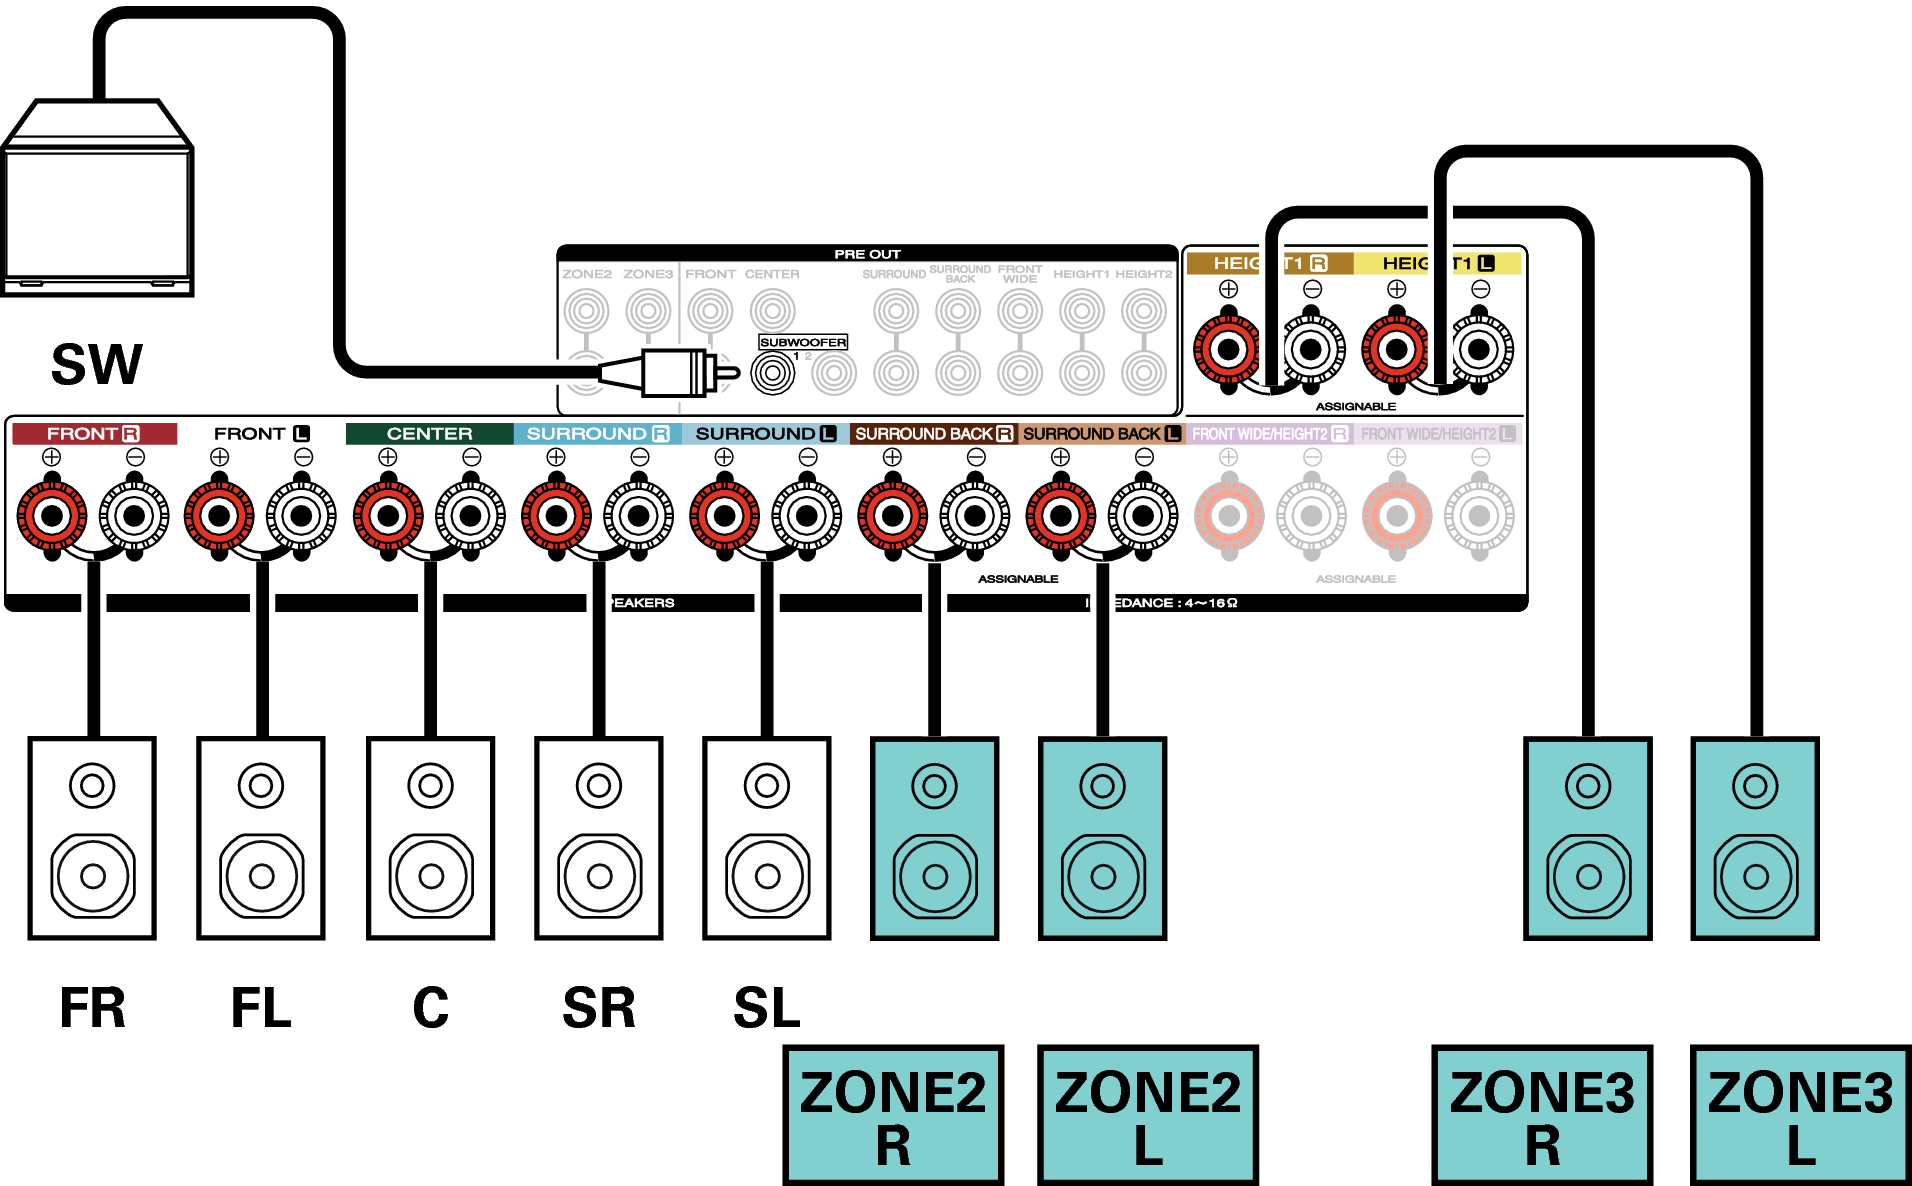
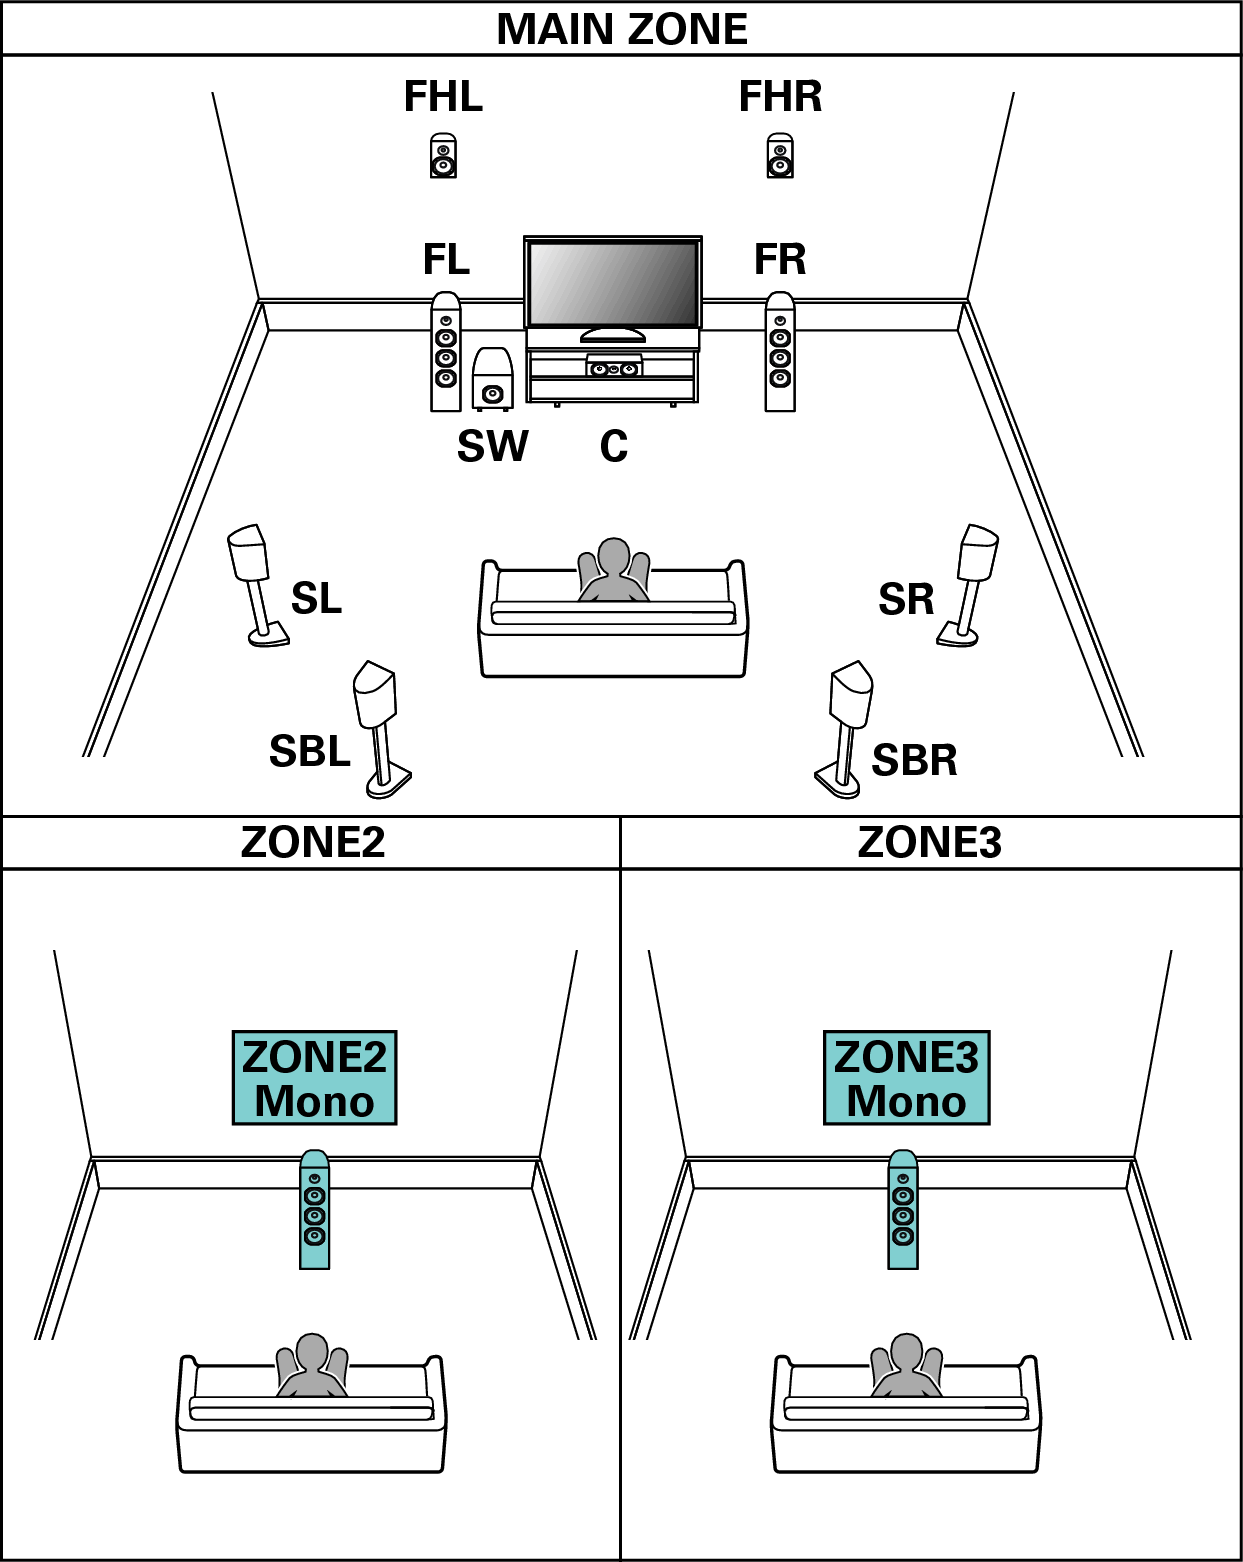
7.1-channel playback (MAIN ZONE) + 1-channel playback (ZONE2) + 1-channel playback (ZONE3)
This type of configuration plays back 7.1-channels in MAIN ZONE and 1-channel (monaural) in ZONE2 and ZONE3.
You can connect speakers for up to 9-channels for MAIN ZONE. When you connect speakers for 8 or more channels, the output speakers automatically switch according to the input signal and sound mode.
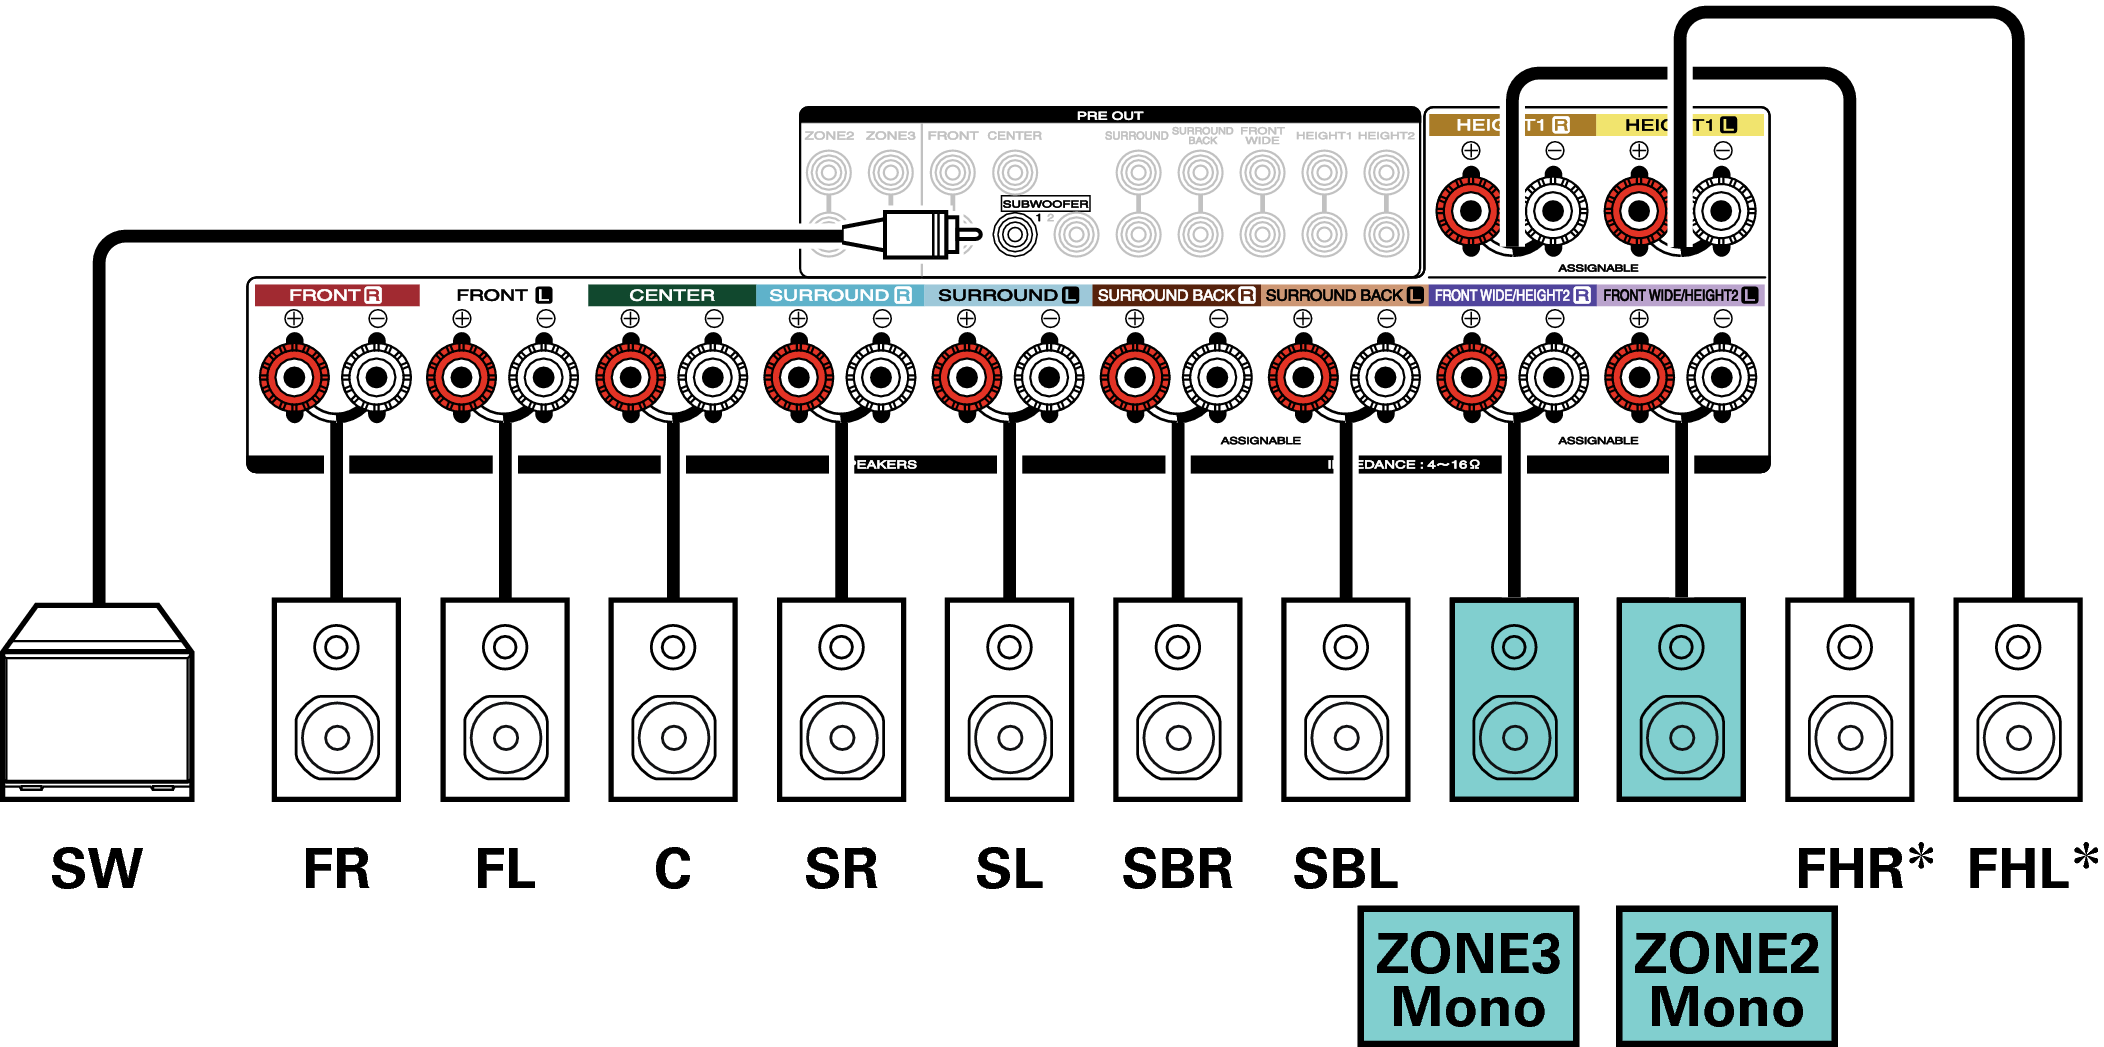
The height speakers, ceiling speakers and Dolby Atmos Enabled speakers can be connected to the HEIGHT1 speaker terminals. Set the speaker to be connected from “Height” - “Layout” in the menu. link
Connecting an external power amplifier
You can use this unit as a pre-amp by connecting an external power amplifier to the PRE OUT connectors. By adding a power amplifier to each channel, the realness of the sound can be further enhanced.
Select the terminal to use and connect the device.
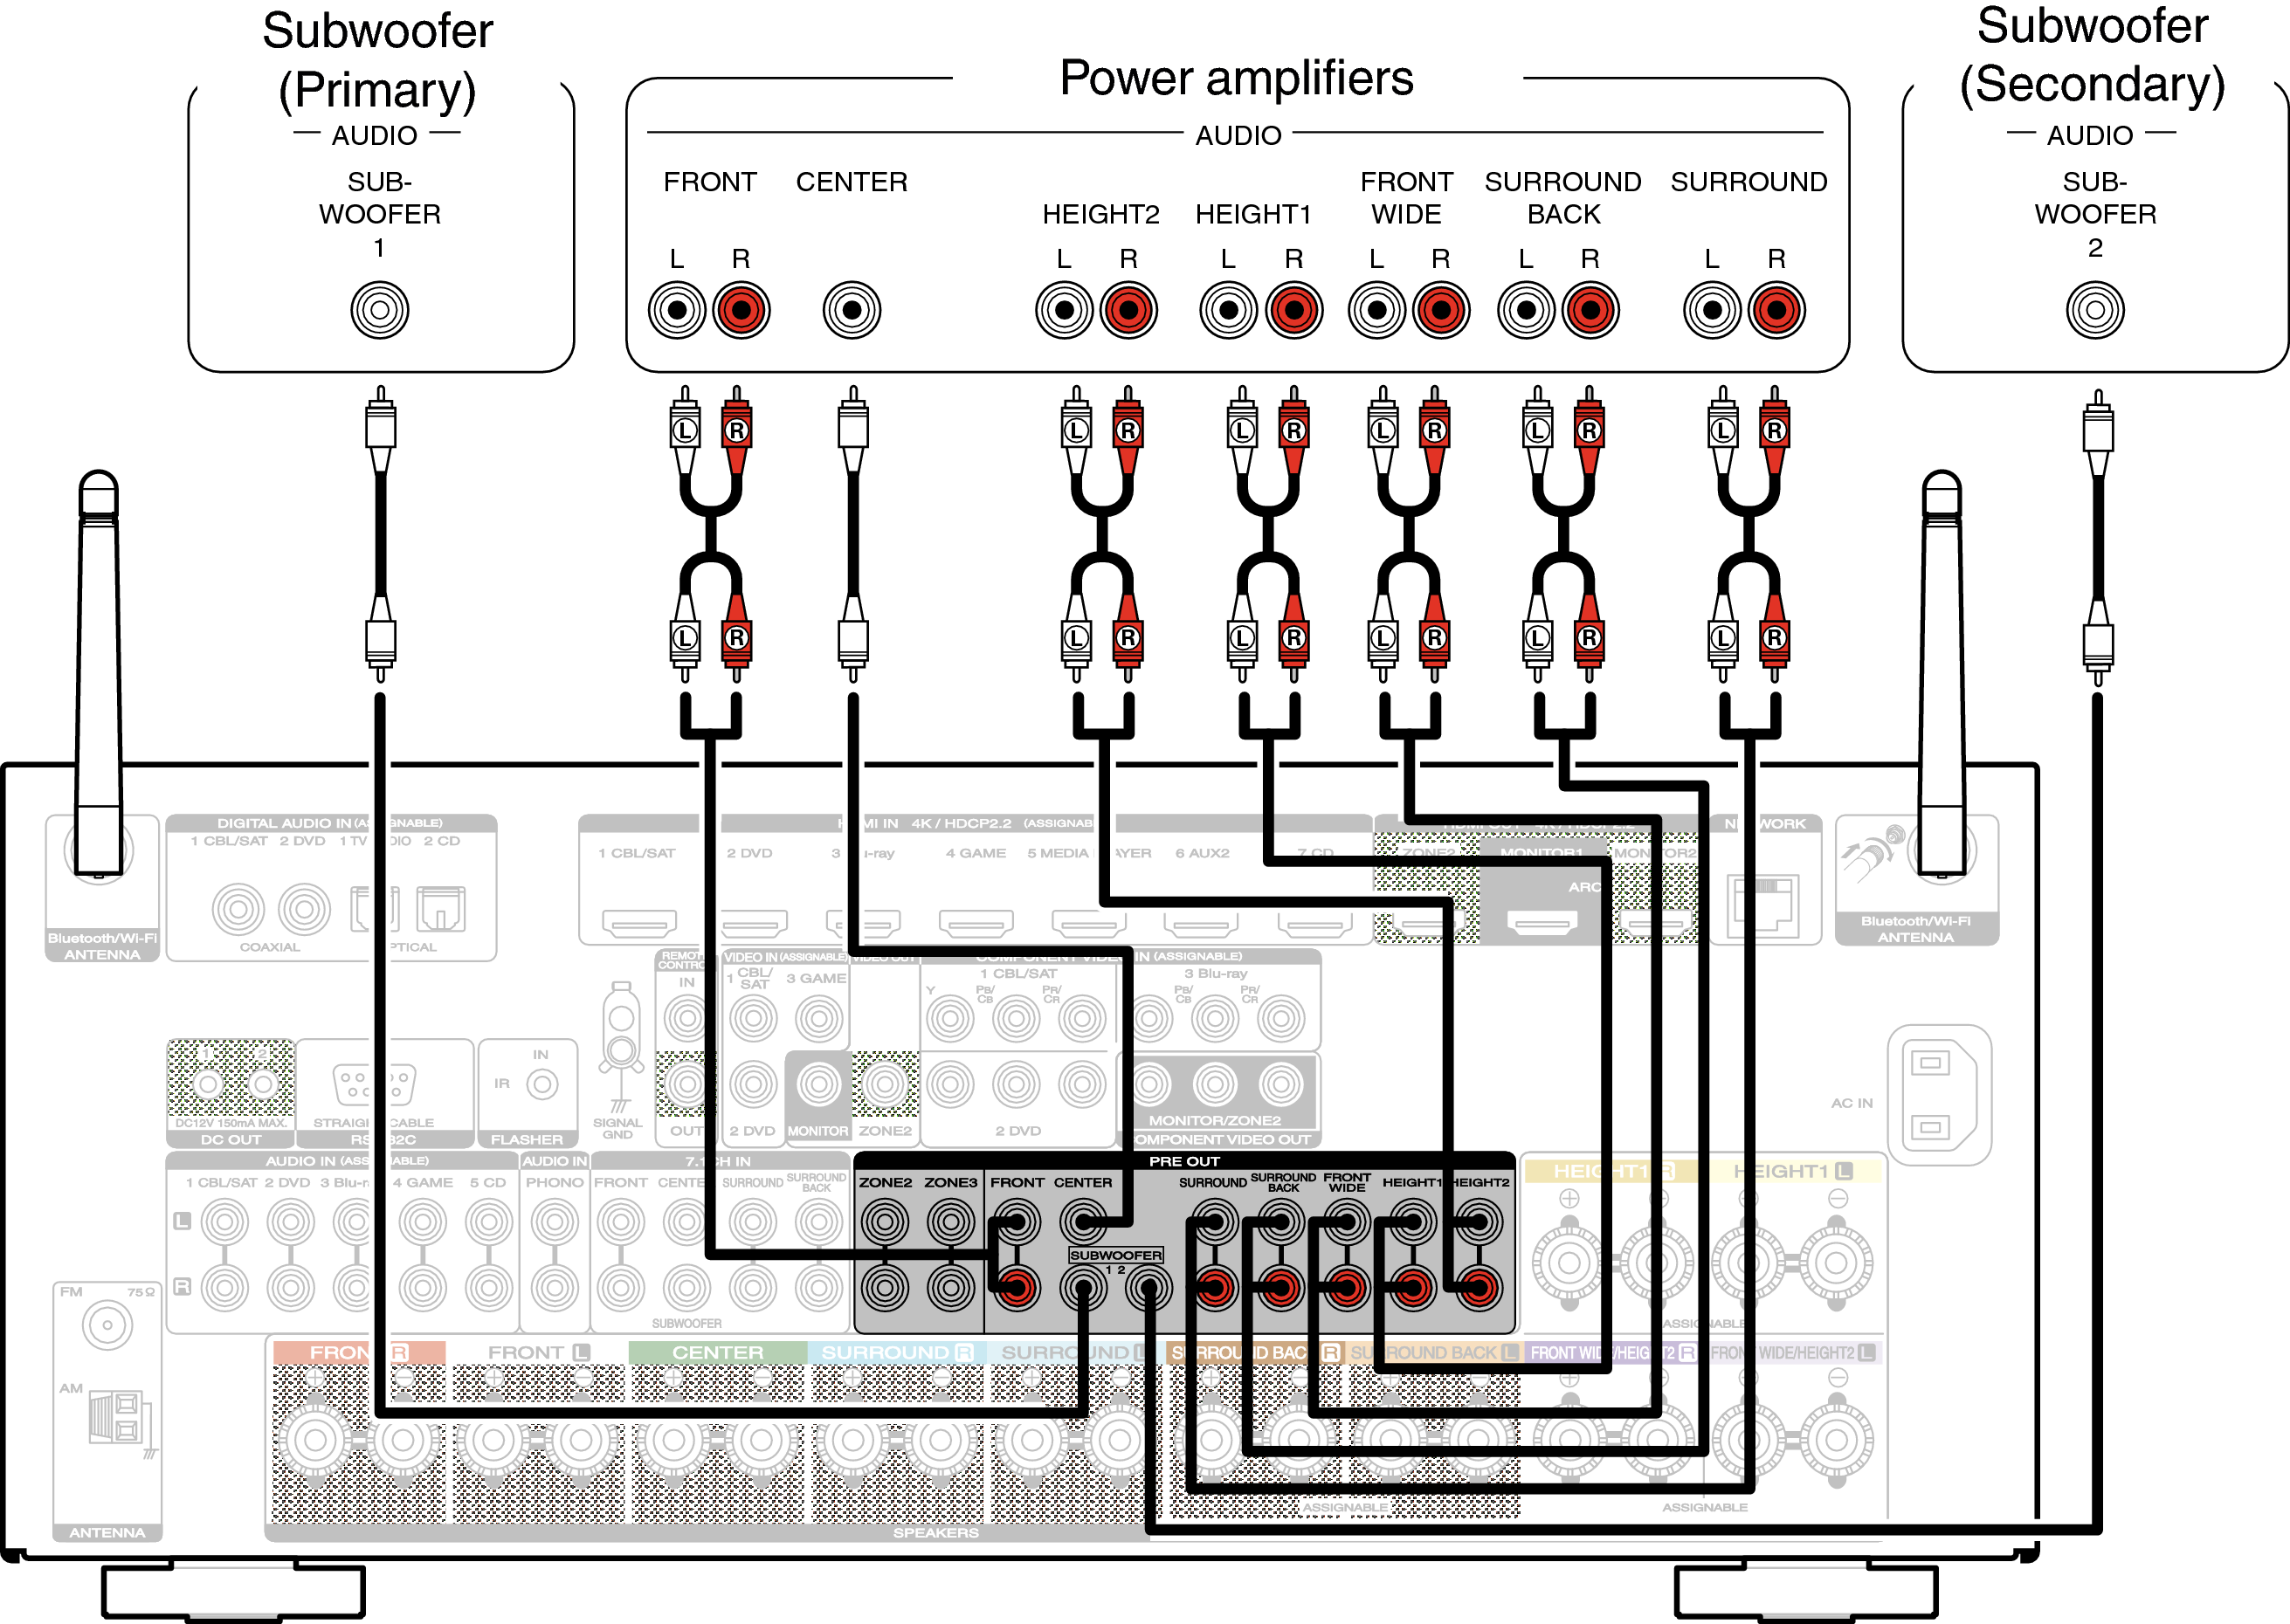
When using just one surround back speaker, connect it to the left channel (L) terminal.

