Search result
Measuring with Dirac Live software
The Dirac Live software is used for the measurement. Follow the instructions in the Dirac Live software to take the measurements.
Start the Dirac Live software on your PC/Mac.
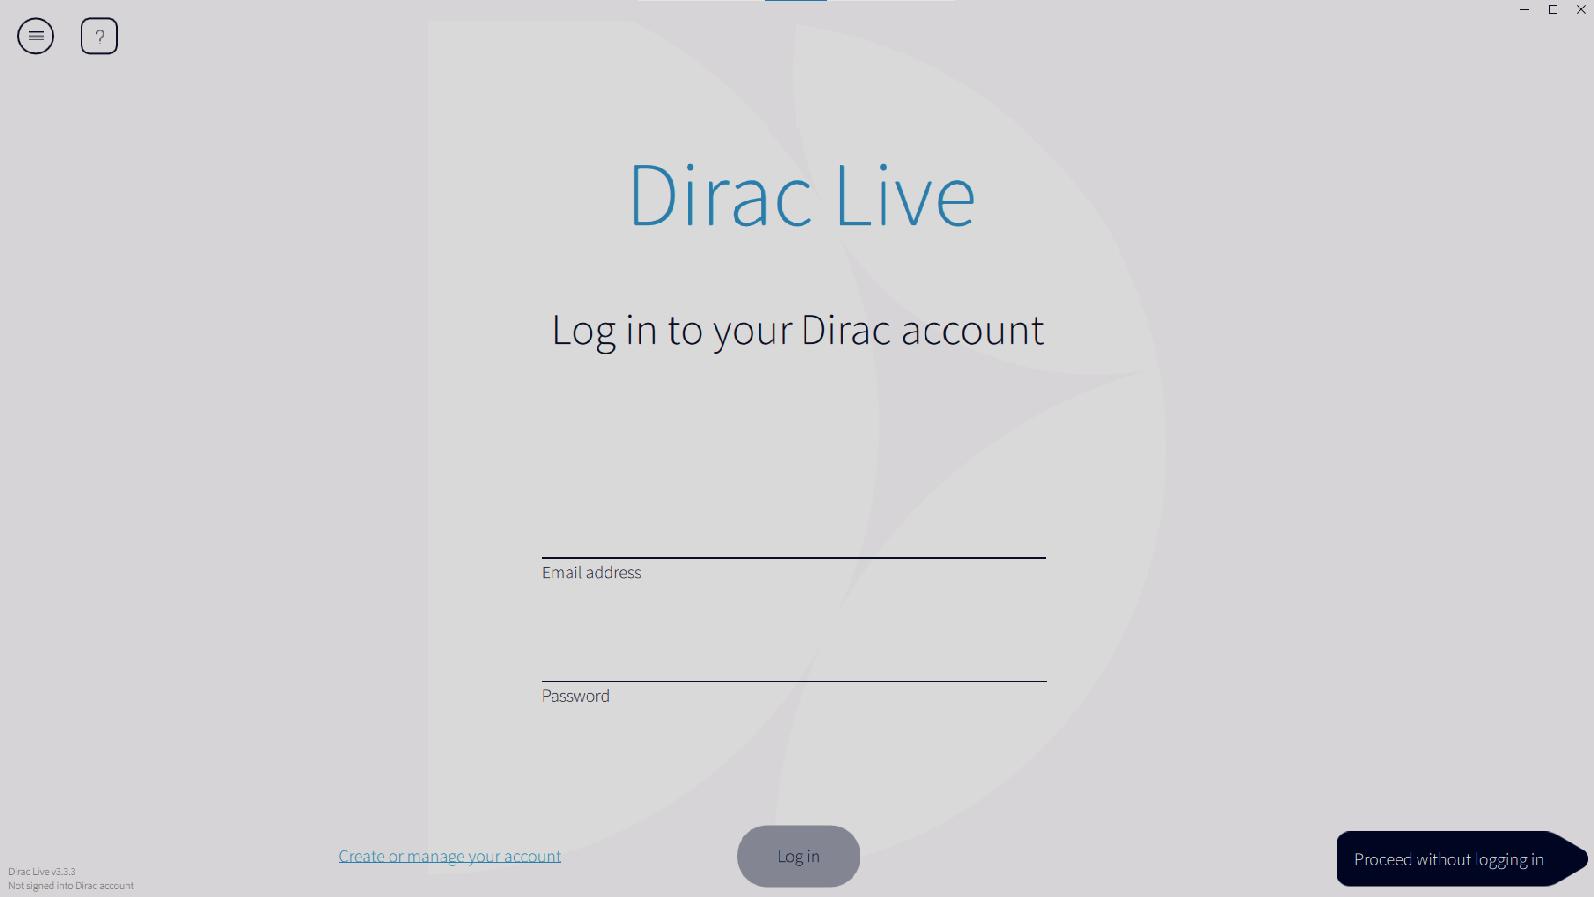
Log in to your Dirac Live account.
Enter the account details you created on the Dirac Live website.
Select the product you want to take measurements for.
The software detects products compatible with Dirac Live on the same network as the computer and displays them on the screen.
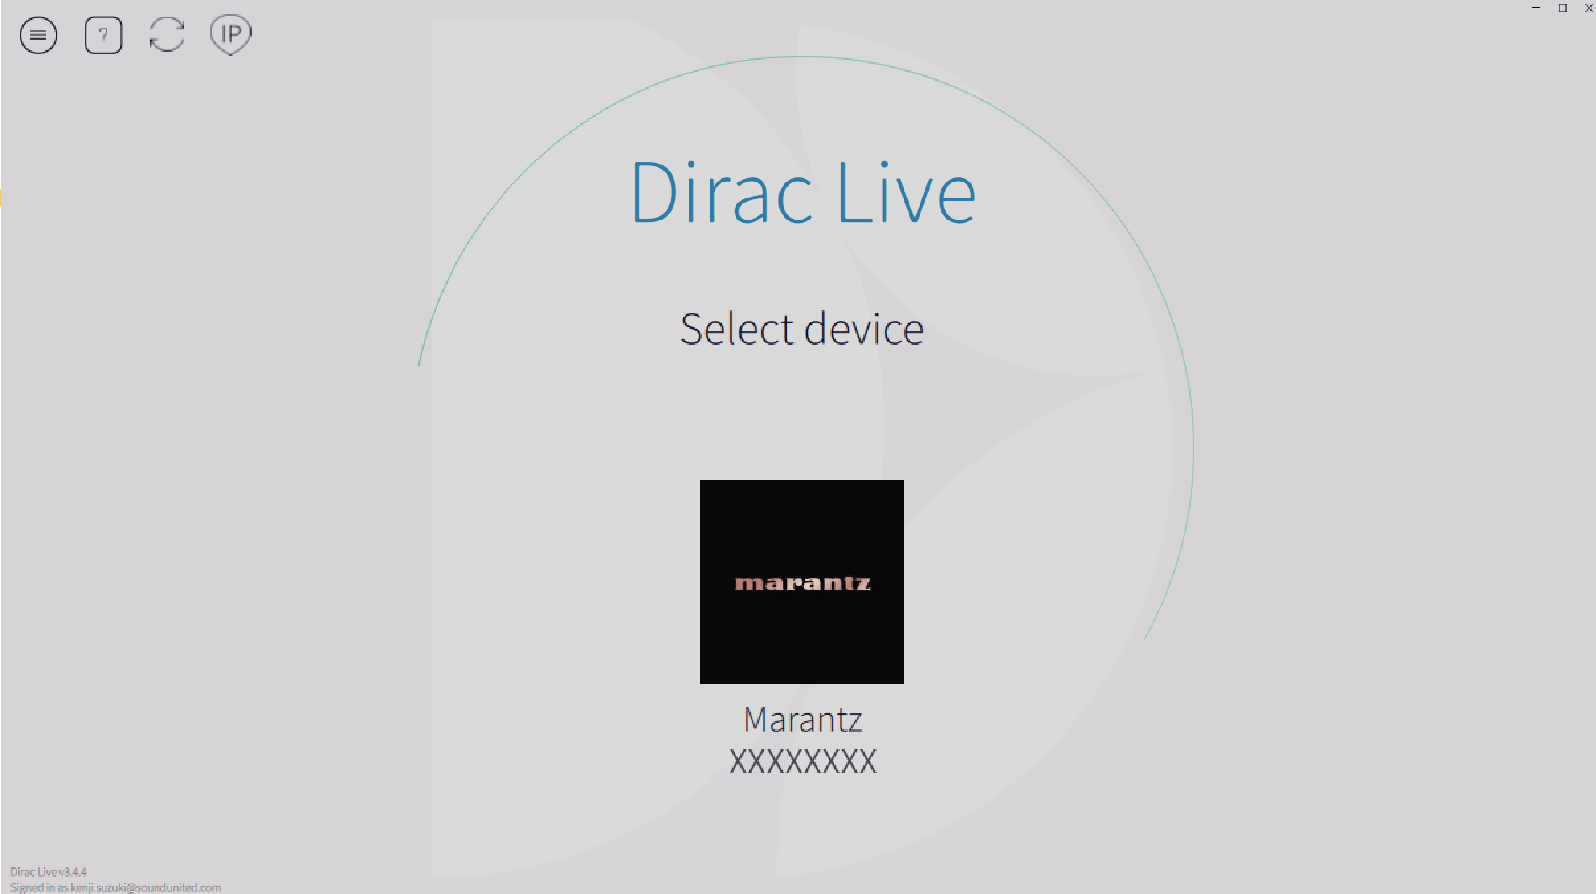
If this unit cannot be found, click ![]() (Rescan). Make sure your PC/Mac is on the same network as your AVR.
(Rescan). Make sure your PC/Mac is on the same network as your AVR.
Click the ![]() (IP) button to detect this unit manually by entering the IP address.
(IP) button to detect this unit manually by entering the IP address.
Click the ![]() (Menu) button to display the menu. This allows you to select the language and save and import projects.
(Menu) button to display the menu. This allows you to select the language and save and import projects.
Click the ![]() (Help) button to view a help page for each screen.
(Help) button to view a help page for each screen.
If you have already taken measurements with Dirac Live
You can skip the measurement process by loading the project file you saved with your previous measurements after selecting this unit. Creating a filter using an existing project filelink
When you load the project file, you can use new filter options like Bass Control or ART to create filters based on your previous measurement results. 9-2 If using Bass Management or Dirac Live Bass Control™link, 9-3 If using Dirac Live Active Room Treatmentlink
Connect the microphone that will be used for the measurements to a USB port on the computer or this unit.
The microphone is displayed in the Dirac Live software when it is connected.
If connecting the microphone to the computer
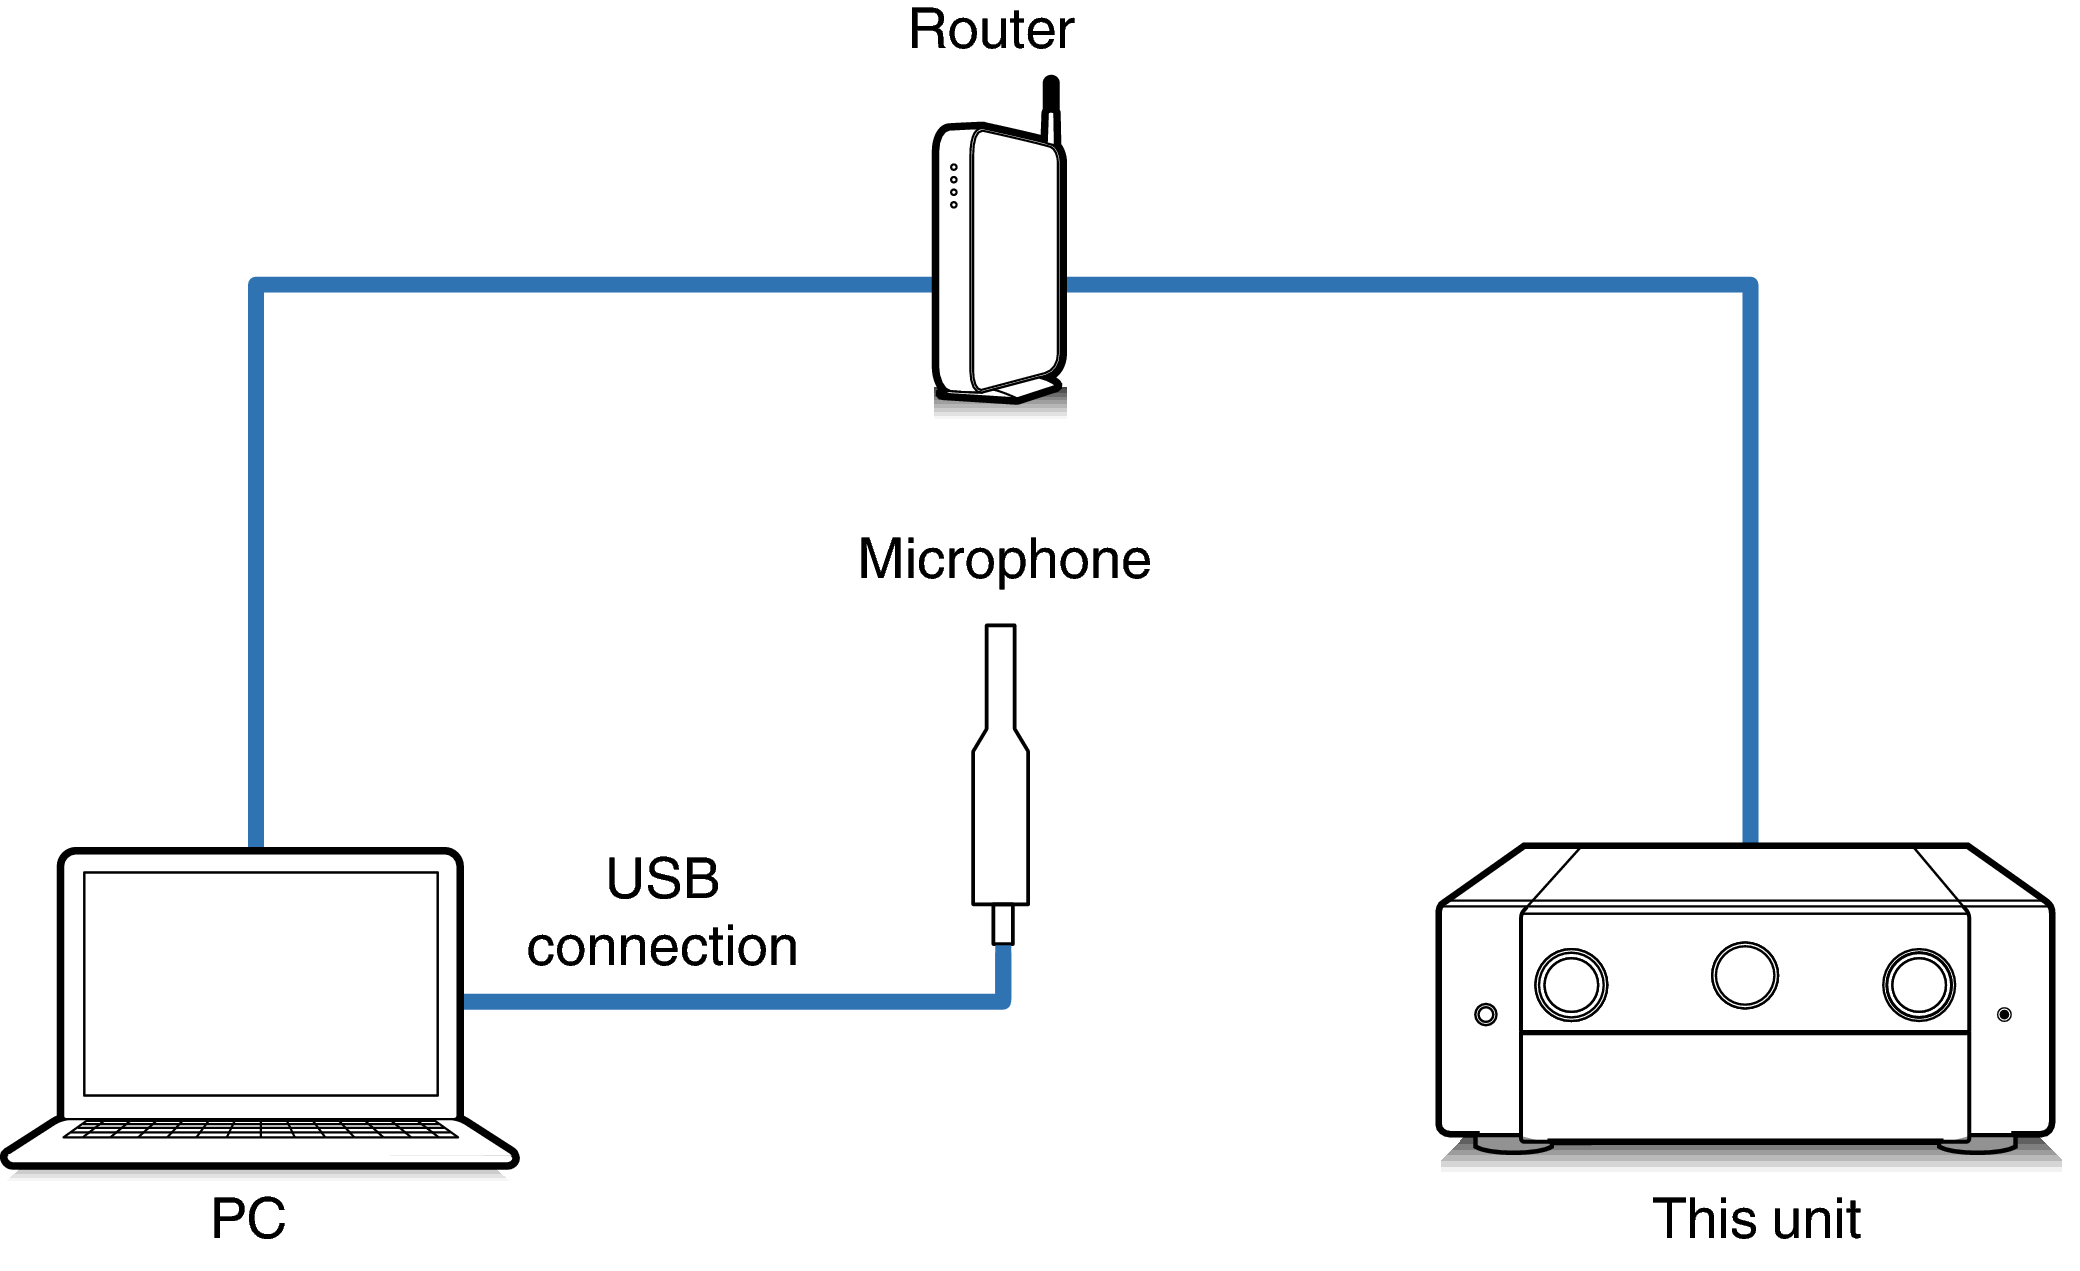
If connecting the microphone to this unit
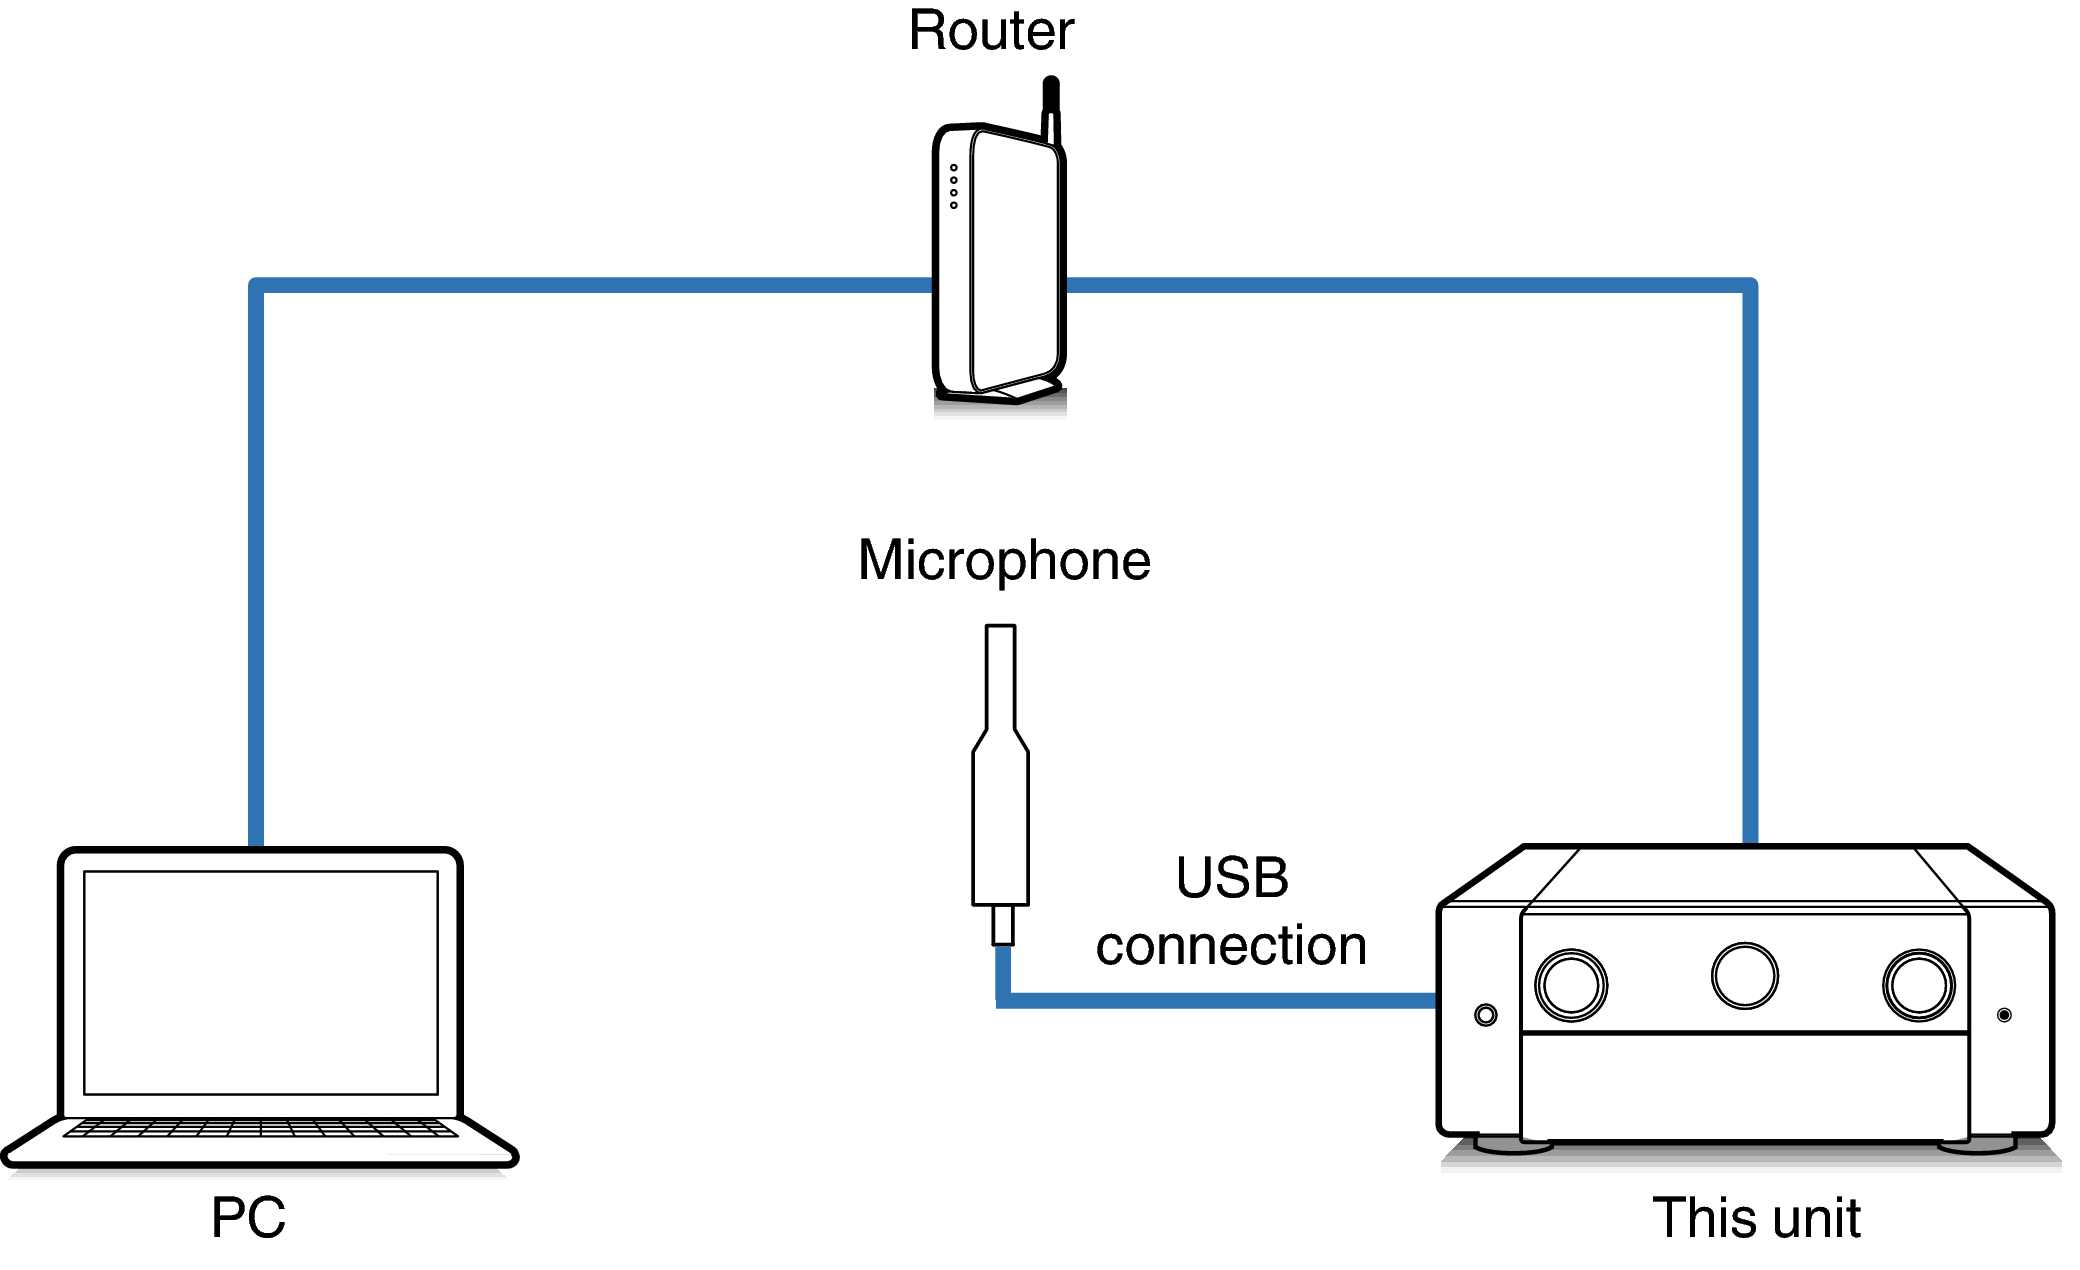
NOTE
If your unit has two USB ports, connect the microphone to the USB port on the front panel.
Select the microphone you will use for the measurements.
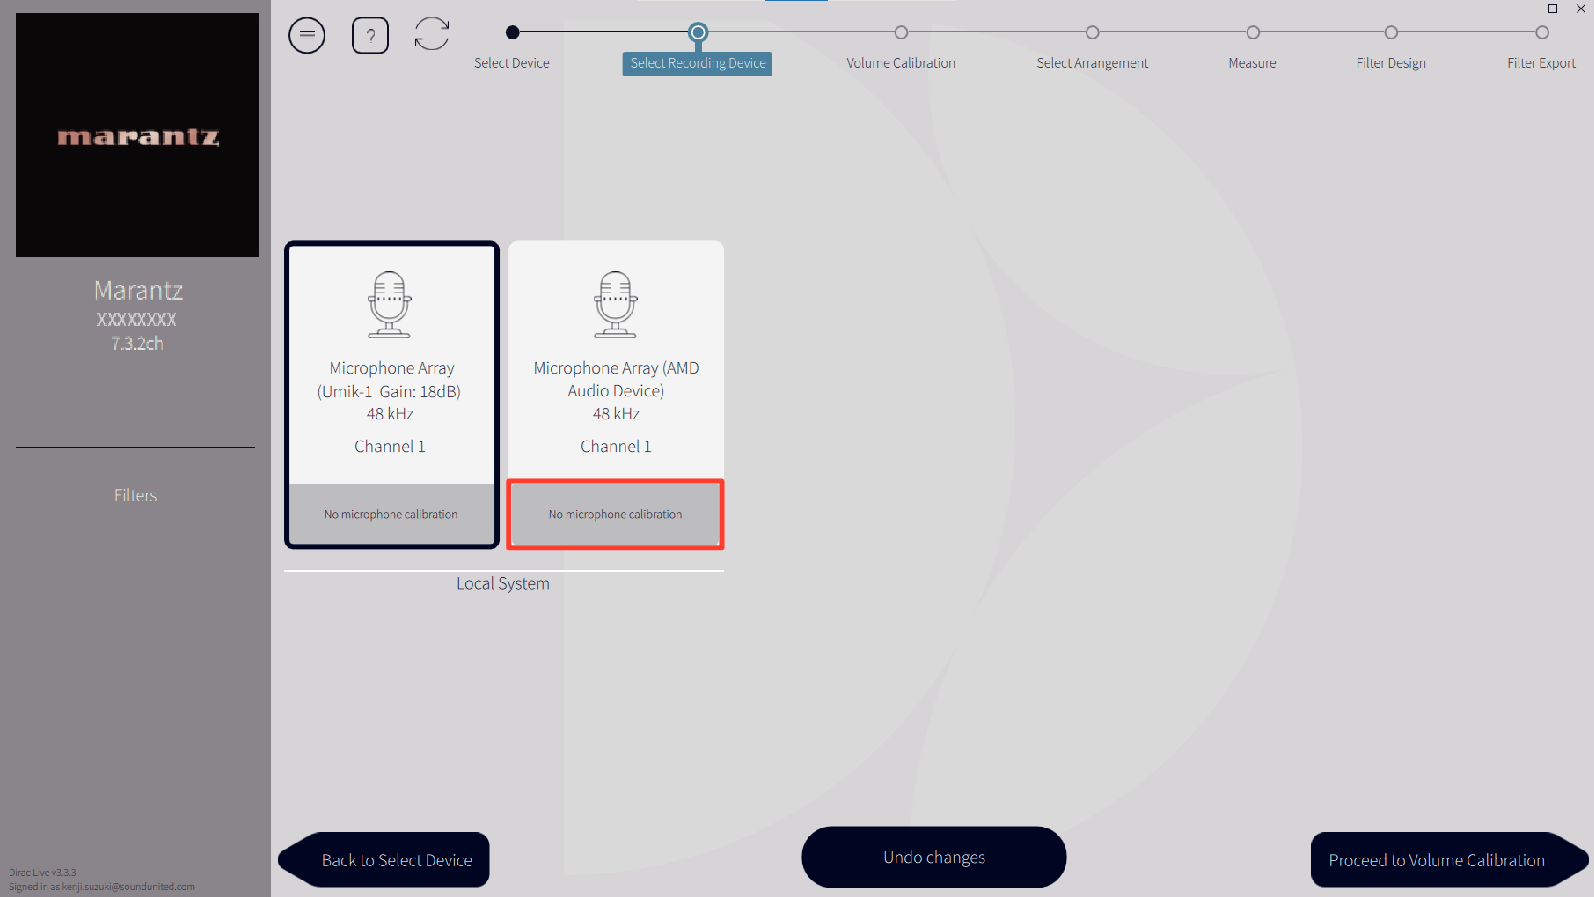
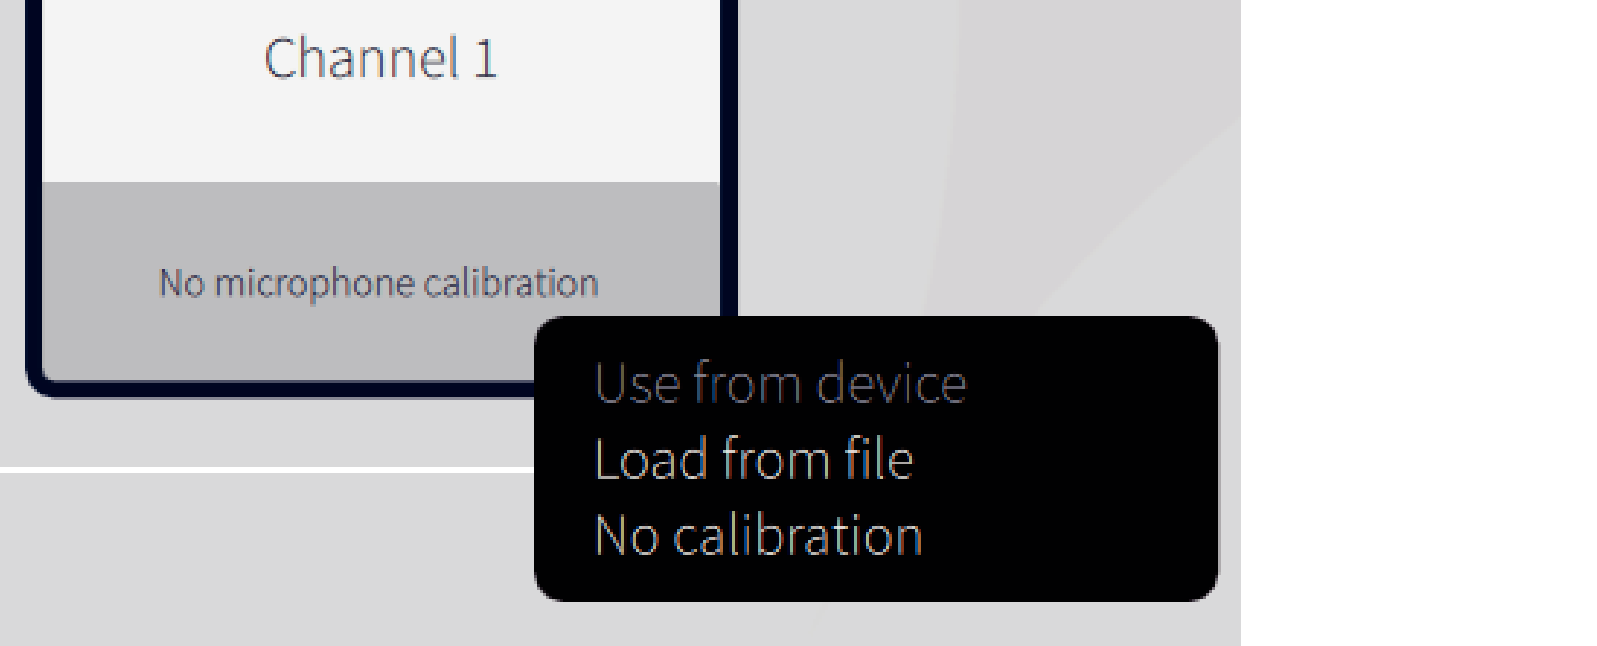
If the microphone you are using for the measurements comes with a calibration file, you will need to load the calibration file in the Dirac Live software too.
Click “No microphone calibration” of the microphone (shown in red) to load the calibration file.
After selecting the microphone, click “Proceed to Volume Calibration”.
NOTE
The internal microphone of the computer and other recording devices connected by USB are also displayed. Be sure to select the microphone you connected for these measurements.
Adjust the output level for the measurements and the input level for the microphone.
Adjust the output of all of the speakers that are connected to a suitable level so that proper measurements can be taken.
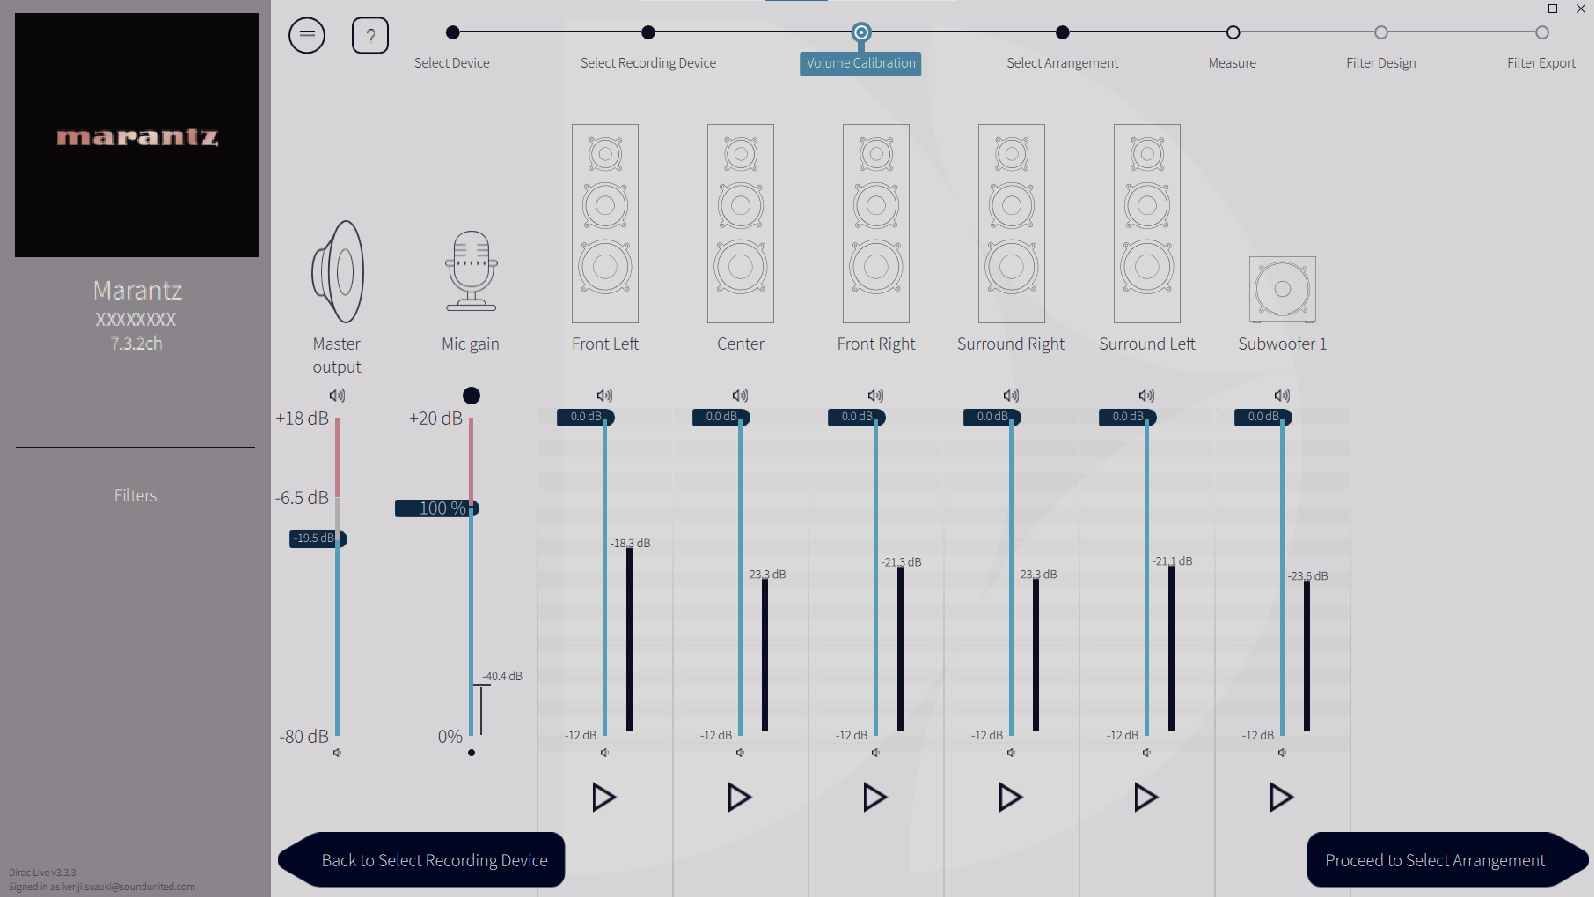
Put the microphone you will use for the measurements on the microphone stand and place the stand at the main listening point.
Point the tip of the microphone toward the ceiling and adjust the height to match the height of the ears of a listener in a seated position.
Set Mic gain to 100%.
Set Master output to around -55.0dB.
Select one speaker and press the  button.
A test tone will be output from the speaker you selected and the audio that is detected will be displayed on a level bar.
Adjust the master output so that the audio that is detected is around -15.0dB to -30.0dB.
Play the test tone of the next speaker and check that the output displayed in the level bar is between -15.0dB and -30.0dB.
If it is outside this range, adjust the output level using the volume controls for each channel in the Dirac Live software.
Repeat step 6 for all of the speakers and adjust each speaker so that the output level is between around -15.0dB and -30.0dB. When you have finished adjusting the output levels, click “Proceed to Select Arrangement”.
NOTE
The output displayed on the level bar is a guide only, and the level bar may not reach -30dB depending on your computer or environment. In this case, adjust all channels to approximately the same level.
Set the volume level a little higher than the level you would typically use.
About the main listening position
The main listening position is the position where listeners would normally sit or where one would normally sit alone within the listening environment.
To ensure that the measurement results are correct, put the microphone for measurement on a microphone stand.
Select a listening area
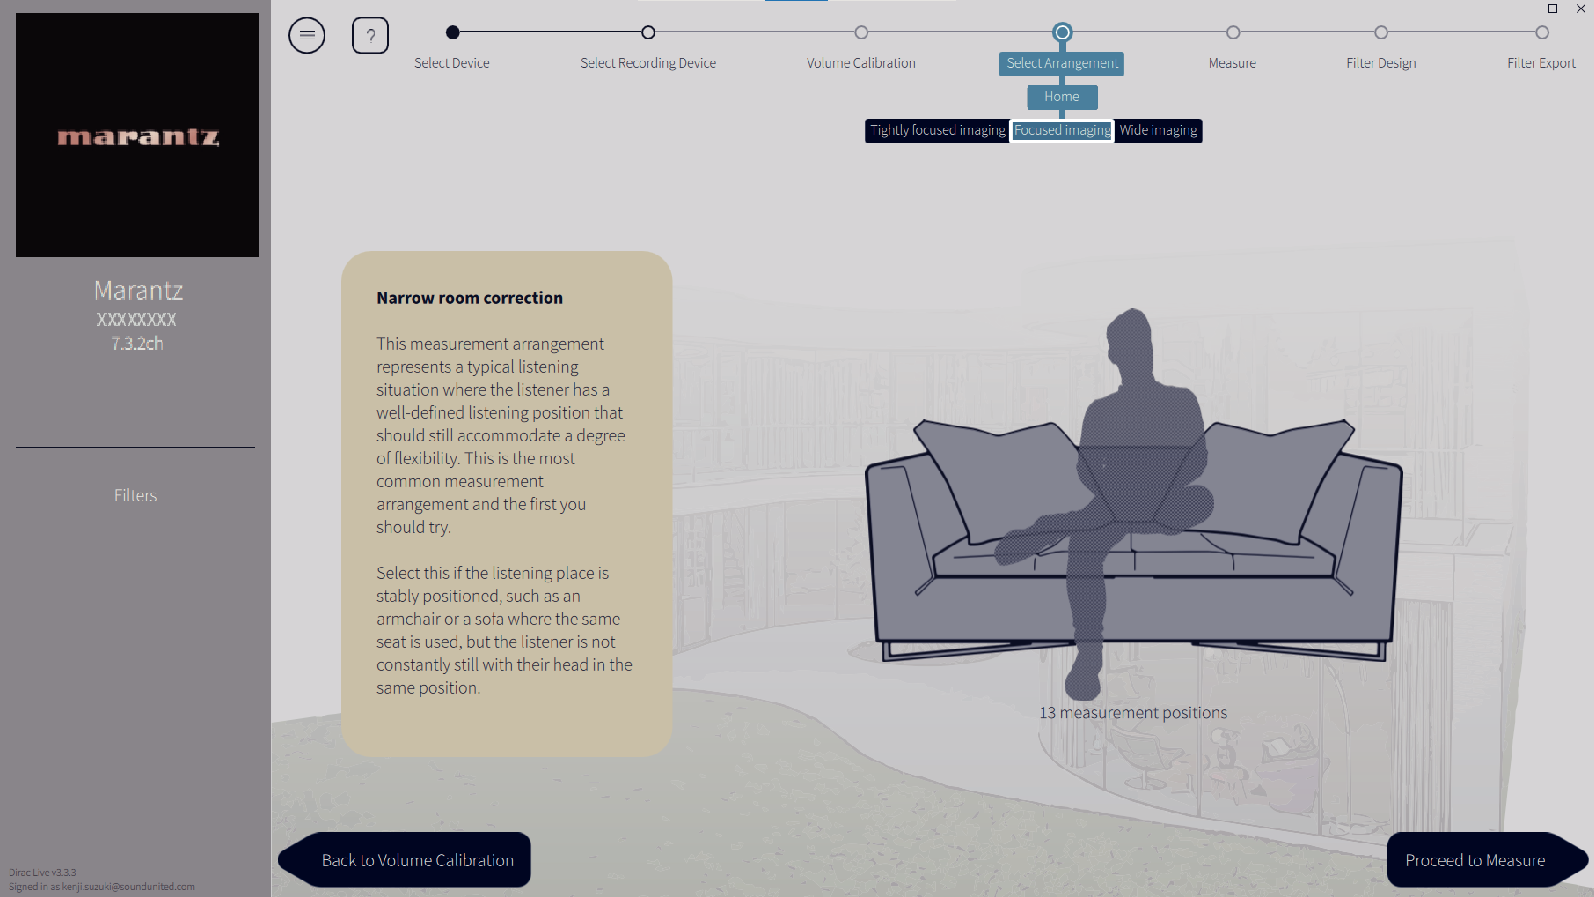
After selecting the listening area, click “Proceed to Measure”.
NOTE
Use the “Wide Imaging” arrangement in Dirac Live if your room has more than one row of seating or is large enough for more than two people.
Take the measurements.
Take measurements in each position.

Put the microphone you will use for measurement in the main listening position and point it straight upward.
Select the circle in the center of the illustration on the screen.
Click “Measure Selected position”.
A test tone will be output from each speaker and the measurement will start.
When the measurement is finished, move the microphone to the next position.
Select the next position on the screen and take the measurement.
Repeat steps 4 and 5 to take measurements in all of the positions.
When you have finished taking the measurements, click “Proceed to Filter Design”.
NOTE
You can proceed to the next step (“Filter Design”) without taking measurements in every position. However, we recommend taking measurements in every position, because the more measurements that are taken, the more accurate the calibration is.
Keep the room as quiet as possible during measurements. Other noise will interfere with measurements. Close the windows and turn off electrical products (radios, air conditioners, fluorescent lights, etc.) Noise from these products may affect measurements.
Do not stand between the speakers and the microphone or place large items there while taking measurements.
Adjust the filters.
Adjust the filters of each channel.
Filter options
The features of the filter options that can be selected in Dirac Live software are as follows.
“Dirac Live” is a digital room correction technology that employs a sophisticated analysis of your speakers and listening room.
“Bass Management” directs bass frequencies from all input channels to one or more subwoofers.
“Bass Control” is a measurement based bass management where both speakers and subwoofers are viewed as a complete system.
9-1 If using Dirac Live Room Correction
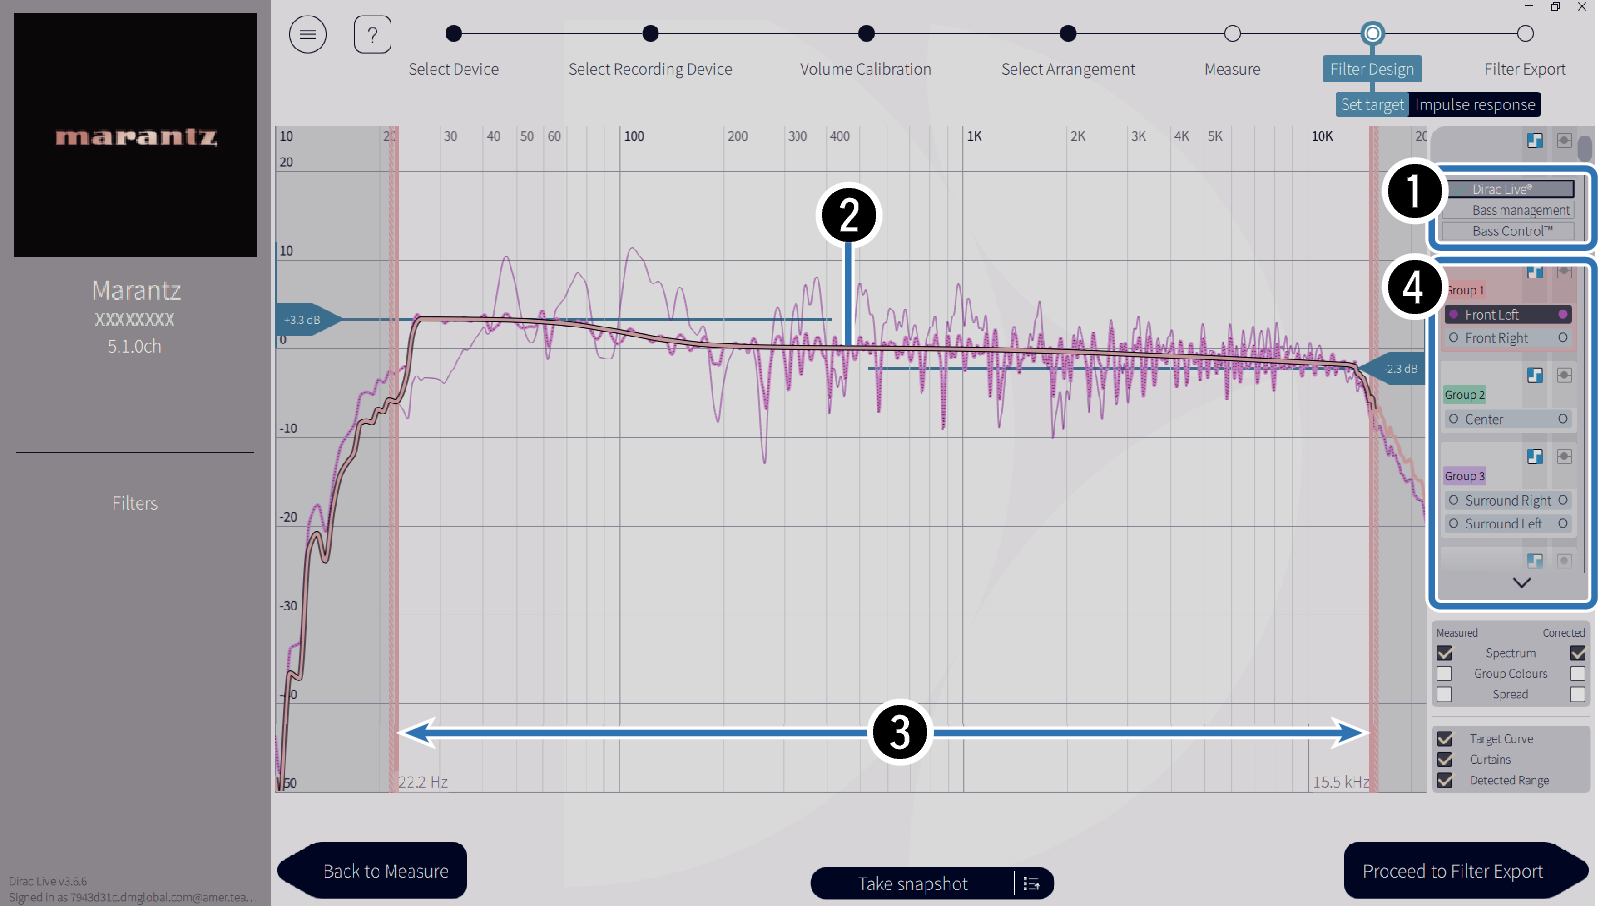
Filter options
To use Dirac Live Room Correction as the filter design, select Dirac Live®. Filters are calculated after they are selected, so it may take a while for the full results to be displayed.
Target curve
The target curve is the curve used to decide the frequency characteristics of the speakers after calibration by Dirac Live. You can adjust the target curve according to your preferences.
Curtains
Use the sliders on the screen to adjust the frequency range across which the filter will be applied.
Speaker selection
Select the speaker for which you want to edit the target curve. You can also group together specific speakers. The same target curve will be applied to all of the speakers in the group.
When you have finished adjusting the filters, click “Proceed to Filter Export”.
NOTE
“Crossovers” are not calculated by the Dirac Live software when Dirac Live is set as the filter option. Set them manually on the unit if necessary.
9-2 If using Bass Management or Dirac Live Bass Control™
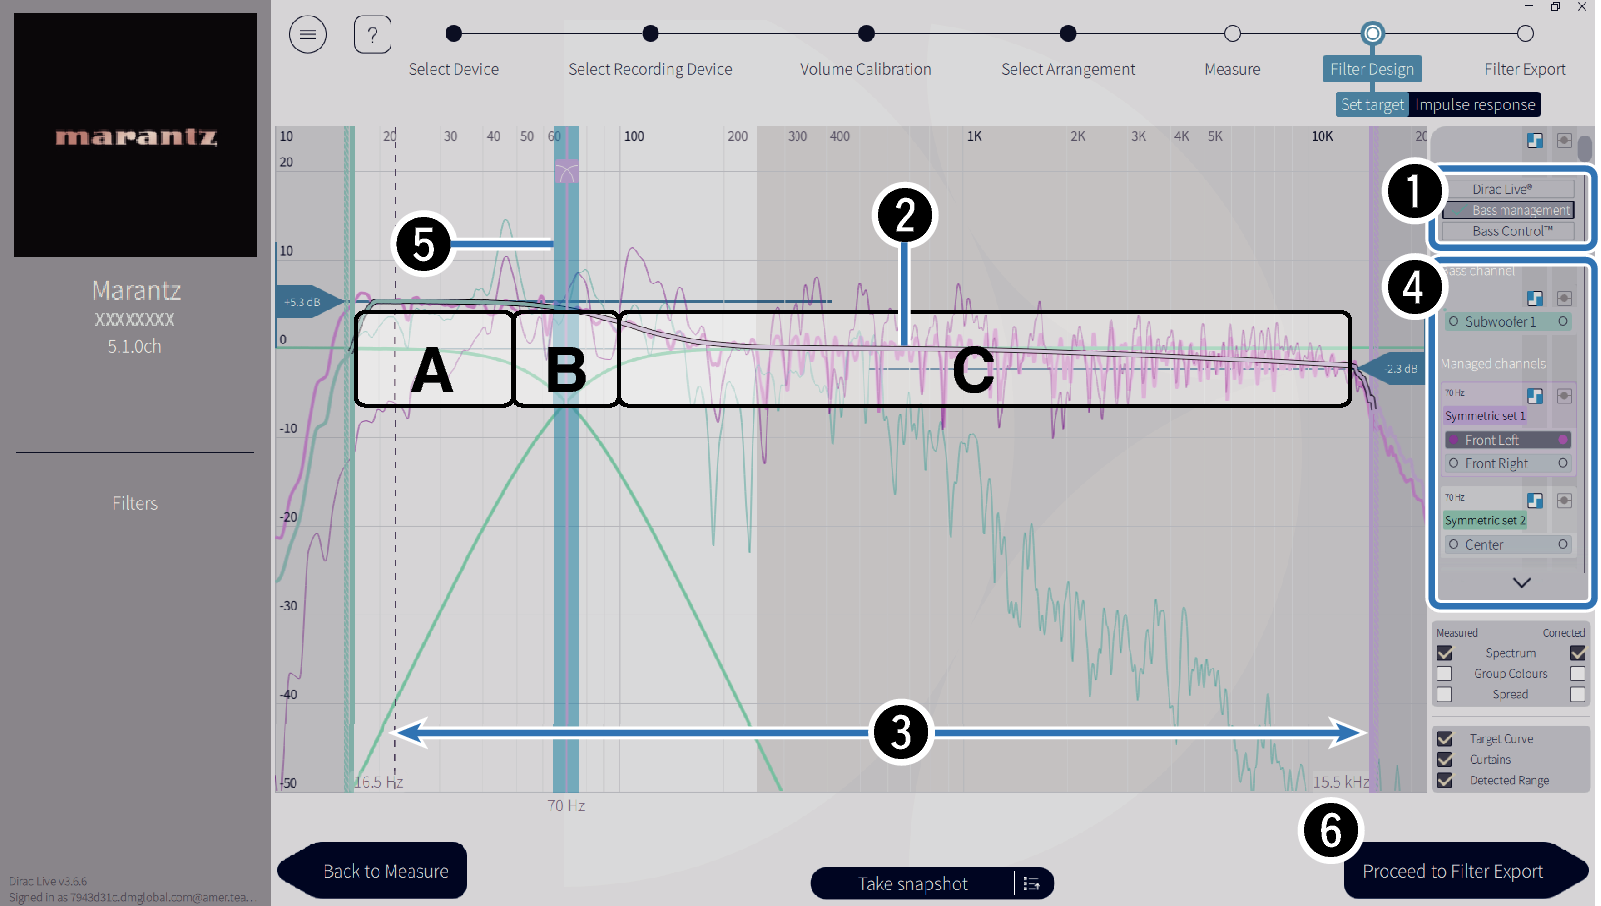
Filter options
Select Bass Management or Bass Control™ as the filter design. Filters are calculated after they are selected, so it may take a while for the full results to be displayed.
Target curve
The target curve is the curve used to decide the frequency characteristics of the speakers after calibration by Dirac Live. You can adjust the target curve according to your preferences.
Curtains
Use the sliders on the screen to adjust the frequency range across which the filter will be applied.
Speaker selection
Select speakers to edit the target curve and crossover point. You can also exclude a group of speakers from Bass Management or Bass Control by dragging them to Unmanaged Channels.
Crossover point
Adjust the crossover frequency of the selected group of speakers.
A, defines which frequencies are assigned mainly to the subwoofers.
B, both subwoofers and high-range speakers will receive the frequencies.
C, defines the frequencies that are assigned mainly to the high-range speakers.
Calculate (Bass Control™ only)
If Bass Control™ is selected as the filter option, press the Calculate button to calculate the filter.
When you have finished adjusting the filters, click “Proceed to Filter Export”.
Bass Control and Bass Management
The filters that can be used will differ depending on your license.
Bass Control is fundamentally different from traditional bass management solutions. Bass Management is a common AVR function that extracts bass content from input signals and routes it to connected subwoofers.
Bass Control does offer bass management functions, but the core value of Bass Control is that it co-optimizes speakers to improve bass accuracy and ensures consistent bass performance throughout the listening area from a single- or multiple-subwoofer setup. Put simply, each subwoofer is tuned as part of a complete unit in your listening space, leading to a consistent and realistic response, no matter the arrangement.
For more details on Dirac Live, see Dirac Live Support.
https://helpdesk.dirac.com/
NOTE
The optimal “Distances”, “Levels” and “Crossovers” are calculated by the Dirac Live software when Bass Management or Bass Control™ is set as the filter option. These settings cannot be changed after the filter is sent to the unit and enabled on the unit. Dirac Livelink
9-3 If using Dirac Live Active Room Treatment
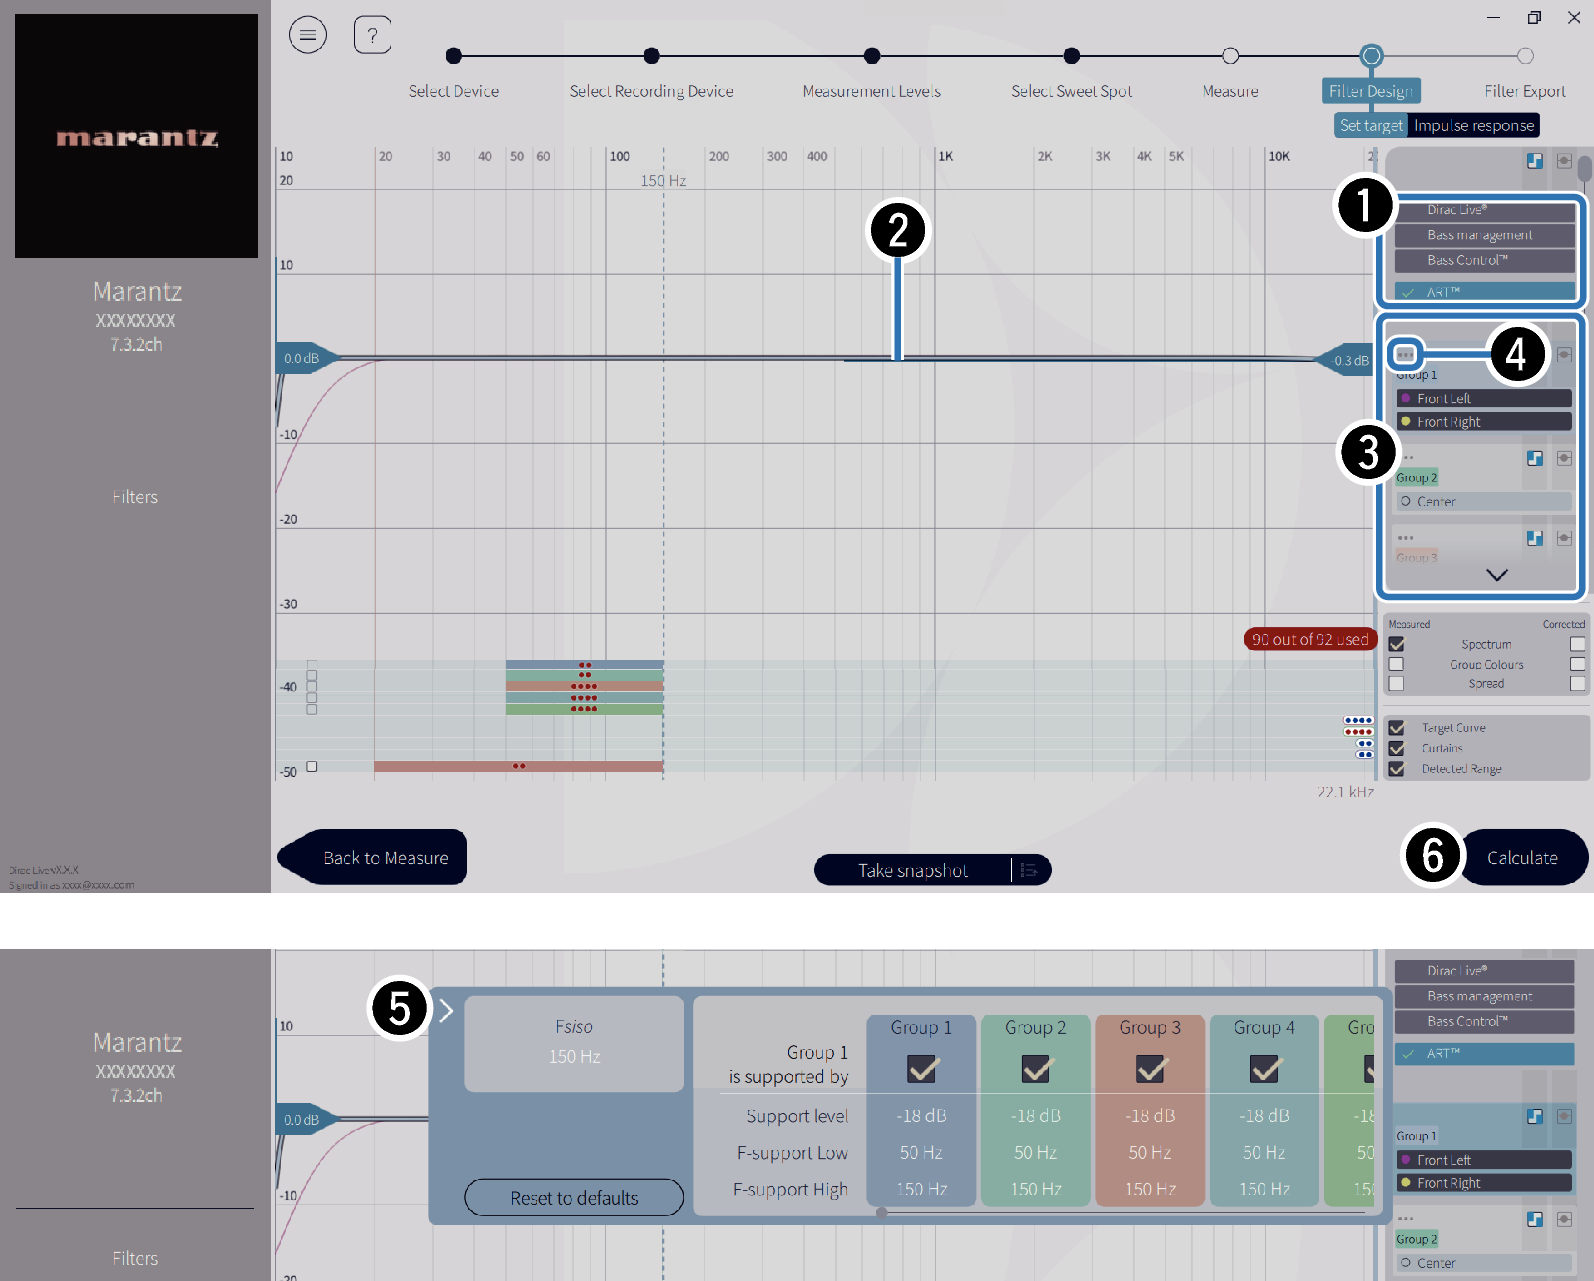
Filter options
Select ART™ as the filter design. Filters are calculated after they are selected, so it may take a while for the full results to be displayed.
Target curve
The target curve is the curve used to decide the frequency characteristics of the speakers after calibration by Dirac Live. You can adjust the target curve according to your preferences.
Speaker selection
Select the speaker for which you want to edit the target curve. You can also group together specific speakers. The same target curve and ART parameters will be applied to all of the speakers in the group.
ART settings button
The ART parameter settings box will open.
ART parameter settings box
The ART parameter settings box is assigned to each speaker box. The Dirac Live software automatically assigns the optimal value to parameters according to the measuring results. No need for users to change any settings. When you want to change the settings manually, see the setup guide in Dirac Live Support. https://helpdesk.dirac.com/
NOTE
When setting the ART parameters manually, check the specifications of your speaker to ensure that the parameter settings do not go below the playback frequency of your speaker.
Since there is a limit to the total number of speakers that are included in the group you have selected, you may not select some groups depending on the layout of your speakers. In that case, Dirac Live Software will automatically select the appropriate group enabling you to get the full effect of the ART filter. If you would like to select a group manually, clear rthe existing group selection and then choose your preferred group.
Calculate
When you have completed the settings, click the Calculate button. It may take a longer time to calculate depending on the performance of your PC or the network environment
When you have finished adjusting the filters, click “Proceed to Filter Export”.
NOTE
If ART™ is specified as the filter option, the optimal “Distances” and “Levels” will be calculated by the Dirac Live software. Bass management will be automatically adjusted using ART Parameters, instead of “Crossovers”. These settings cannot be changed after the filter is sent to the unit and enabled. Dirac Livelink
Export a filter to this unit.
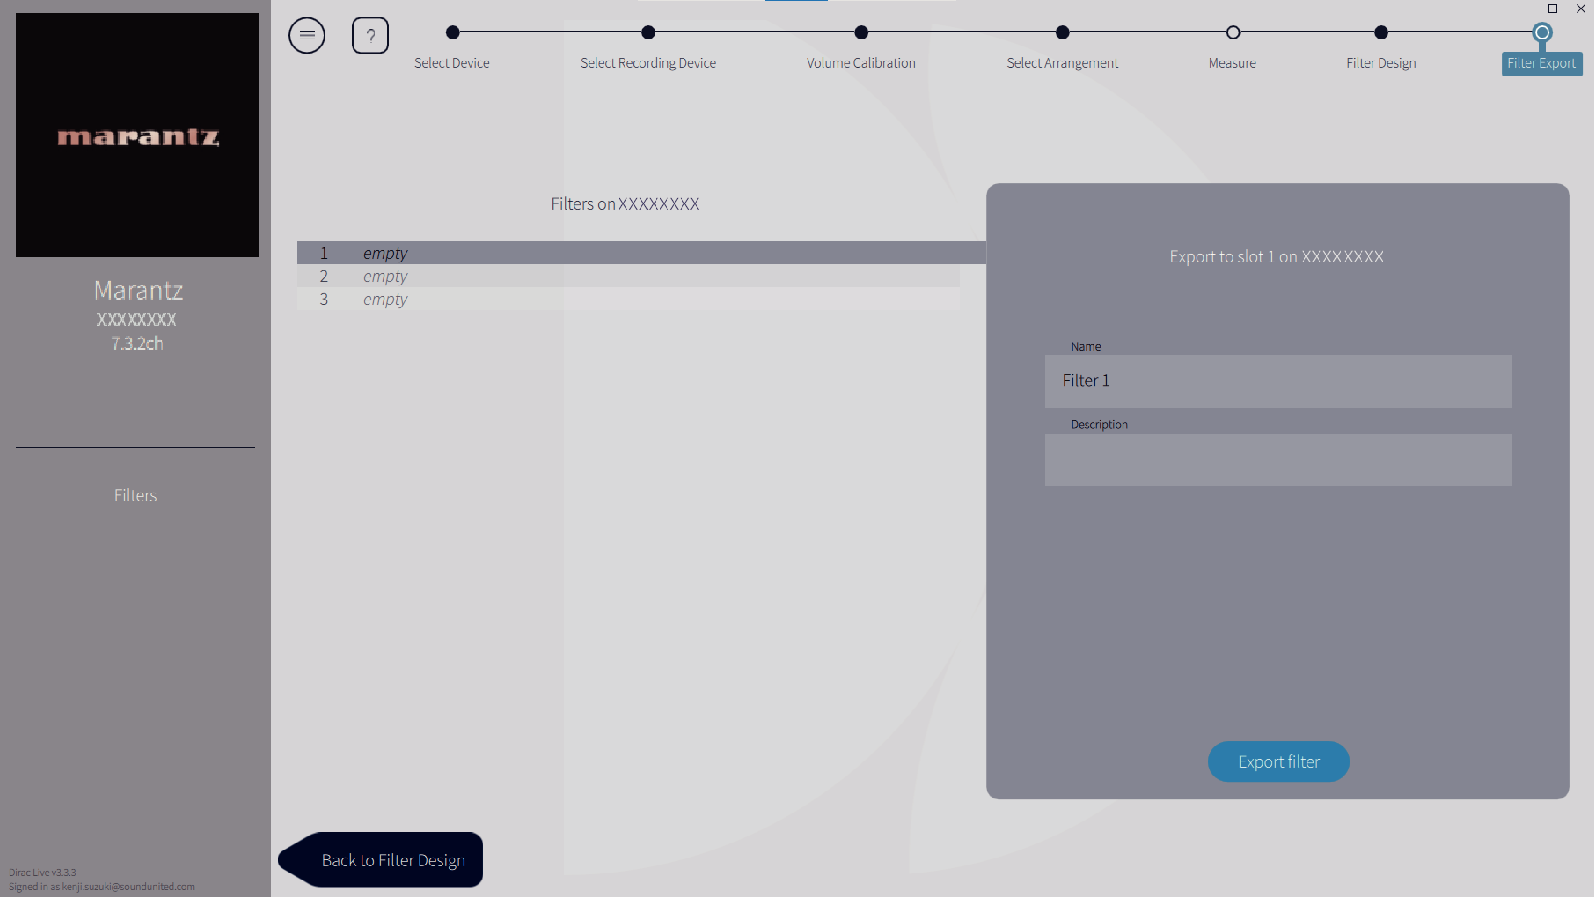
Select the slot of a filter you want to export.
Enter a name for the filter.
You can enter any name in Dirac Live software, but this unit has a character limit. We recommend entering a name that is 20 characters or less.
Click Export Filter.
The filter is exported to this unit. The Filter Design page is displayed automatically when the export is completed.
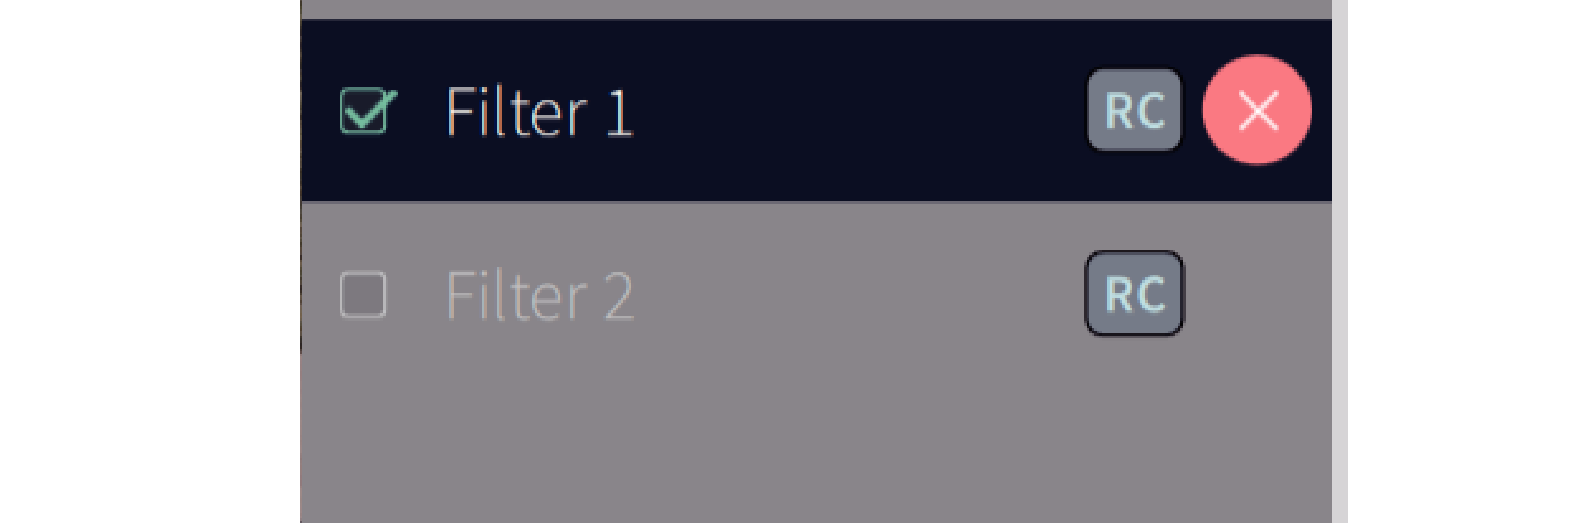
Create multiple filters.
Up to three filters can be created in Dirac Live according to the measurement data. After creating new filters in the Filter Design page, select the numbers of unused slots in the Filter Export screen and export the filters.
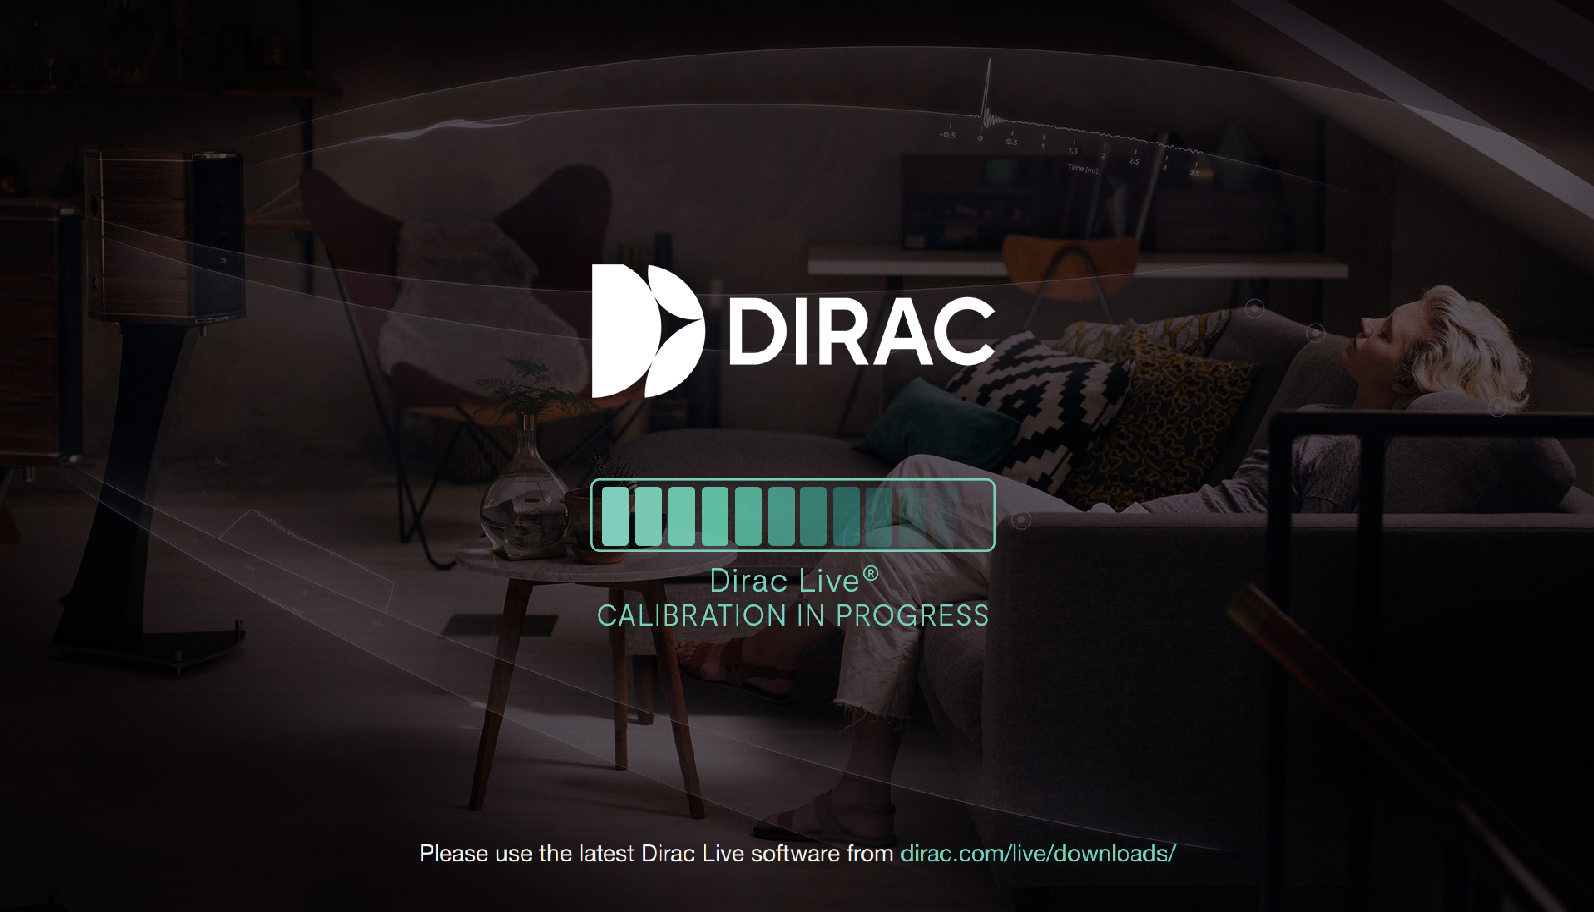
The following screen appears in the display (GUI) of this unit while the unit is communicating with the Dirac Live software. This unit cannot be operated while this screen is displayed.
If a network issue or other issue disrupts the process while this screen is displayed, press the BACK button on the remote control to return this unit to normal mode and start the Dirac Live software again.
NOTE
You can save and import measurement projects at any time from the menu in the Dirac Live software. Saving a project file allows you to resume measurements if they are interrupted or export measurement results again if necessary.
When importing a project file, set the speakers of this unit in the same layout as when the project file was saved.
If you try to overwrite an exported filter with the same filter after editing it manually, there may be some cases in which the saved settings are not applied.
In this case, select the filter you want to overwrite from “Filter” displayed in the lower left of the Dirac Live software screen.
The filter can be deleted from this unit by clicking the X mark. Then export a new filter.