Search result
Speaker configuration and “Amp Assign” settings
This unit has a built-in 7-channel power amplifier. In addition to the basic 5.1-channel system, a variety of speaker systems can be configured by changing the “Amp Assign” settings to suit the application, such as 7.1-channel systems, bi-amp connections and 2-channel systems for multi-zone playback. link
Perform “Amp Assign” settings to suit the number of rooms and speaker configuration to be installed. link
|
Playback speaker and zone |
“Amp Assign” settings |
Connection page |
|
|---|---|---|---|
|
MAIN ZONE |
ZONE2 |
||
|
5.1-channel |
2-channel (Pre-out) |
Can be set in all “Amp Assign” modes. |
|
|
7.1-channel (surround back) |
2-channel (Pre-out) |
Surround Back |
|
|
7.1-channel (front height) |
2-channel (Pre-out) |
Front Height |
|
|
7.1-channel (top front) |
2-channel (Pre-out) |
Top Front |
|
|
7.1-channel (top middle) |
2-channel (Pre-out) |
Top Middle |
|
|
7.1-channel (front Dolby Atmos Enabled speaker) |
2-channel (Pre-out) |
Front Dolby |
|
|
7.1-channel (surround Dolby Atmos Enabled speaker) |
2-channel (Pre-out) |
Surround Dolby |
|
|
5.1-channel (bi-amp connection for front speaker) |
2-channel (Pre-out) |
Bi-Amp |
|
|
5.1-channel + second pair of front speaker |
2-channel (Pre-out) |
Front B |
|
|
5.1-channel |
2-channel |
ZONE2 (Default) |
|
The sound mode that can be selected varies according to the speaker configuration. See “Relationship between sound modes and channel output” link for the sound modes that are supported.
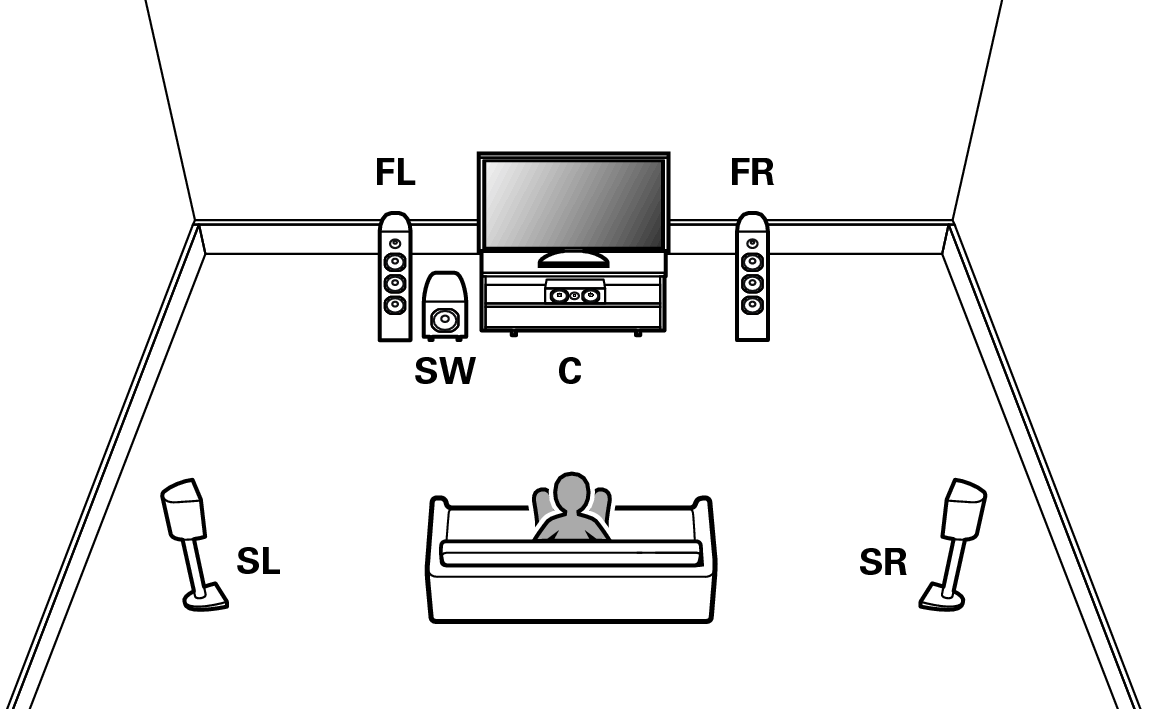
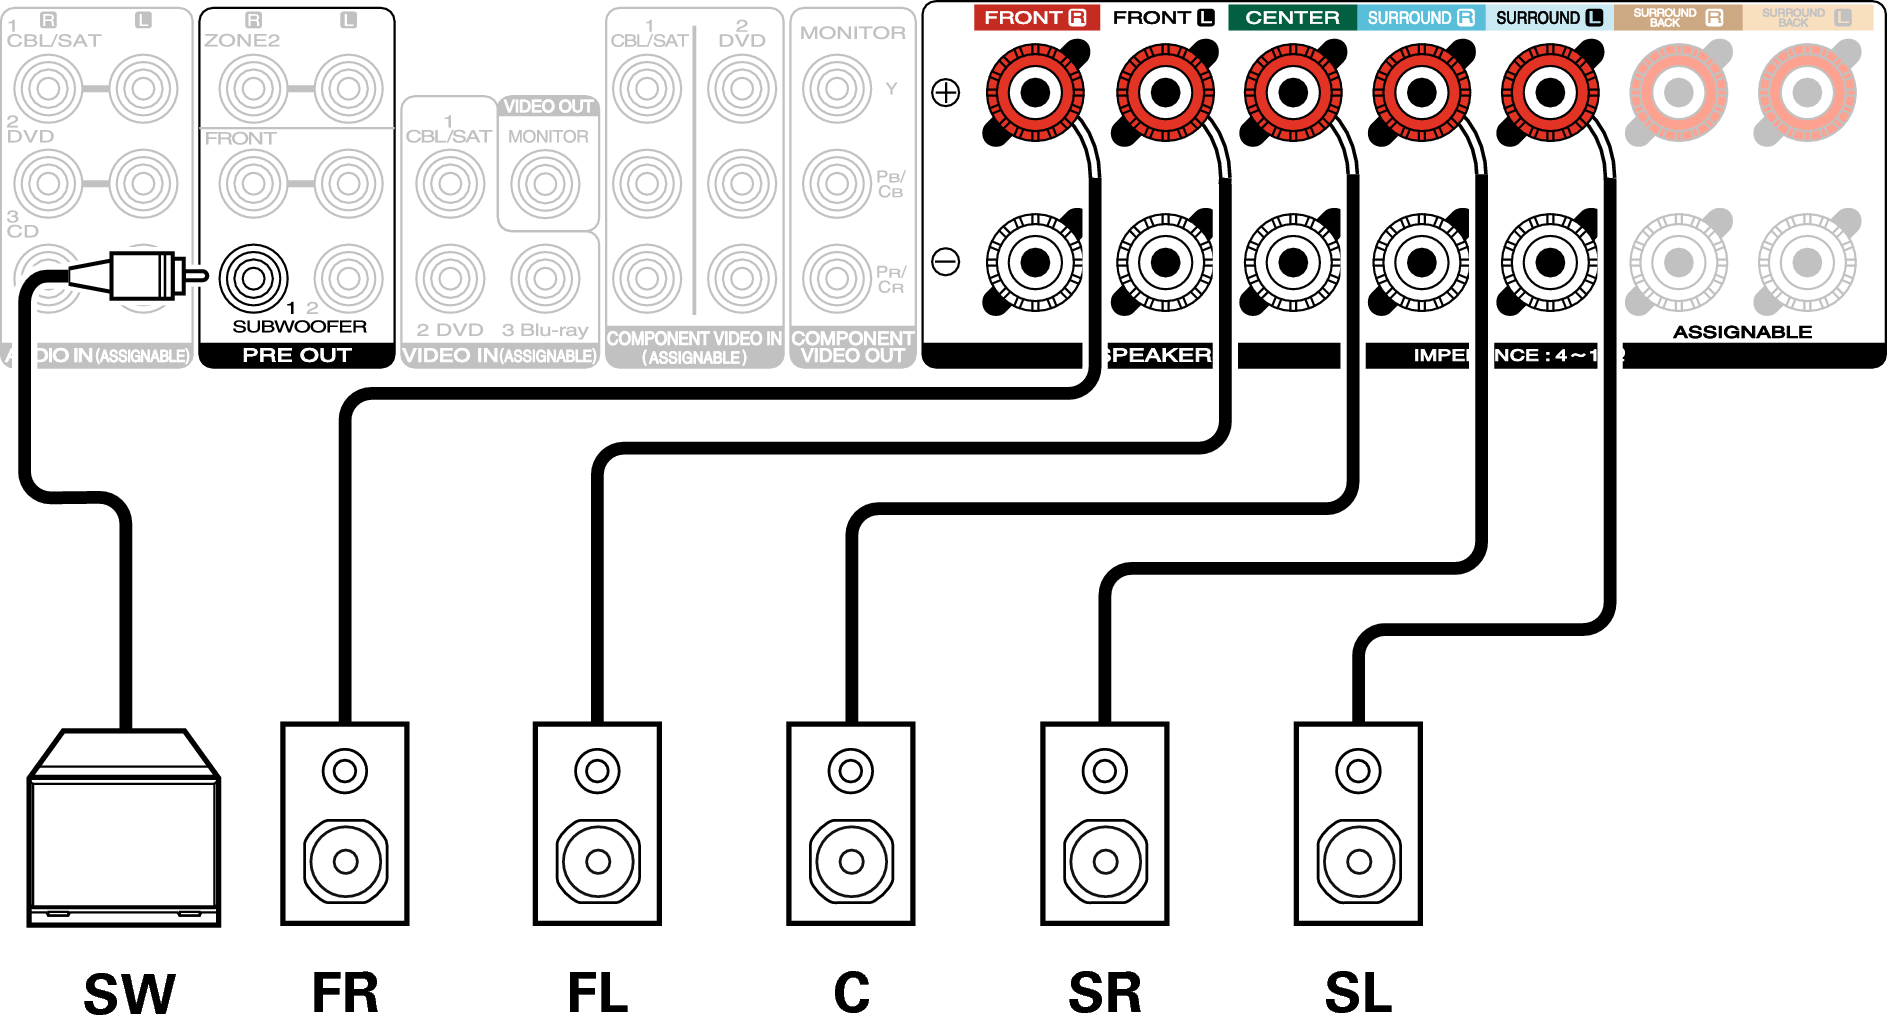
5.1-channel playback
This serves as a basic 5.1-channel surround system.
7.1-channel playback
System for 7.1-channel surround playback.
Example connections when using surround back speakers
This 7.1-channel surround system is the same as a basic 5.1-channel system but with surround back speakers.
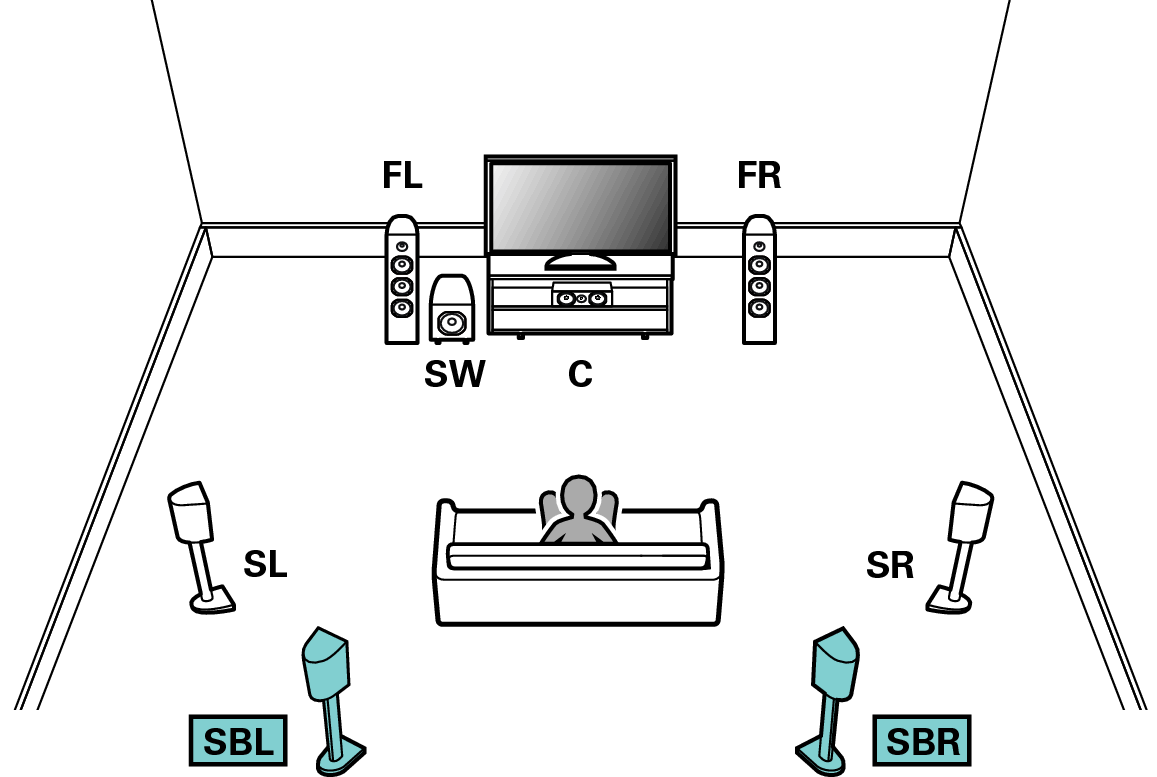
Set “Assign Mode” to “Surround Back” in the menu. link
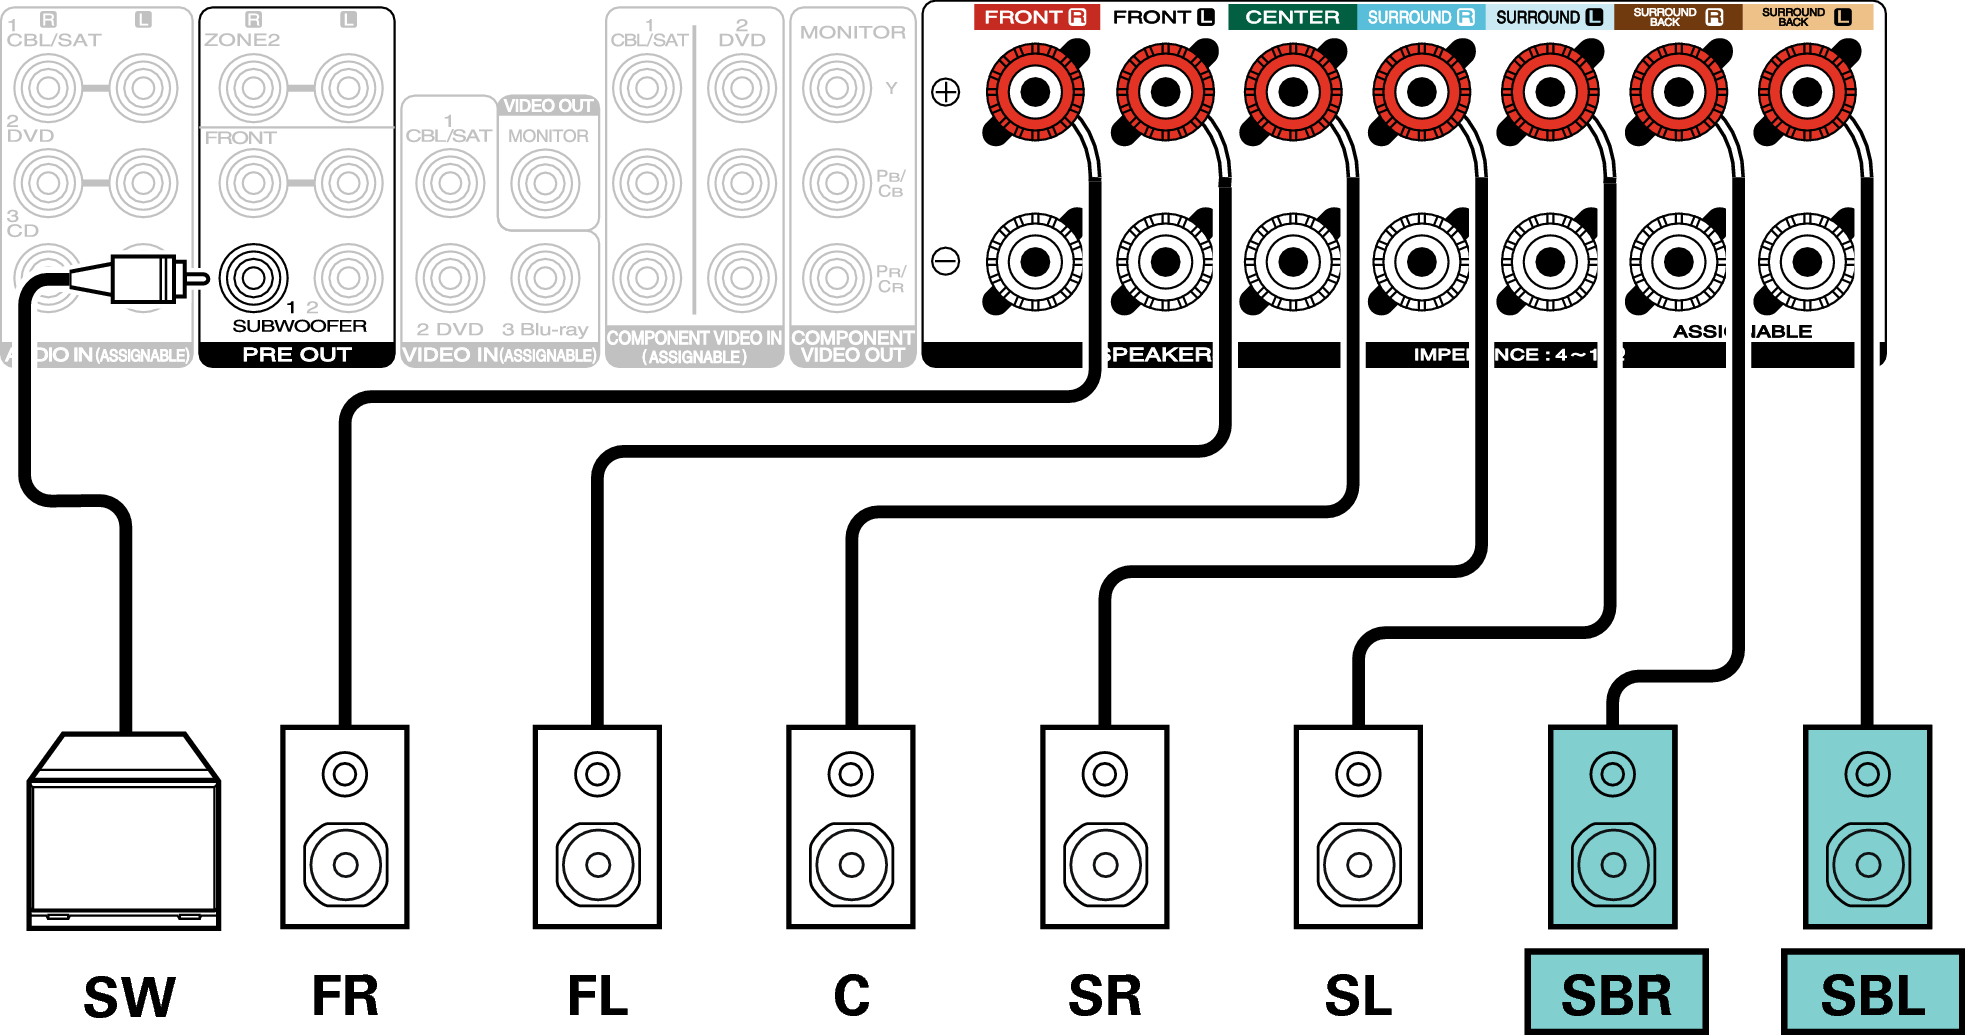
When using a single surround back speaker, connect it to the SURROUND BACK L terminal.
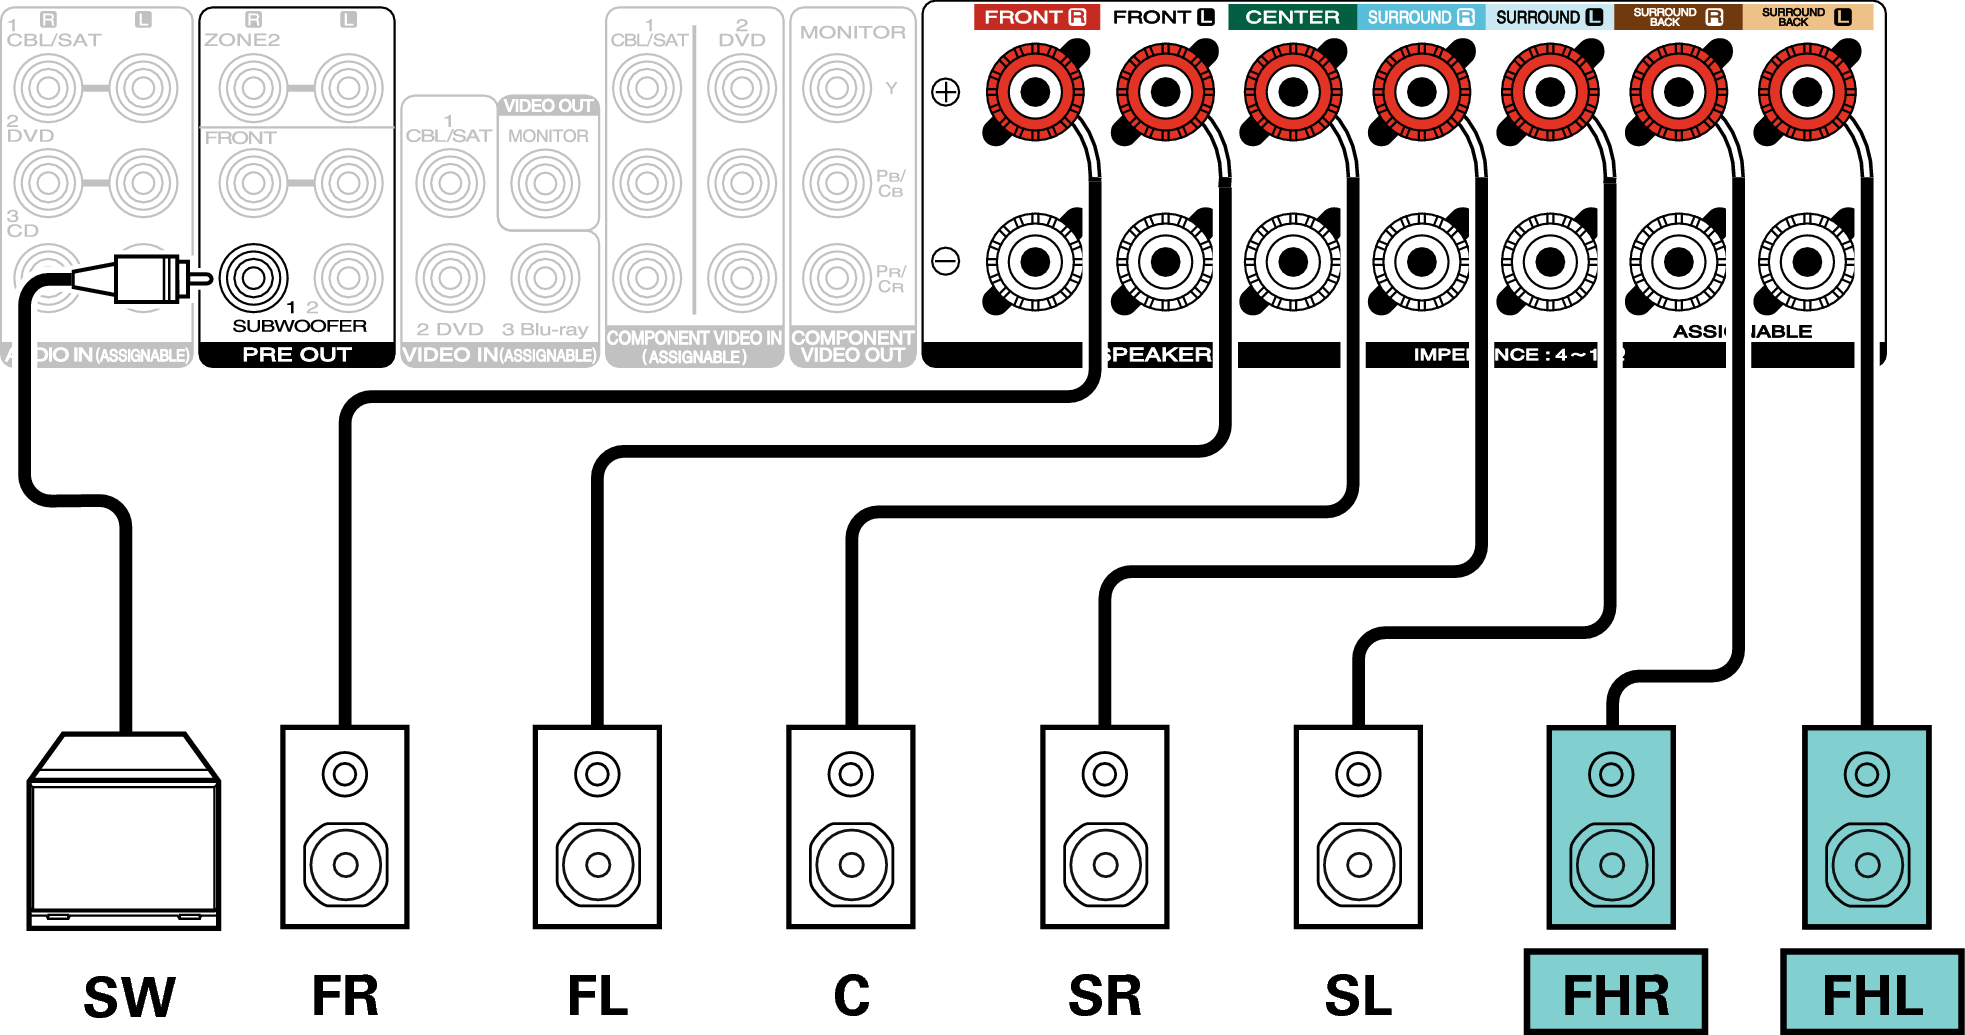
Example connections when using front height speakers
This 7.1-channel surround system is the same as a basic 5.1-channel system but with front height speakers.
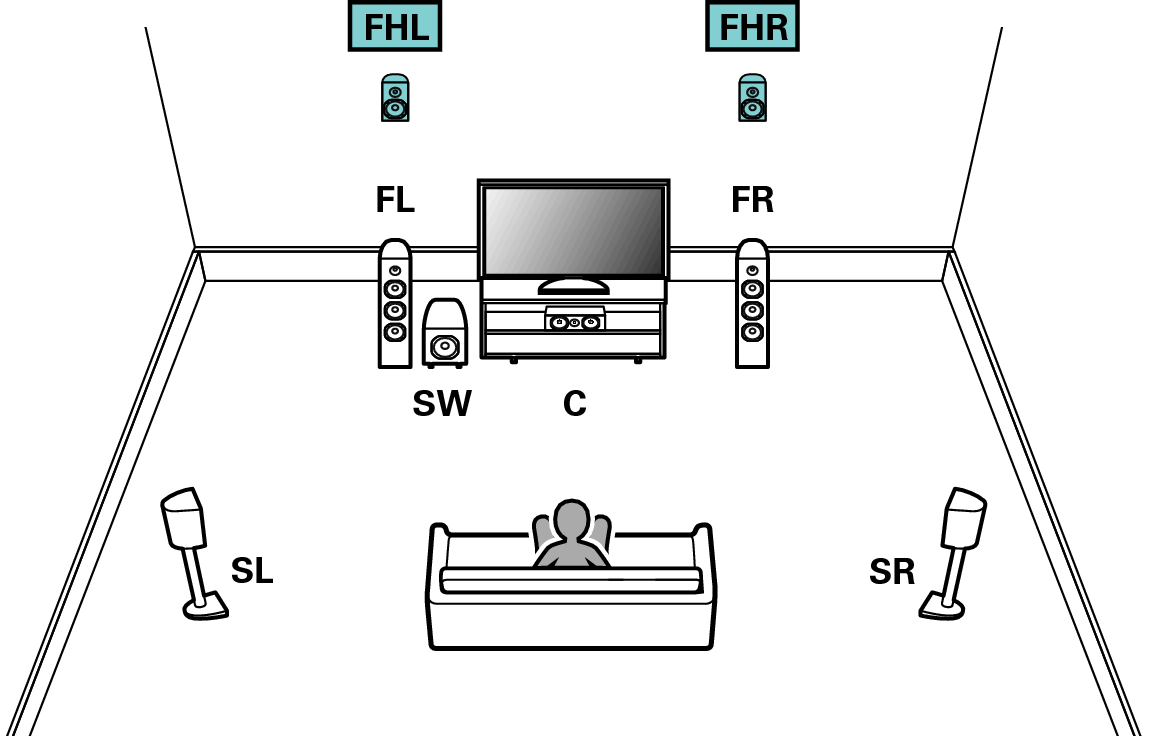
Set “Assign Mode” to “Front Height” in the menu. link
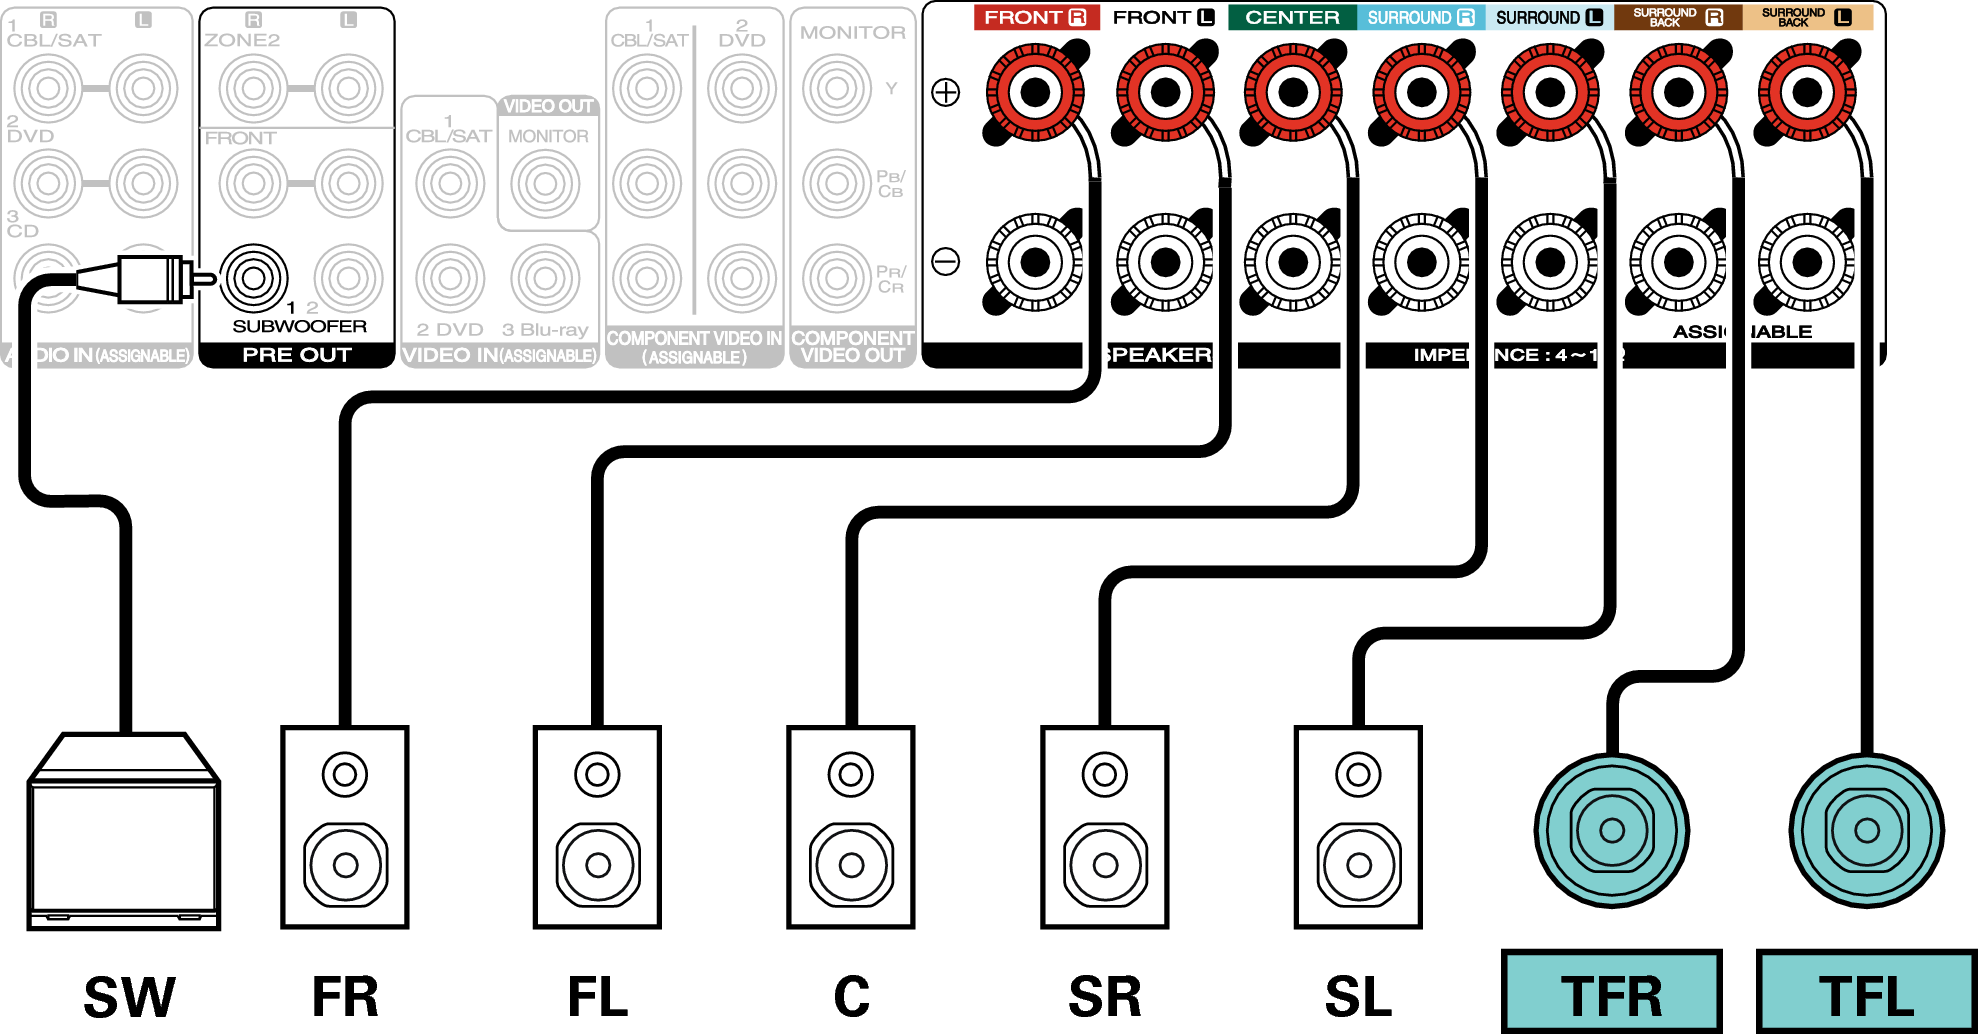
Example connections when using top front speakers
This 7.1-channel surround system is the same as a basic 5.1-channel system but with top front speakers.
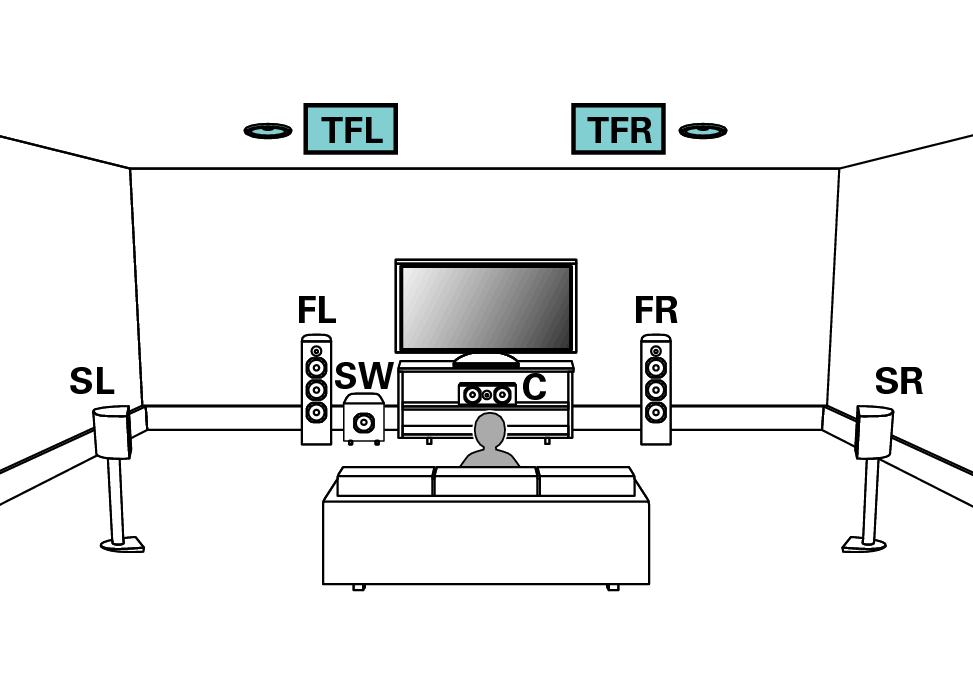
Set “Assign Mode” to “Top Front” in the menu. link
Example connections when using top middle speakers
This 7.1-channel surround system is the same as a basic 5.1-channel system but with top middle speakers.
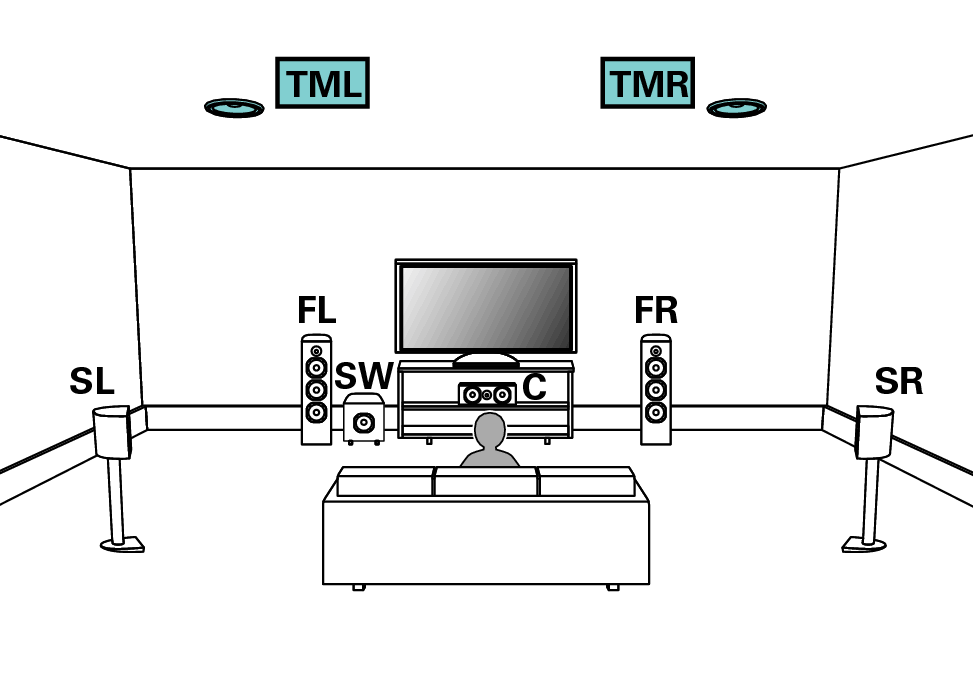
Set “Assign Mode” to “Top Middle” in the menu. link

Example connections when using front Dolby Atmos Enabled speakers
This 7.1-channel surround system is the same as a basic 5.1-channel system but with front Dolby Atmos Enabled speakers.
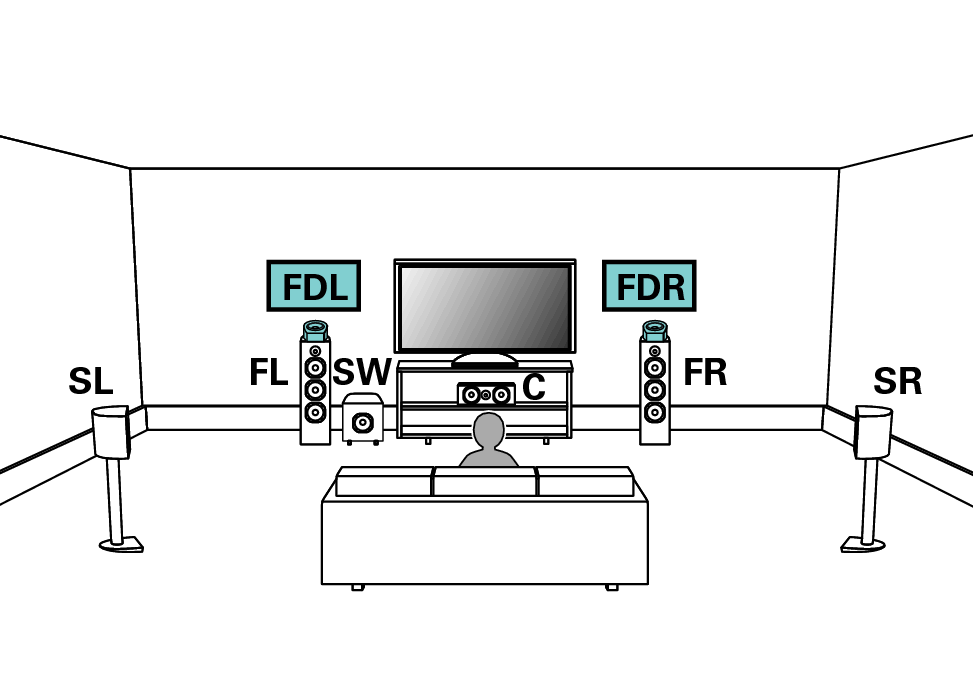
Set “Assign Mode” to “Front Dolby” in the menu. link

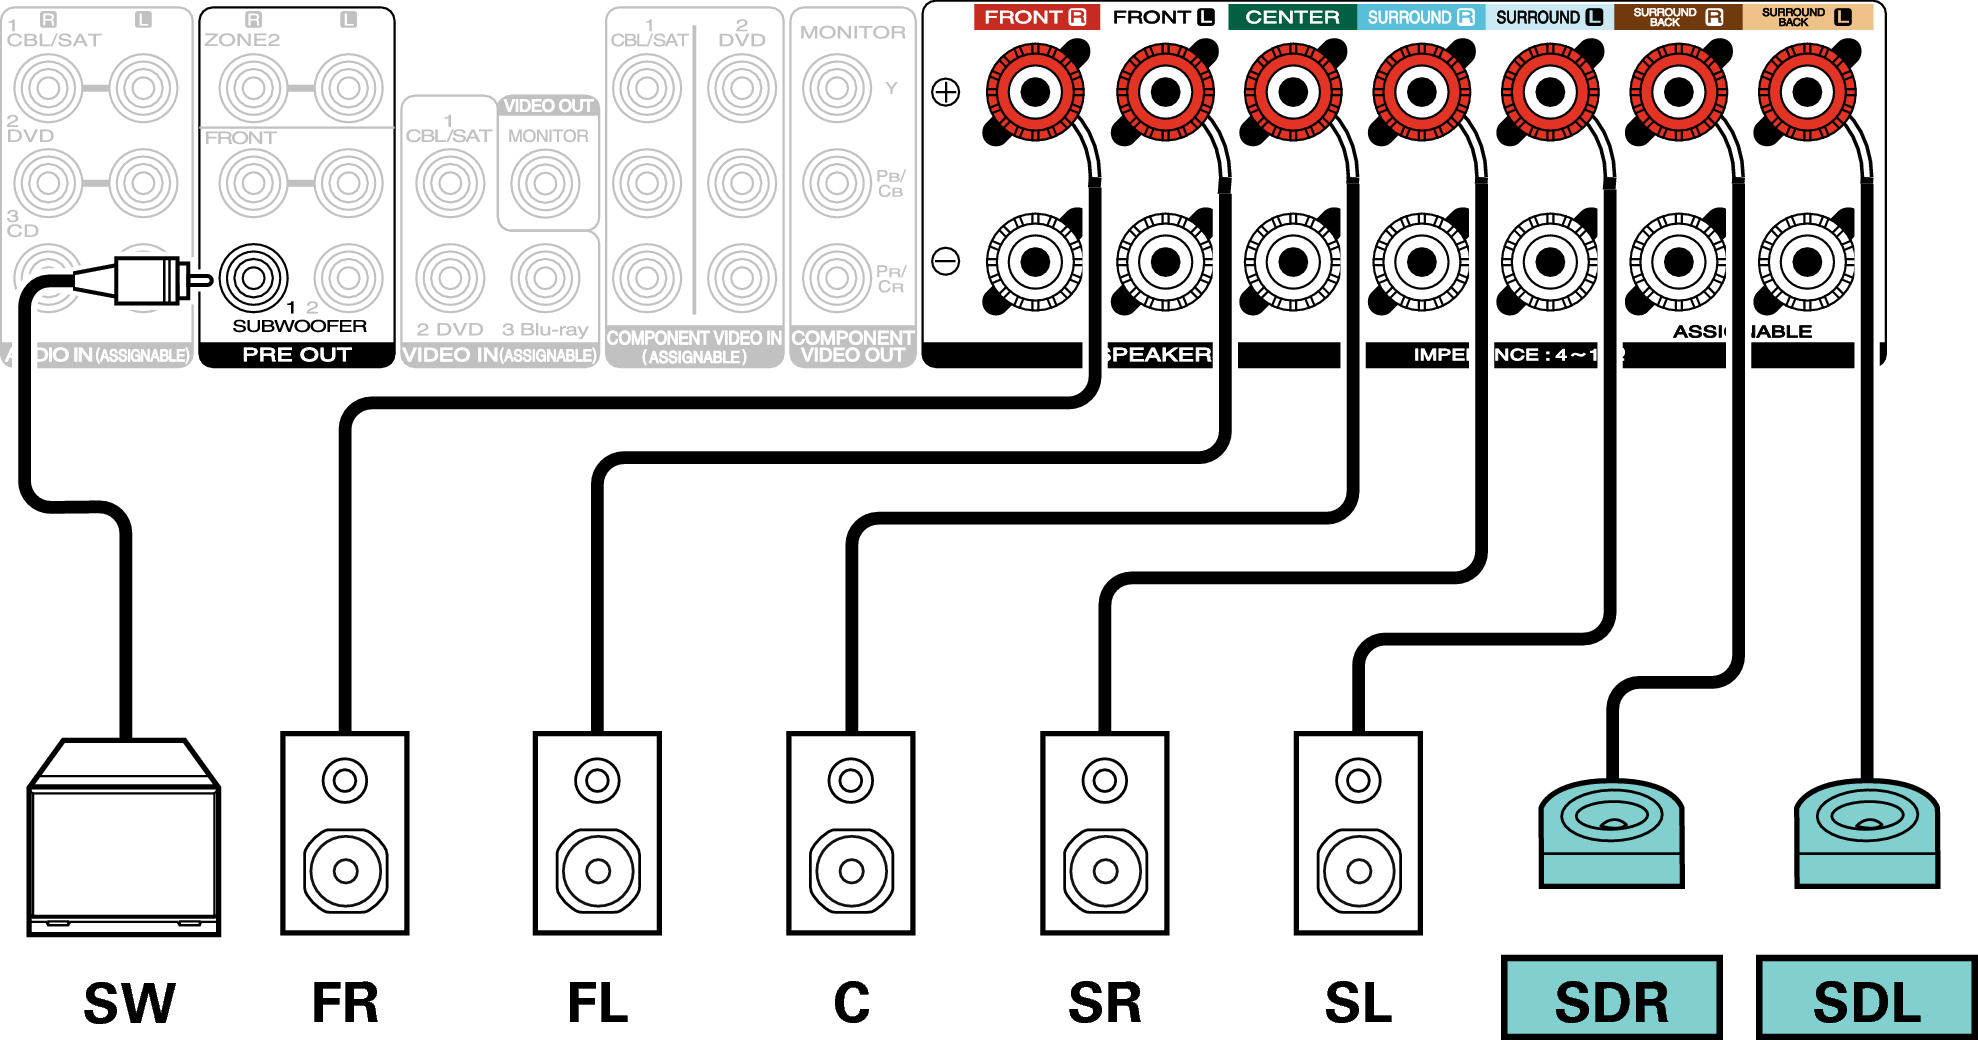
Example connections when using surround Dolby Atmos Enabled speakers
This 7.1-channel surround system is the same as a basic 5.1-channel system but with surround Dolby Atmos Enabled speakers.
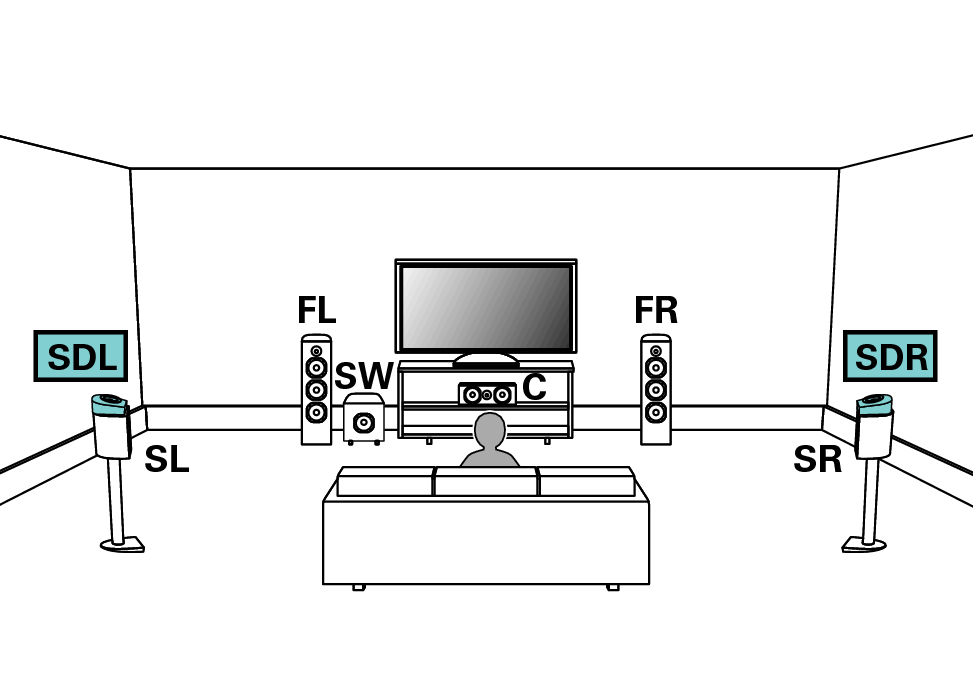
Set “Assign Mode” to “Surround Dolby” in the menu. link
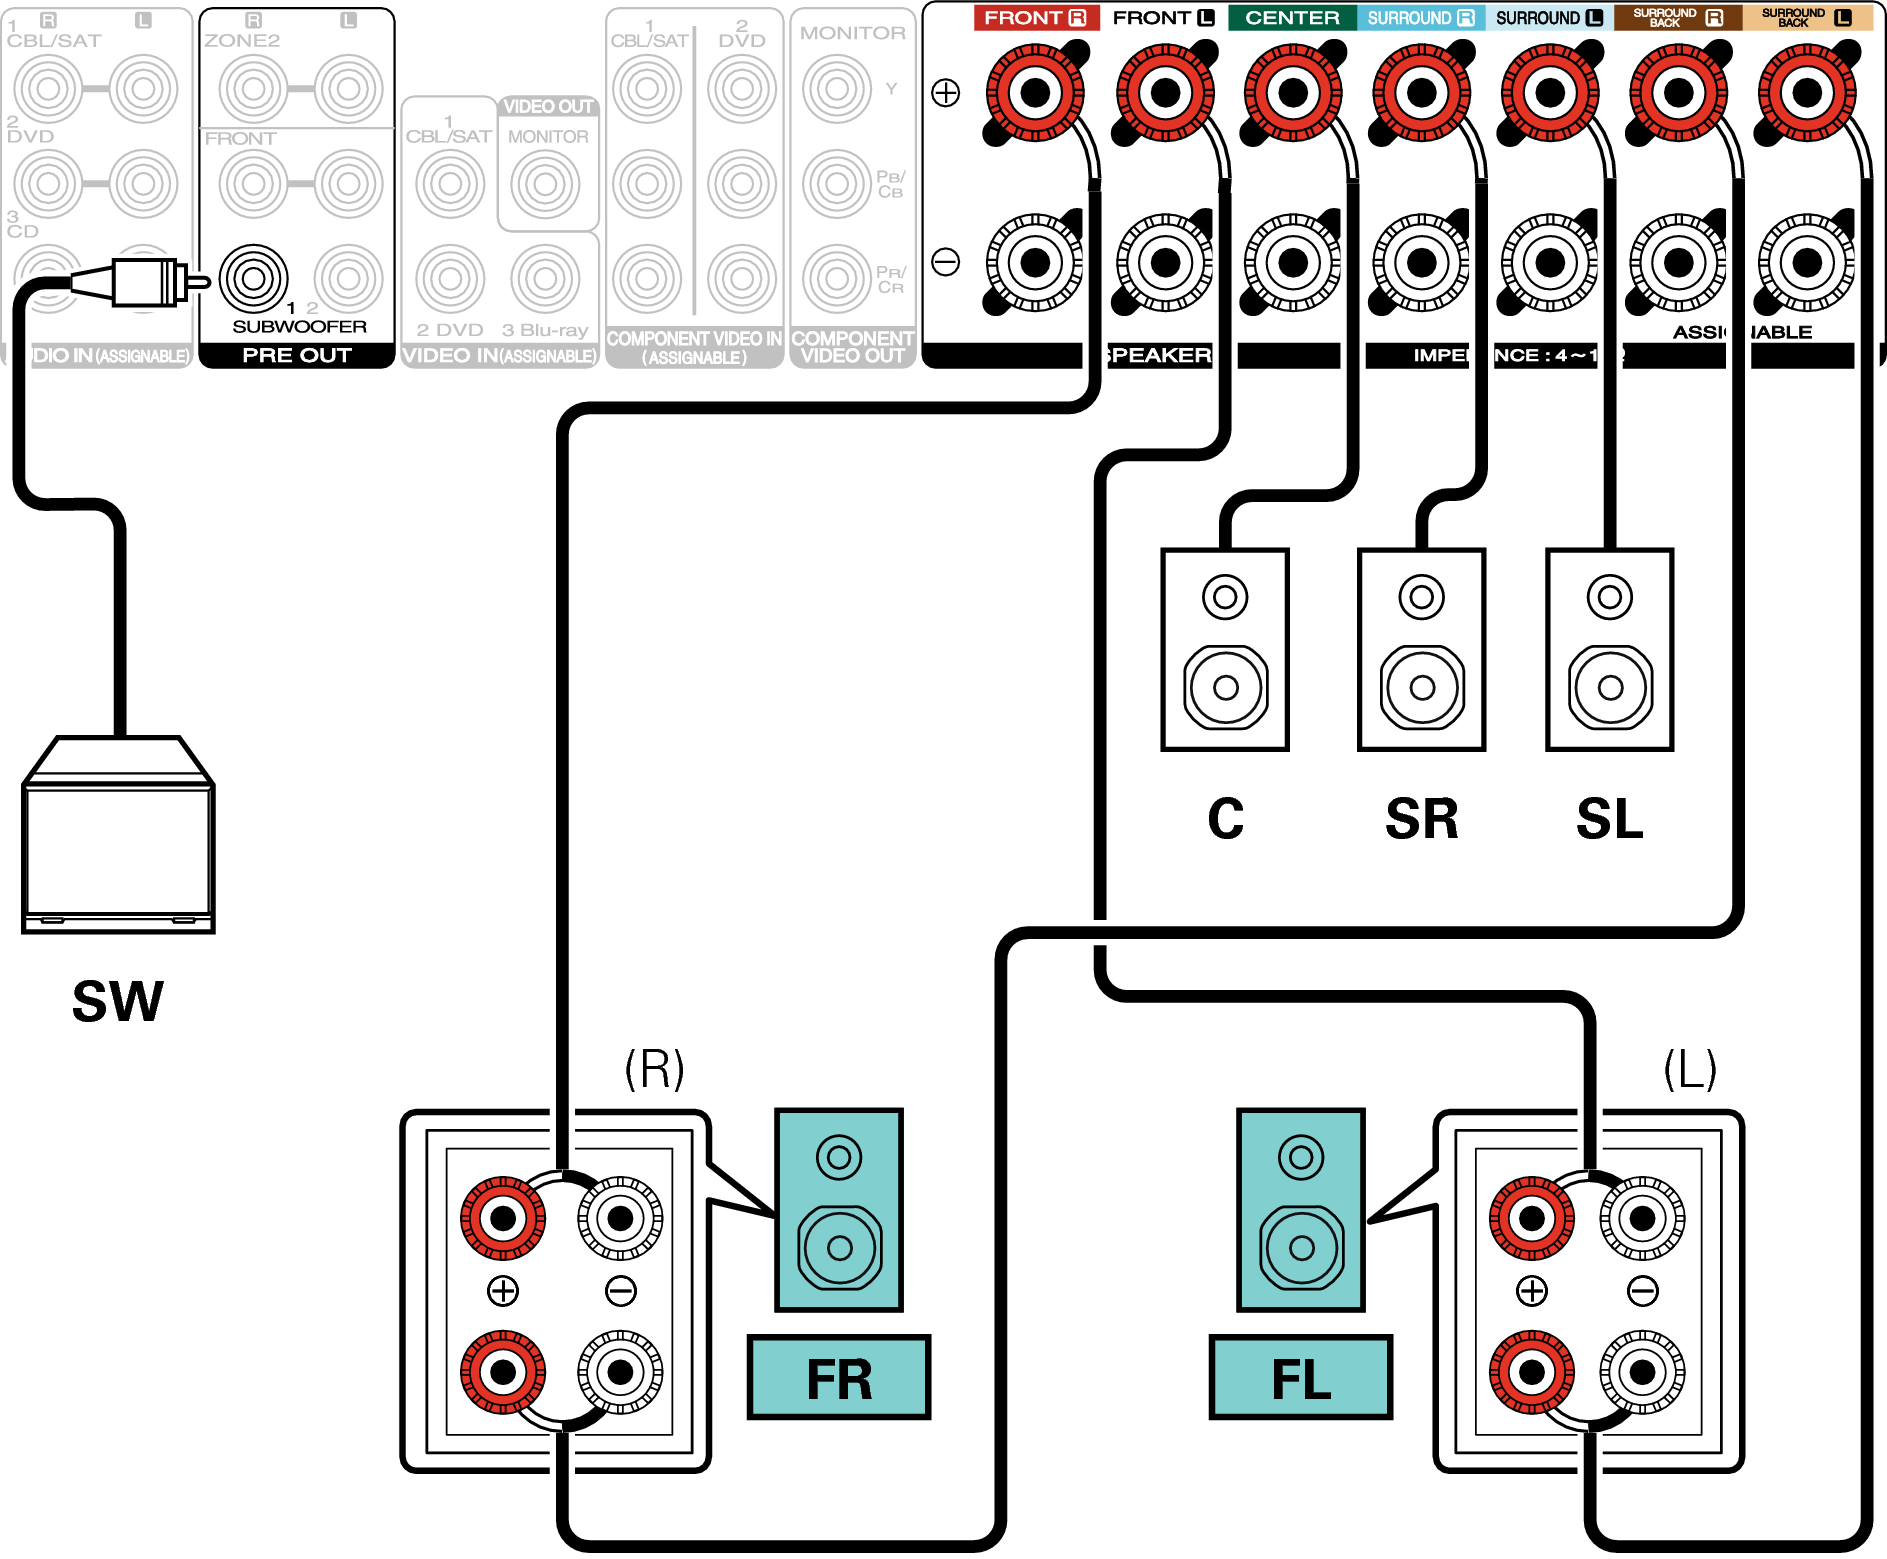
5.1-channel playback (bi-amp connection of front speaker)
This system plays back 5.1-channels. You can use the bi-amp connection for front speakers. Bi-amp connection is a method to connect separate amplifiers to the tweeter terminal and woofer terminal of a speaker that supports bi-amplification. This connection enables back EMF (power returned without being output) from the woofer to flow into the tweeter without affecting the sound quality, producing a higher sound quality.
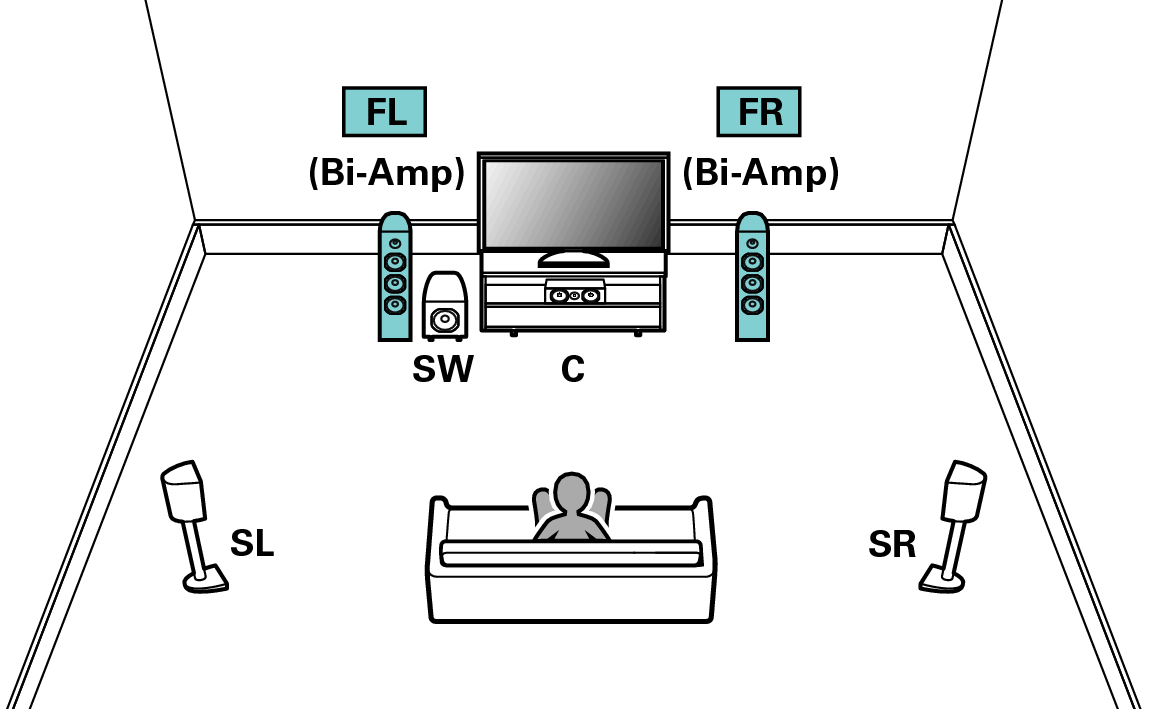
Set “Assign Mode” to “Bi-Amp” in the menu. link
NOTE
When making bi-amp connections, be sure to remove the short-circuiting plate or wire between the speaker’s woofer and tweeter terminals.
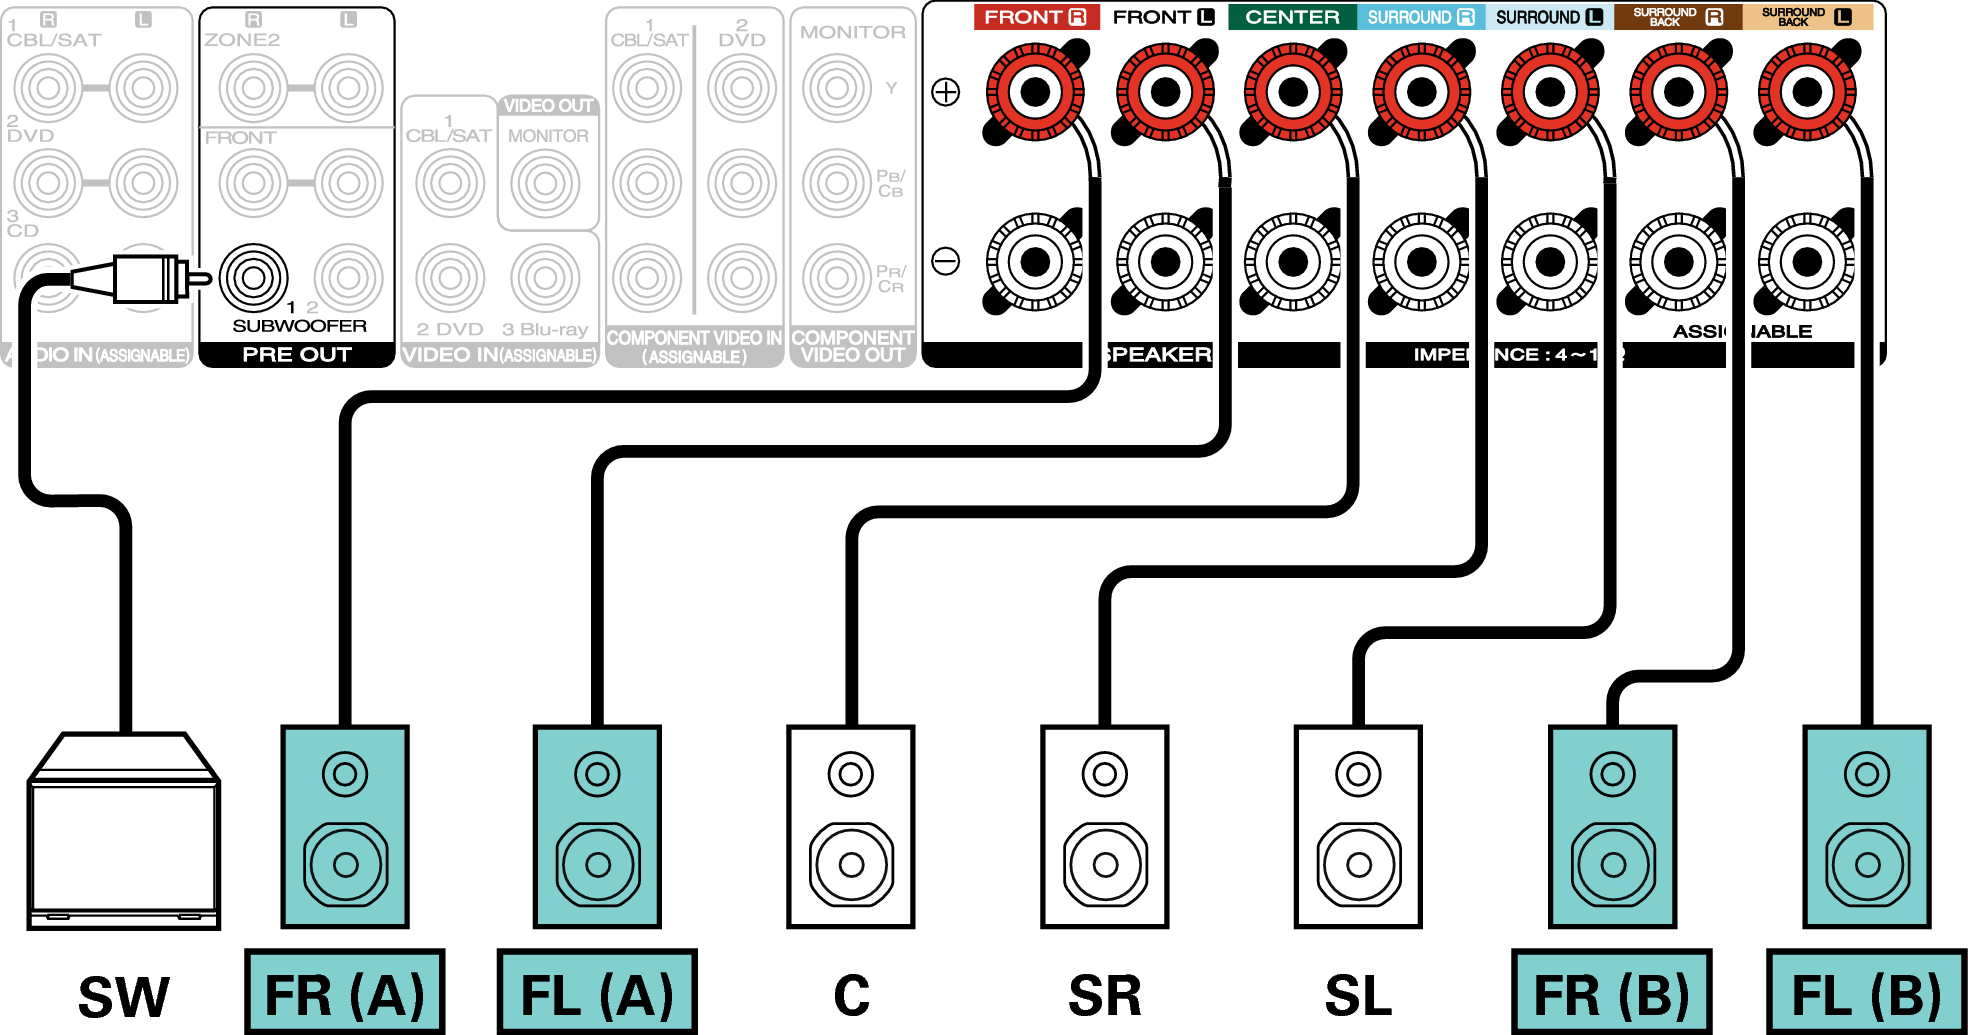
5.1-channel playback + second pair of front speaker
This system enables switching playback between front speakers A and B as desired.
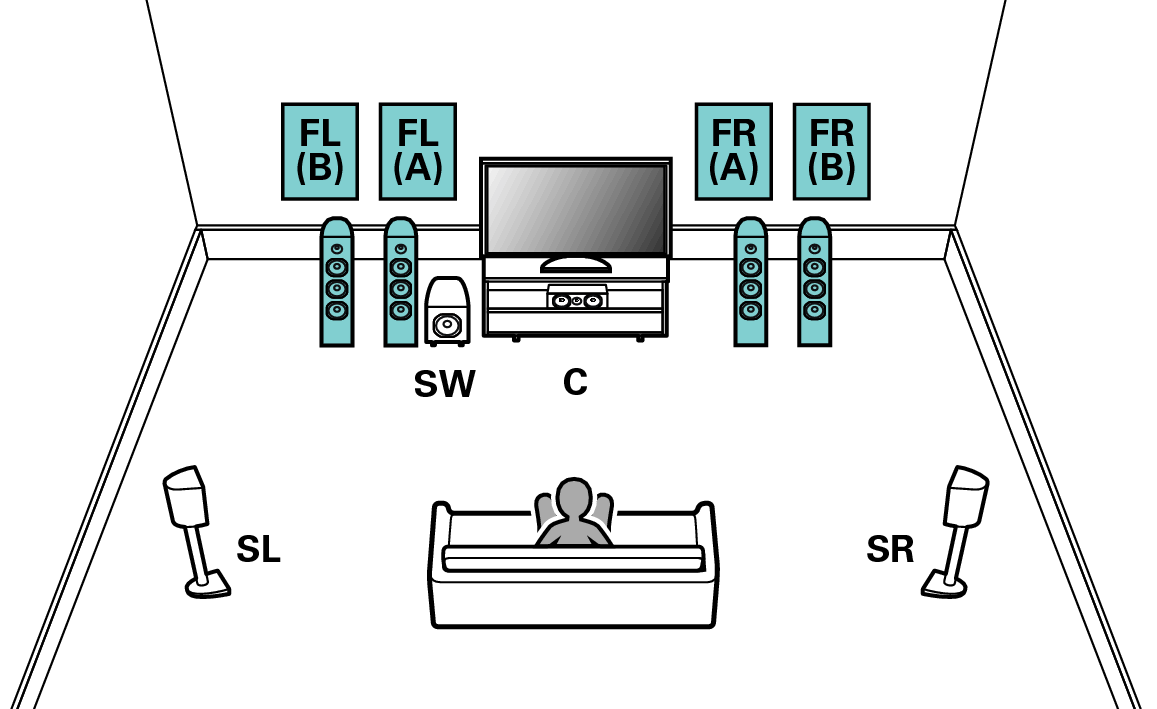
Set “Assign Mode” to “Front B” in the menu. link
5.1-channel playback (MAIN ZONE) + 2-channel playback (ZONE2)
This connection method constructs a 5.1-channel speaker system in the MAIN ZONE and a 2-channel system in ZONE2.
|
MAIN ZONE |
 |
|
ZONE2 |
 |
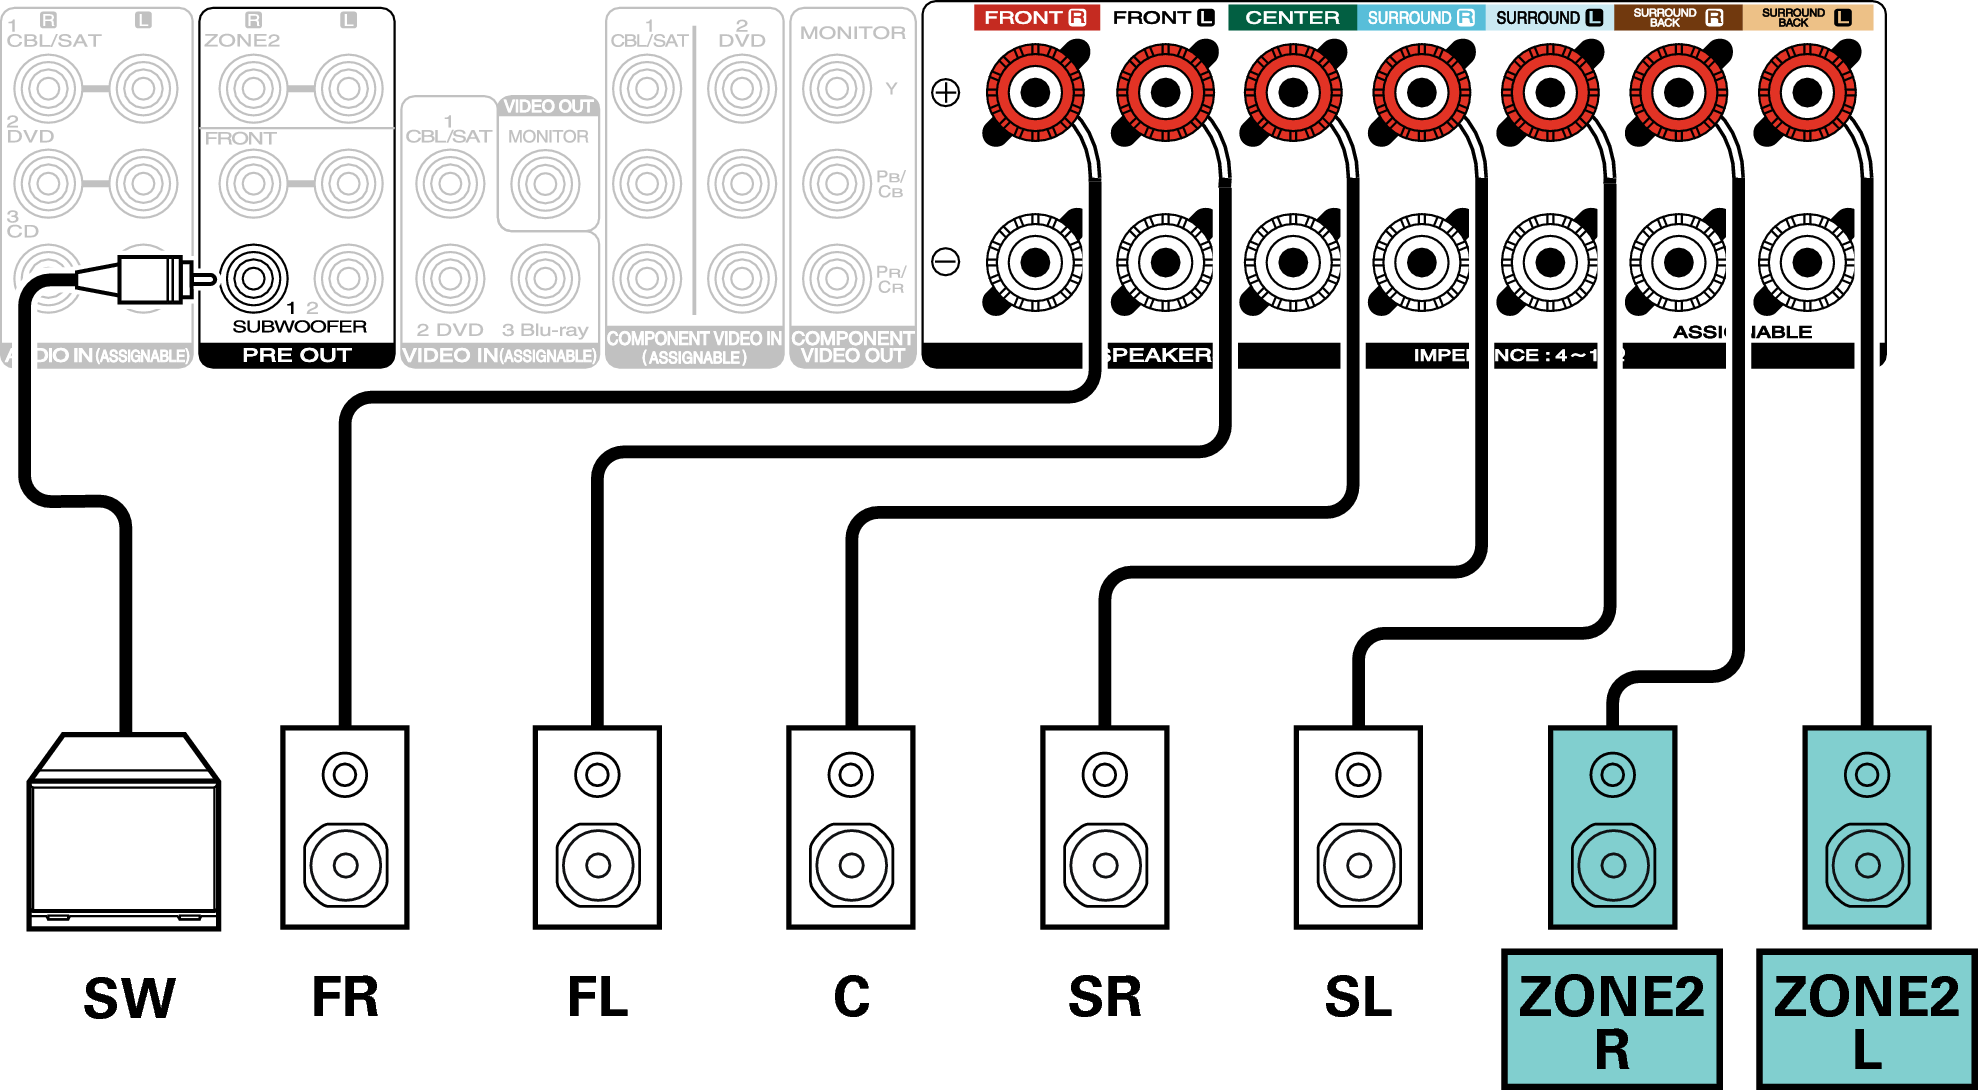
Set “Assign Mode” to “ZONE2” in the menu. link